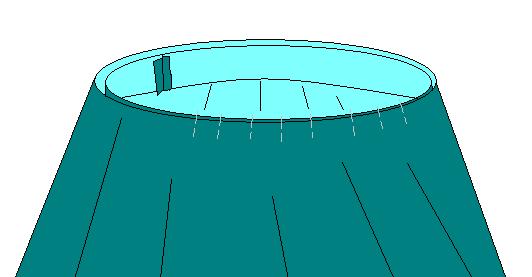
Circle skirts are a really simple concept. They're made up of a number of half circle panels sewn together, with a smaller half circle cut out to make room for the waist. There could be two panels, three, or as many as five. The skirt could have one layer or multiple layers of fabric - such as some chiffon skirts. I tend to use three panel skirts as my standard, and I'll use five panel skirts for Turkish skirt-dancing.
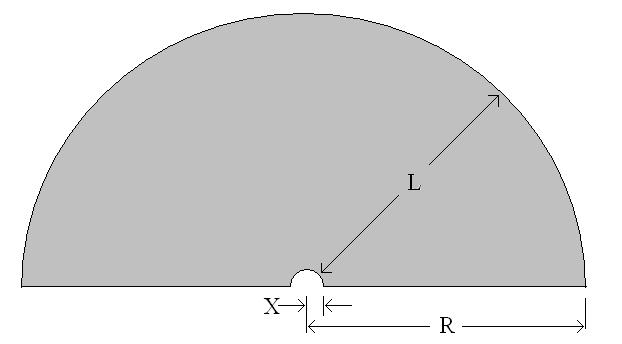
Fortunately, half circles are really simple shapes to make. You use a string or a measuring tape, have a friend or a handy heavy object hold the end of the string in place, and holding the string taunt you draw the half circle with a shard of soap or a marker. What's difficult is knowing how long that string needs to be (R). So let's figure that out.
H = the circumference around the largest part of your lower hips / butt
N = the number of half circle panels (2 to 5)
R = the Radius of the panels (to be calculated)
X = the radius of what you will cut out to make a waist hole (to be calculated) *We won't be adding an inch for a seam allowance to the skirt length because the waist band will compensate for it.
You might be wondering why we're measuring our lower hips instead of our upper hips - where the skirt will sit. It's because in order to get the skirt over your hips, the opening will need to be big enough. You can choose to substitute your bust measurement if you want to put it on overhead. It's best to use the larger of the two measurements though. The elastic waist band will ensure that the skirt is snug enough for your upper hips.
Now L, the length you want your skirt to be, is probably always going to be the same for you. But the number of panels you choose will affect how big X needs to be, and X + L will equal R. The more panels, the smaller X will be, because you'll be spreading your lower hip circumference (H) plus your seam allowances (N inches) over more waist holes. Here's the formula:
X = (H + N) / (N * 3.1416)
R = X + L
So using your handy fabric measuring tape, shard of soap, and sharp fabric scissors, you will cut out N half circles with a radius of R. Here's how you'll cut out your panels from your fabric:
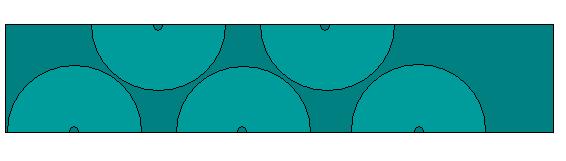
I've figured out a formula to determine how much fabric you need! There's no easy way to include N as a variable for the number of panels, so I'll show you an equation for the Three Panel Skirt, and another for the Five Panel Skirt. The basic concept is that your odd panels (1, 3, 5) all lay on the same side of the fabric, whereas the even ones cause a gap between them. The size of that gap is determined by the Radius (R) of the panels and the Fabric Width (Fw). Here's how we solve for Fabric Length (Fl)
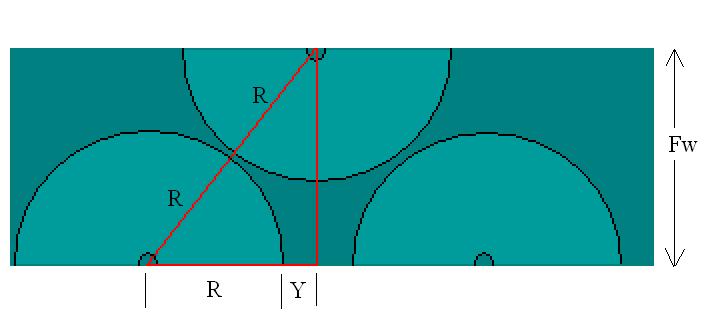
Y =
√ (2R)^2 - (Fw)^2
- R
(derived from the Pythagorean Theorum of A^2 + B^2 = C^2, where C is the hypotenuse of a right triangle)
Three Panel Skirt
Fl = 4*R + 2*Y
Five Panel Skirt
Fl = 6*R + 4*Y
The 4*R in the Three Panel equation represents the 1st and 3rd panels, which is the easy part of the total length. The hard part is the distance between the 1st and 3rd panels. I've figured it out based on Pythagrian's theorum of the hypothenus squared equalling the sum of the two legs squared, for a right triangle. The hypothenus is a line drawn from the center of the first and second half circles, which equals 2*R (plus an inch if you want). The width of the fabric is the first leg, and second leg will give us the length-wise distance from the center of the first circle to the center of the second, which equals the square root of {(2*R)^2 -(Fw)^2}. That leg of the triangle is made up of R plus some extra distance we can call Y. Twice that extra distance (2*Y) is the distance between the 1st and 3rd circles.
I like to mark the center point of my half circles with a straight pin, but you can also fold your panel in half to find the center point again. You'll need to find it to cut out the waist hole. Just as before, draw your circle with the measuring tape and cut out half circles with the radius of X.
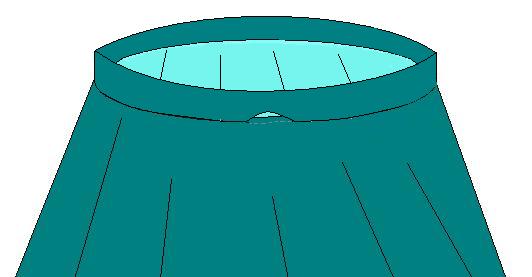
Now you sew each of your panels together on the straight edges, good sides facing in. Put your straight pins in perpendicular to the edge of the fabric so that they don't get caught in the sewing machine. You can do this by hand, but you'd be crazy. Straight or serge stitch up the seams. To have a slit, just leave one or two seams open most of the way. I sew at least two inches at the top though, to make attaching the waist band easier.
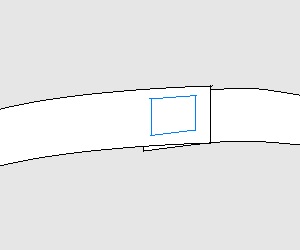
For elastic, I like to use a one-inch non-roll elastic waist band. It comes in a 36" roll in a package - which is the unstretched length. The width of the elastic (let's call that width E) will affect the width of your fabric waist band casing. Cut out a rectangle that is (H + 1) inches long (lower hips circumference plus seam allowance), and a width that is (2*E + 1) inches wide. (Instead of using H, you could measure the distance around the waist hole of your skirt and add an inch. It should be pretty close to H.) Sew the short ends of the casing together, good sides facing in, to make a circle. Fold the seam's raw edges out and iron. Pin the casing to the inside of the skirt, good side of the casing facing the bad side of the skirt, with the raw edges lined up. Straight stitch with a machine.
Next, fold the waist band over, folding under the 1/2" seam allowance, and top stitch a straight stitch just inside of the folded edge of your waist band, leaving the last 2" unsewn so we can fish in our elastic. Do a couple backward and forward stitches on the beginning and ending of this stitch, because as we finagle the elastic, the end of the stitch can start to unravel.
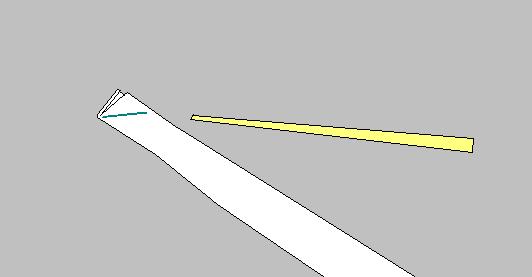
For this next part, you need to order Chinese food. Well you don't need to, but it's tasty. Fold your elastic in half along the length and sew a diagonal dart as shown below. We're going to use that as a pocket for the end of a chopstick or pencil, and push the elastic through our casing till it comes back out the hole.
Once you've got both ends of the elastic, check to make sure the elastic is laying flat throughout the casing, and try on your skirt. You can cut out the thread of the diagonal dart you had made for the chopstick. Note with a pin how tight you want the elastic to be, and make sure at that tightness it can easily come off. Machine sew, or chain stitch by hand, the ends of the elastic together. I like to trim them so they overlap by two inches and sew a square on the overlap. It's less bulky and lies flatter than sewing them top-facing-top.
If you have any slits, fold over the edge (it's really a double fold, so the raw edge is hidden) of the slit and zigzag or straight stitch - or you could serge it. As for the bottom hem, this is where it can get a little tricky. Circle skirts have a tendency to "grow". Where the fabric hangs on the bias - meaning that the threads of the fabric are at a 45 degree angle to the ground, the fabric can over time become longer. Seriously, I'm not making this up. With lightweight fabrics like chiffon, there's not as much risk that this will happen, and you could just serge or roll-stitch (uses a special foot) the hem right now. But if your circle skirt is made out of something heavy like crepe-backed satin (my favorite), then you need to let the growing happen first and cut off the excess. Growing can take a week unaided, but this is an age of science! Put your satin skirt in the shower and wet it thoroughly, hanging it from the waist band over night. The extra weight of water will make the skirt grow faster, and by the time it's dry, it will have grown as much as it ever will. Put it on a dress form or a friend and trim it down to about 1/2 inch longer than you want it to be, and serge, fold and straight stitch, or roll stitch the hem.
That sounds like a lot of work, doesn't it? It is. They're all easy steps, but there are a lot of them. If there's a special fabric you want your skirt to be made out of (like crepe-backed satin), then it's worth doing it yourself. But otherwise, I suggest you buy one made to your specifications for you by L Rose Designs, or buy one pre-made from Moondance Bellydance, Dahlal, or the Bellydance Store. Though I must break it to you, no one makes them for sale out of crepe backed satin, and it is the most luscious fabric ever.
For more methods and information about making circle skirts, check out this page from Shira.net.
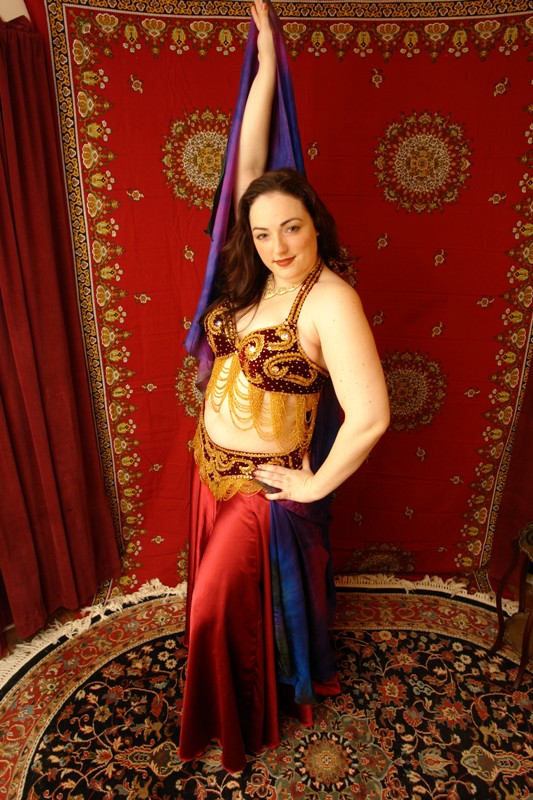
Here's a pictures of me in my burgundy crepe-backed satin, three-panel, circle skirt.