
An Original Shushanna Design
Hyperlinks to Page Contents:
~Project Background
~Inspiration & Design
~How It Was Made
It's a good idea to have at least one bedlah (bra and belt set) in either gold or silver, or ideally, one of each. They can be worn with skirts and accessories of all different colors and styles, and it would appear as if you have a never ending supply of costumes. I searched for a gold bedlah I could buy, because buying is always easier than making one from scratch, but it was suprisingly difficult to find a gold bedlah without other colors involved. It would be blue fabric with gold beads, or red fabric with gold beads, but rarely just gold on gold or gold on neutral. The one exception was a beginner's bedlah style made entirely of sequins and seed beads. They weren't particularly nice or well put together, and the cup shapes were... they weren't good. Definite Kermit the Frog boobs where the cups were each made of two stiff pieces of buckram sewn together at a sharp angle. To use one of those I would have had to do reconstructive surgury on the cups and also extensively decorated the set. And for $300 for the unaltered set, it just wasn't worth the time and the money. So, that left making one from scratch.
As always, I started with a sketch. I tend to start with the bra and then draw a belt I think would go well with it, because there's less space on a bra cup and any design motif you use would need to be suited to that space. But there's no reason you couldn't start with a skirt idea or a belt idea and then come up with a bra to match. If you feel inspired by a particular element, run with it.
My inspiration for this costume was gold filigree jewelry. Filigree is an intricate, delicate type of ornamentation used with metal, bone or wood, where the material appears to have shapes carved out of it. The shapes of either the remaining material or the holes could be vines, spirals, swirls, flowers, animals, or geometrical patterns. Essentially, it is a pattern of holes cut out of a solid field. With wood or bone you could carve the negative space away, and with metal you could add the positive space by hammering wires into shapes and attaching them to the frame of the space. It is the visual affect and not the method of getting it that is key. Click here for an explanation of design concepts like positive and negative space.

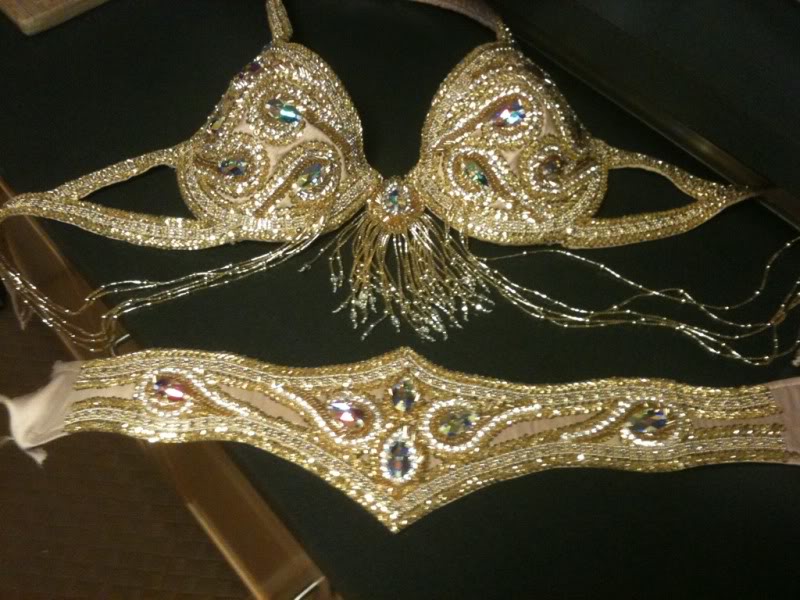
I decided that the edges of my bra and belt would be the frame of my filigree, and that the space inside the frame would be filled with spirals of gold that were all ultimately attached to the frame at their base. With filigree, none of the decorations are free floating - all of them are anchored to the frame. For the background (the fabric I used to first cover the bra and belt) I used a matte peach colored satin chosen because it most closely matched my skin color. I wanted to create the illusion that the costume had filigree holes in it (and in some places, it actually does). If you want to make something like this for yourself, pick a fabric that matches your skin color. Matte satin can mimick the luminosity of skin, but avoid anything too shiny. I think this design would also look absolutely stunning on other vibrant colors not meant to mimick skin - like emerald green velvet or red duchess satin.
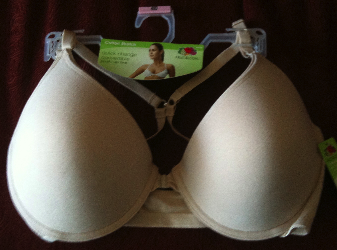
I started with my favorite Fruit of the Loom bra as a bra base, cut off the side and shoulder straps and reinforced the connection between the cups - which on that base was a clasp. I created my own straps and attached them, and covered the bra cups in the fabric. Then the beading began.
Along each strap and along the edges of the bra cups and belt, I attached an inexpensive trim made of plastic that looked like gold metal squares with a diamond in the center of each link. They were very effective at creating my frame. On either side of the trim, I beaded a small cupped gold sequin, four pale gold hex cut seed beads, and another gold sequin in a diagonal stitch. Only, I did not add the beads to the inside edge of the plastic trim on the cups, because that was where my filigree would be attached. I wanted the diamond trim of the spirals to touch the plastic trim of the frame where they met.
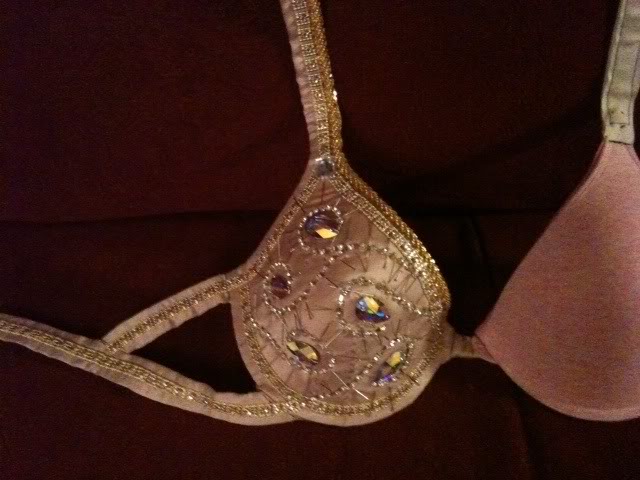
After my frame was created I pinned my diamond strand trim into the swirl shapes I thought would fill the space best, keeping in mind that once they were beaded they would be much thicker. Each strand began at the edge of the plastic trim and was attached at an acute angle to the trim to make it look like it flowed out of the frame like the branch of a tree. I also intended for the center of each swirl to hold a teardrop shaped 28 mm AB Swarovski crystal (flat backed, mirrored, with holes). So I pinned those in place as well, to get my diamond trim in eactly the right spots. I then stitched on the diamond trim and crystals, and I started the long process of beading. The outer edges of the spirals were edged in the same bead pattern as the frame - sequin, four hex cuts, sequin. But the insides of the spirals were sequin, two gold bugle beads, sequin. The difference is subtle and no one may notice it but me, but I feel like it makes the spirals more dynamic. Click here for instructions on how to attached diamond trim, sew on gemstones, and other types of beading.
I started all of this on one cup, by the way, before I applied it to the rest of the costume, since this was a prototype. If I made this costume again, I might cover everything in fabric first, attach the framing trim everywhere, then add all of the embellishments, but when you're unsure of how something will come to fruition, it makes sense to try something on one section first (or use a Beading Doodle Pad). Once it worked for one cup, I carefully did the other cup, making it as symmetrical as possible.
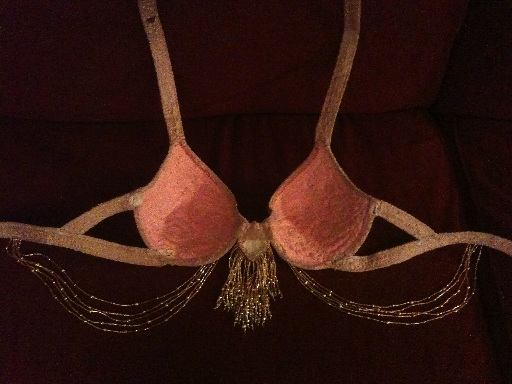
An interesting thing about the side straps of this bra - I left an open triangle between the outer side of each cup and the two straps that attached to it on the side. The straps were all beaded with the plastic trim edged in beading. Inside the triangles I added another spiral, which was cut out of thick interfacing separatedly, covered in satin and beaded, and then attached with hand stitches to the edges of the triangle where they touched. Within these triangles, the filigree is actually real filigree - meaning that holes around the spiral really are there and aren't just illusions of peach colored satin. I think that's pretty cool.
The center diamond shaped emblem was made in a similar way - cut out of interfacing, covered and beaded, and then attached by hand stitches to the center connector strap that reinforced the original clasp between the cups. I made two more identical ones that I later attached to straps to make my arm accessories. The arm straps were made out of grossgrain ribbon (but no interfacing) covered in satin and beaded, and were lined with elastic with a zig-zag stitch casing.
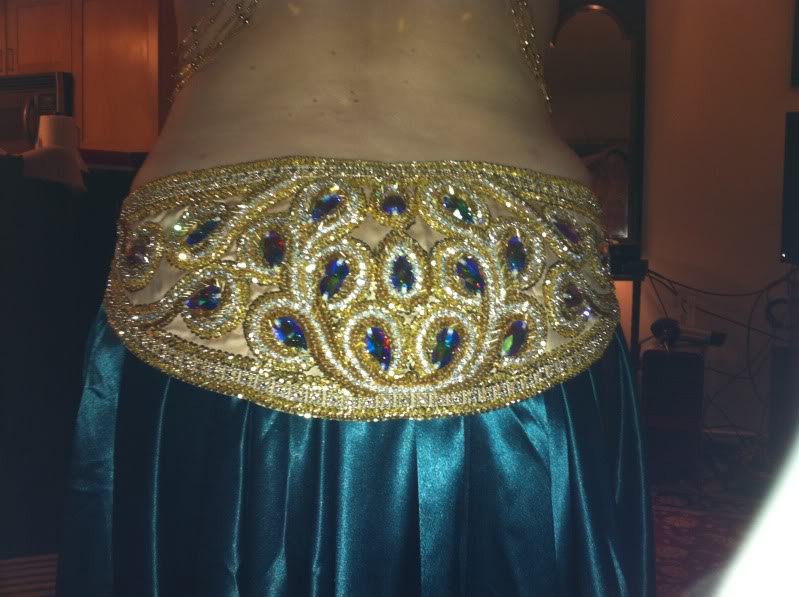
I followed my own method for making a belt base, covered it in the peach satin, and decorated it in the same method as I had the bra cups. As is usually the case for my bedlahs, I started with the bra, made the front of the belt and then made the back of the belt.
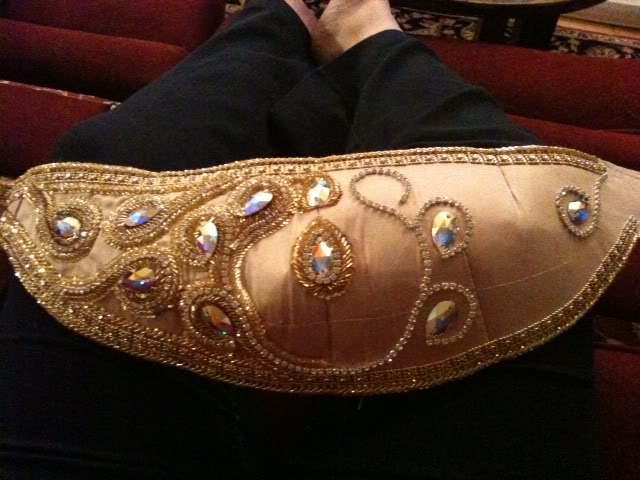
Here I had a bit of a delema - the question was do I continue to use the peach satin or should I have actually made the belt filigreed so that the color of my skirt underneath would show through. That could have been pretty neat, and then there would be no question on people's minds about if they actually were seeing skin on my caboose. But after asking the opinions of my friends, I felt that it was sufficiently embelished in the necessary places that what illusions of skin there were would not be inappropriate.
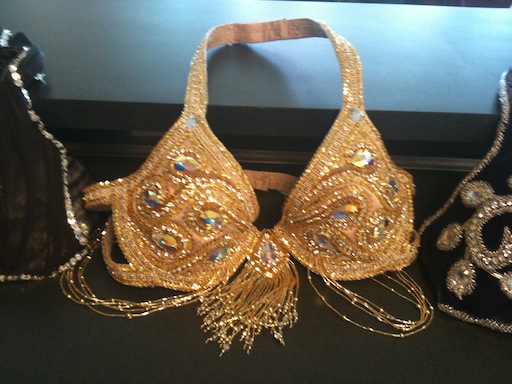
And then... the fringe. The fringe took almost as long as all of the rest of the beading. That's because you take all that time to fill a strand with beads, but you've only moved a sixteenth of an inch along the edge of your costume. But it looks so damn pretty. I really advocate using hex cut seed beads for fringe. Here's my How to Make Fringe Tutorial video on YouTube, showing the very gold costume we're talking about.
There are also long beaded swags on the bra that attach towards the center of the cups, drape on the sides of my torso, and attach to the center back on the straps. These are mostly hex cut seed beads, but also have larger round plastic beads. Each strand has a different repeating pattern, measured by length between beads in inches - not the number of beads (I'm not that crazy). The strands on the right side match the strands on the left side (I am that crazy).
And of course, last of all, I lined everything in more of the peach satin. If my decorative fabric had been expensive, scratchy, textured, or uncomfortable against the skin, I definitely wouldn't have used it for a lining, but it just so happened that it was a dollar a yard and very comfortable. I attached my hook and eyes, and I had me a gorgeous gold filigree bedlah!
Cost in materials was maybe around $340? Here's my best guess on how the costs broke down (I wish I had kept better records). The materials were interfacing ($5), bra base ($10), grosgrain ribbon ($3), satin ($3), lots of Button and Craft Thread ($25), machine sewing thread ($5), 1000 grams of gold hex cut seed beads ($40), 60 28mm AB Crystals ($180), 3 yards of plastic gold trim ($3), 2 yards of diamond trim ($40), an uncountable number of small gold sequin packets ($20), and pack of assorted round gold plastic beads ($3). The labor was about two months of Murder She Wrote on Netflix time - how that compares to hours, I'm not really sure. Also, Angela Lansbury rocks.

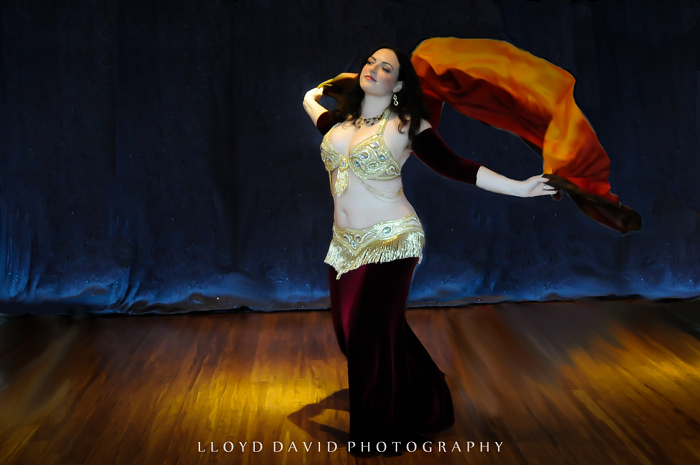
Here's a video with the costume in action. I'm wearing an L Rose Designs reversible double layer circle skirt in red and gold chiffon, and matching arm drapes. The veil was custome dyed to match by the very talented artisan Silkdancer. There's another video on my YouTube Channel where I'm wearing the gold bedlah with a Geisha Moth gold velvet trumpet skirt and fingerless long gloves - at the same event. Many people didn't realize it was the same costume with a different skirts and accessories.