You've got all your tools and materials. Now you just need to learn a few basic skills to get started.
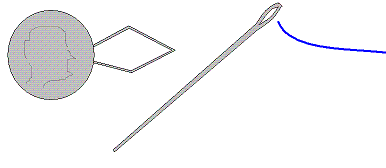
Thread a Needle: The hole is small, and your button-and-craft thread is pretty thick. But don't let that overwhelm you. First, you want a freshly cut end of your thread to work with, and use your sharpest scissors. To stiffen and lubricate the thread a little you can wet the end with your mouth. If all else fails, you can use a handy tool called a needle threader which looks like a dime with diamond shaped wire coming out of it. Stick the point of the wire through the eye of the needle, insert your thread into diamond-shaped wire, and pull the wire back out.
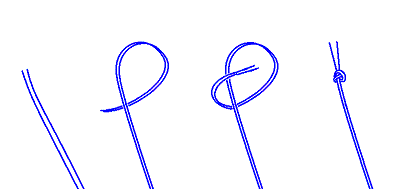
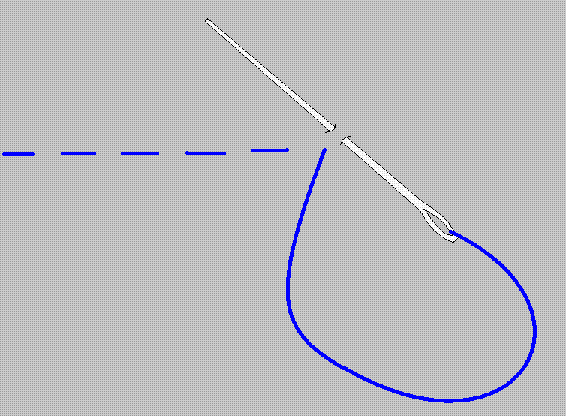
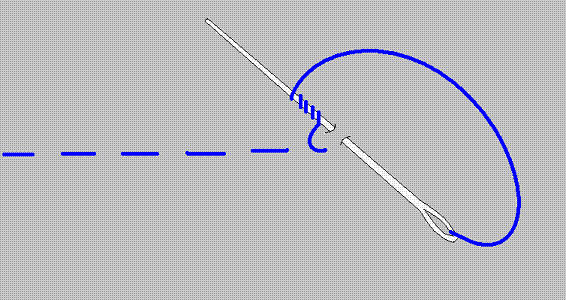
Knot your Thread: You're going to pull your thread halfway through the needle and bring the two ends of the thread together. Doubling your thread like this makes your stitches twices a strong. Treating the doubled thread as if it is a single thread, we will loop behind and enter the loop from the front, as illustrated below. I like to do this twice, with the second knot landing directly on the first one, making the resulting knot much larger. This makes it harder for your knot to get pulled through the fabric by accident. To start sewing, insert your needle from the back of the fabric, so your knot will never be seen on the outside.
Types of Stitches: There are five main types of stitches we'll be doing by hand: Straight, Chain, Zigzag, Spiral and Diagonal. For the sake of description and illustration, each of these stitches will start on the left and go to the right. Each picture will show the stitch from above and from the side.
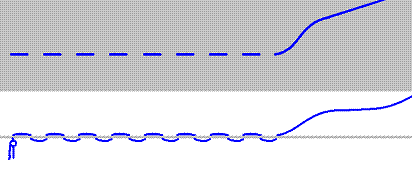
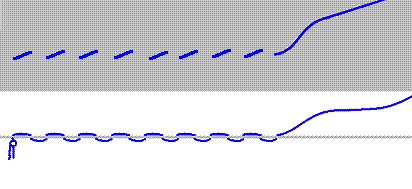
~Straight: This is your most basic stitch. It looks like a dashed line, and the needle moves like a dolphin jumping up out of the water as it swims. You can use this stitch for anything non-stretchy, such as attaching a strip of interfacing to your grosgrain ribbon strap. I tend to use a sewing machine for most of my straight stitches. Some people call this a running stitch, possibly because it's fairly quick to sew compared to other hand stitches.
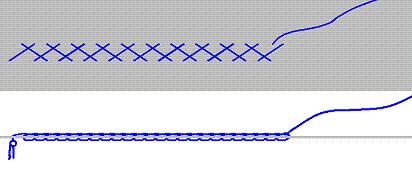
~Chain: This is a very strong stitch for attachments that need to be reinforced, such as where your straps attach to the bra cups. It looks like a continuous line from above, with each stitch coming up between the two threads of the previous stitch, making each stitch look like the link of a chain. The needle moves like a plane doing loop-d-loops, going forward above the fabric and going a little backward under the fabric.

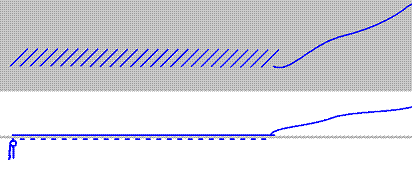
~Zigzag: Unlike the Straight or Chain stitches, the Zigzag stitch can stretch. Like the Chain stitch, this stitch travels backwards underneath the fabric, but unlike the Chain it does not need to come up through the threads of the previous stitch. So on top you make a long stitch to the diagonal, an then underneath you go a tiny bit backwards. Rinse, repeat. Why does it stretch? Because as you lengthen the fabric, the Zigzag can get narrower. This is the stitch you will use to sew in an elastic waist band. See the elastic waist band page for more details.
~Spiral: A spiral stitch is used to attach the lining to the costume, or even to attach the outer fabric to the bra or belt base. The key to this stitch is that you only nick the bra or belt base instead of going completely through the piece. When attaching the lining, you'll fold the raw edge under between the lining and the base and sew along the very edge of the costume, catching some of the outside fabric and the lining in each stitch. When covering a base with fabric, I fold the raw edge over the base to the back and stitch half an inch away from the edge of the costume. I only need to nick the back of the base (made of interfacing) for the stitch to anchor my fabric in place. The benefit of using this stitch for covering a base is that the stitches won't be seen from the outside. However, if you intend to cover the edge of your costume with beading, hiding your stitches (from covering the base with fabric) isn't necessary, and I use a hand or machined straight stitch instead. Some people call this either a slip stitch or a blind hem stitch, which is more a description of their specific intentions than a description of the shape of the stitch itself. Also a slip stitch is the name for something unrelated in crochet, so I avoid the term.
~Diagonal: This stitch is used very often in bellydance costumes for beading. Typically, each of these diagonal stitches will have 4-7 seed beads, or some other combination of beads, on it. This is often used to edge a bra, skirt, belt, or accessory. For more information, check out the beading page.
End your Stitches with a Knot: When you want to end a stitch and secure it so it won't unravel, there is a way to make a knot. First, nick the back of the fabric with the needle very close to your last stitch, catching about 1/8" of fabric.
Next, grab the thread close to the last stitch, and wrap it 3-6 times around the end of the needle.
Finally, while holding your knot of thread around the needle in place, pull the needle through. Push the loops down the thread towards the fabric, making as tight and small a knot as possible. You can now cut your thread about 1/8" from the knot, and you won't have to worry about it unravelling.