An Original Shushanna Design
Hyperlinks to Page Contents:
~Project Background
~Inspiration & Design
~How It Was Made
~Video of the Costume in Movement
This project, which was documented in real time as I worked on it, has been finished! The time that passed was approximately two months, including a few weeks while I went on vacation, with around 30 hours of actual work.
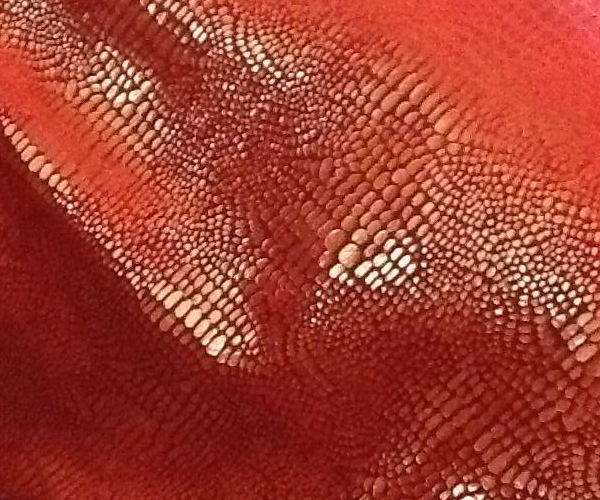
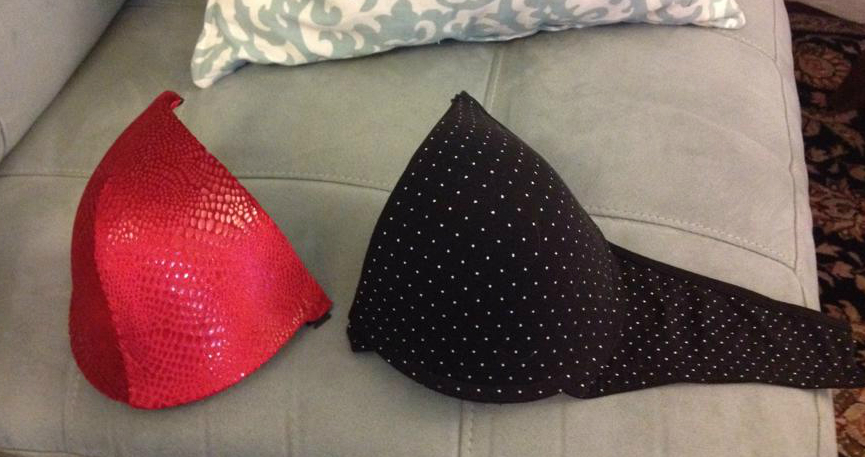
This project is definitely a case of the fabric inspiring the costume. I went shopping with a dear friend and the fabric found me - a ruby colored low pile 4-way stretch velvet with a sparkly snakeskin finish. I know, right? First, you may be wondering exactly what you're looking at, so let me explain how this fabric was likely manufactured. Velvets are made of two parts - the base fabric and the pile or "fur" part on top of it. In the case of a stretch velvet the base fabric is either a knit or made of stretch fibers or both. Through that base fabric additional fibers are inserted and attached making the pile, the length of which can vary. The pile and the base fabric don't have to be made of the same materials or even the same color. To create this specific fabric the manufacturer made a plain ruby stretch velvet and then essentially printed a layer of clear plastic on top of it, giving it a sparkly snakeskin finish. The printing method probably involved a rolling stamp the width of the fabric that would repeat every 18 inches or so. I've used this type of fabric before in a different color for my Smoke costume, so when I found it in this vibrant red of course I had to buy it and turn it into a fabulous bellydance costume.
See how the fabric catches the light as it drapes. How a fabric drapes, stretches, and moves is a very important part of selecting good fabric for dance costumes.
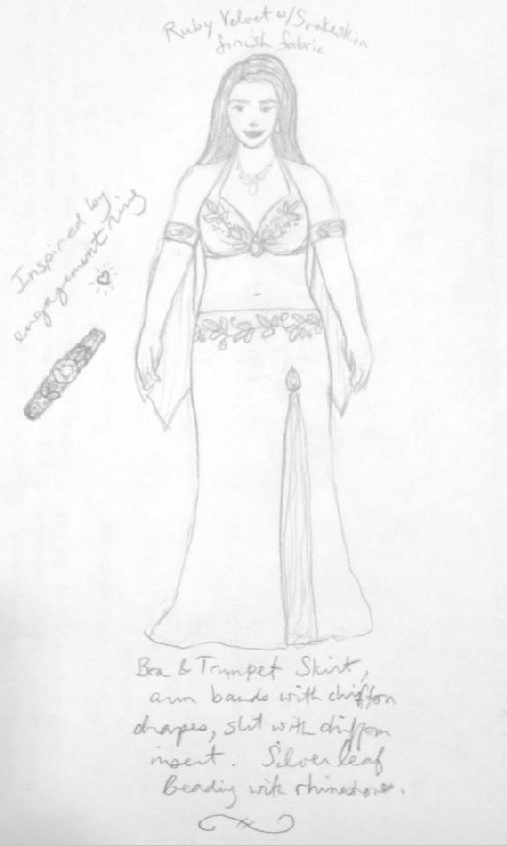
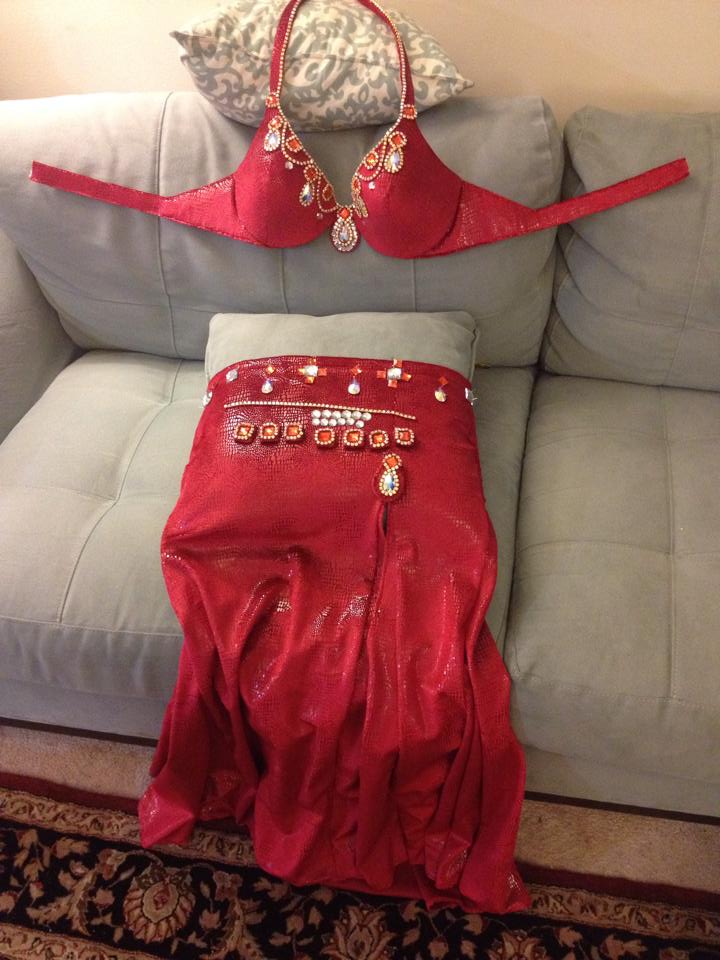
As I usually do, I started with a sketch. I planned to make a trumpet skirt with a matching bra. If you follow those links you'll find my tutorials on how to make each of them. The hard part is coming up with a design of embellishment that will complement the interesting fabric instead of overpowering it or detracting from it, and a final product that will in turn complement the dancer. As I explain in detail in my Design Tutorial, textures, shapes and the colors of the embellishments can greatly affect the feel of the finished product. At first I thought to use silver beading with a leaf motif, inspired by my engagement ring. Here is my preliminary design sketch.
But after further consideration and the suggestions of friends, it seemed that gold beading would better complement the color of the fabric than silver, and jewels would give a high concentration of sparkle without covering up too much of the interesting textile. So from there I used a photo I took of the covered bra cups and a computer drawing program to hash out several rough design ideas. The first is inspired by the Turkish designer Bella, who tends to use S shaped swirls.
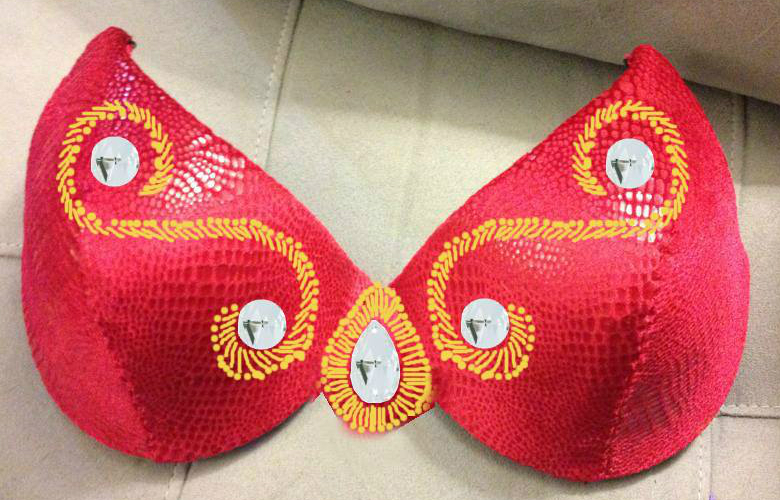
The second was inspired by Hoda Zaki who has several retro styled designs that involve framing the bottom edge of the bra with elaborate beading.

And the third option was to highlight the neck line itself, like a necklace. These drawings are very simplistic and were made by copying and pasting the same jewels over and over again, but it's not a bad method for determining the best way forward.
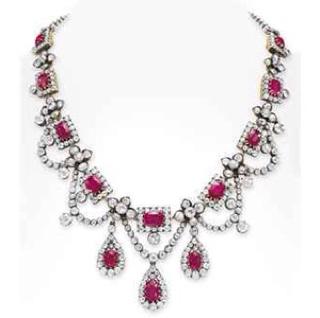
Once I decided to go with the "Necklace" option, I started googling ruby and diamond necklaces for inspiration. I found this lovely image of an antique ruby and diamond necklace that was at one point up for auction at Christies.
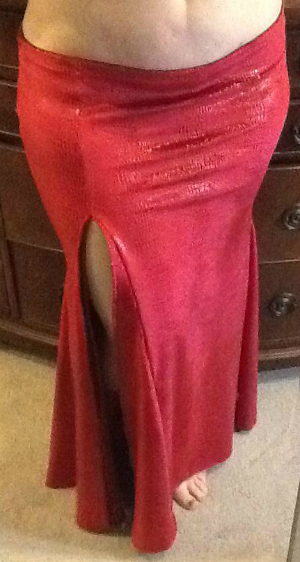
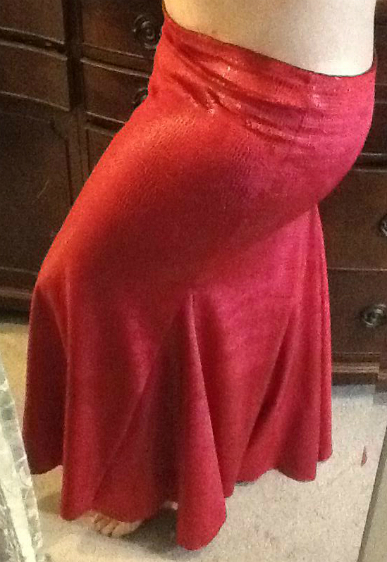
The first thing I made was the trumpet skirt using my Rectangles and Triangles Alternative Method. My fabric had a 20% stretch ratio, meaning that a 10 inch section marked with pins when stretched across my lap became 12 inches long. I used that ratio to adjust the width of my panels so that the skirt would fit snugly, following the steps listed in my tutorial (which believe it or not, I probably use more than anyone else). I used French seams to make the skirt, which locks the raw edges of the fabric in. To do this you lay your panels against each other good-sides-facing-out and sew a straight stitch as close to the edge as you can, say about 1/8th to 1/4th of an inch. Whatever distance you pick, try to be consistent. Then you turn the seam good-sides-facing-in and sew your seam allowance less the distance of the edge stitching. So for a total of a half inch seam allowance, lock in the edges at 1/8th an inch and then sew the seam at 3/8th an inch.
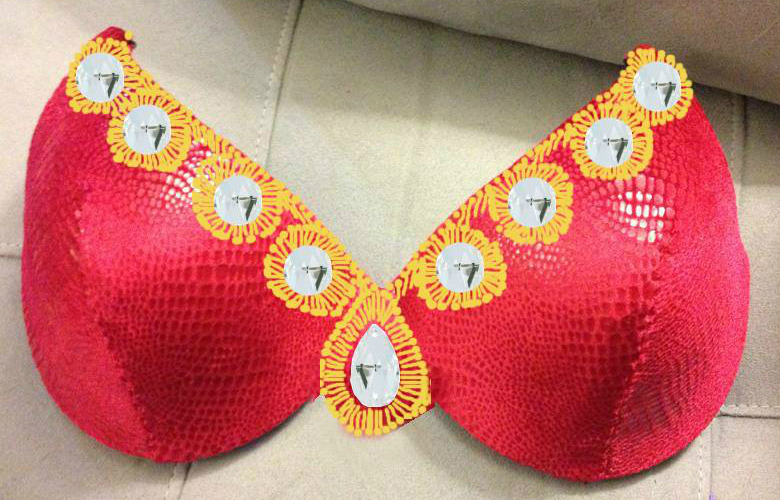
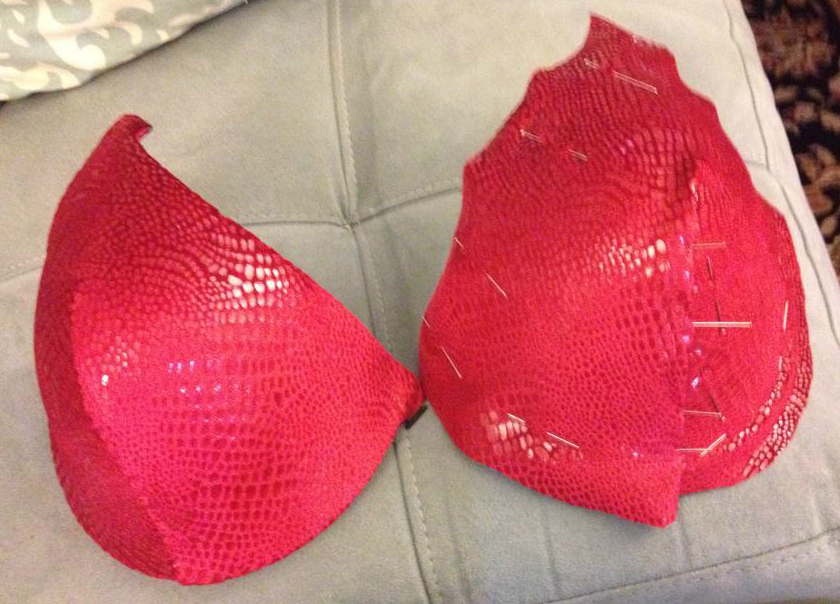
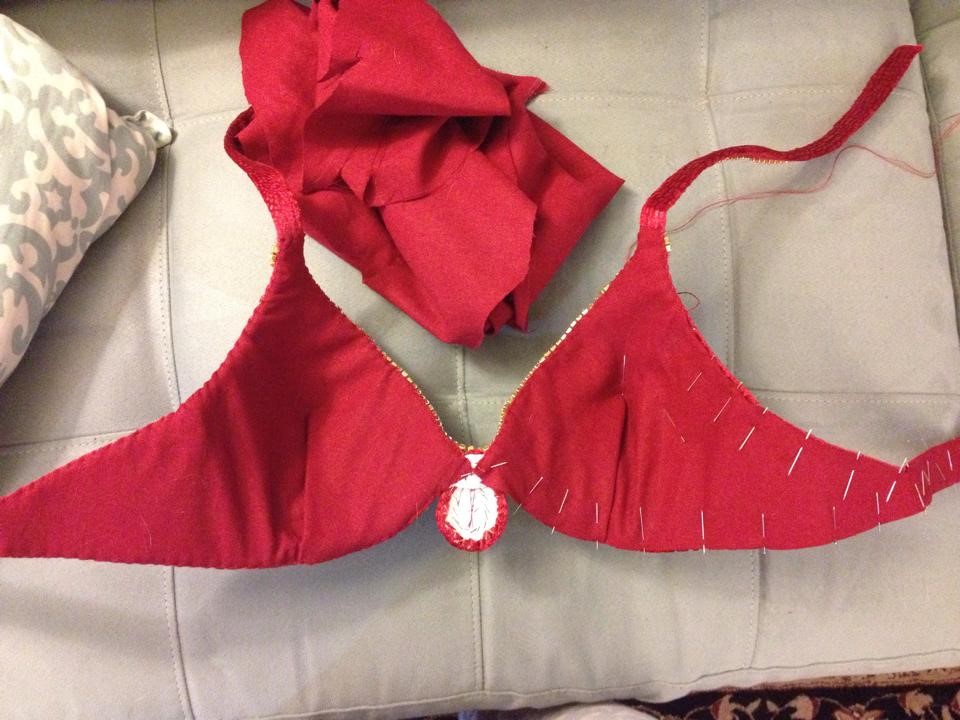
For the bra, I started with my favorite Fruit of the Loom bra as a base, cut off the side and shoulder straps, and then covered the bra cups in the fabric.
I pinned some gold colored aurora borealis rhinestone chain and crystals in place, made the center teardrop shaped insert out of extra thick interfacing and fabric, and took a photo. Then to further hash out my design, I used a computer drawing program to alter the photo to look like a completed design. That's right, these two images are just copy-paste concoctions, not real. Here you'll see two very similar but slightly different necklace embellishment ideas.
Now, usually I make and attach my shoulder and side straps to a bra before I start decorating it, because often you want your embellishments to continue on top of those seams, but unfortunately after making so many costumes I was completely out of grosgrain ribbon. And trying to make costumes without it is like trying to make bricks without clay. So I focused on what I could do, pinning rhinestone chain and gems in place and hand stitching them down.
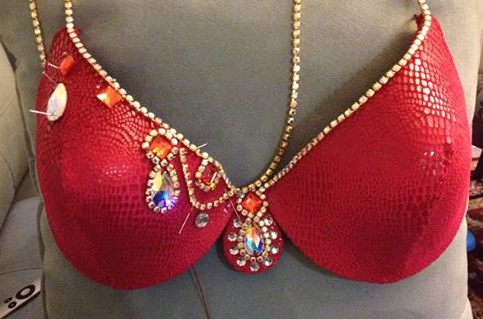
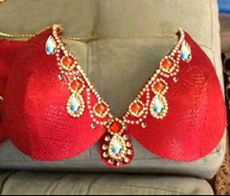
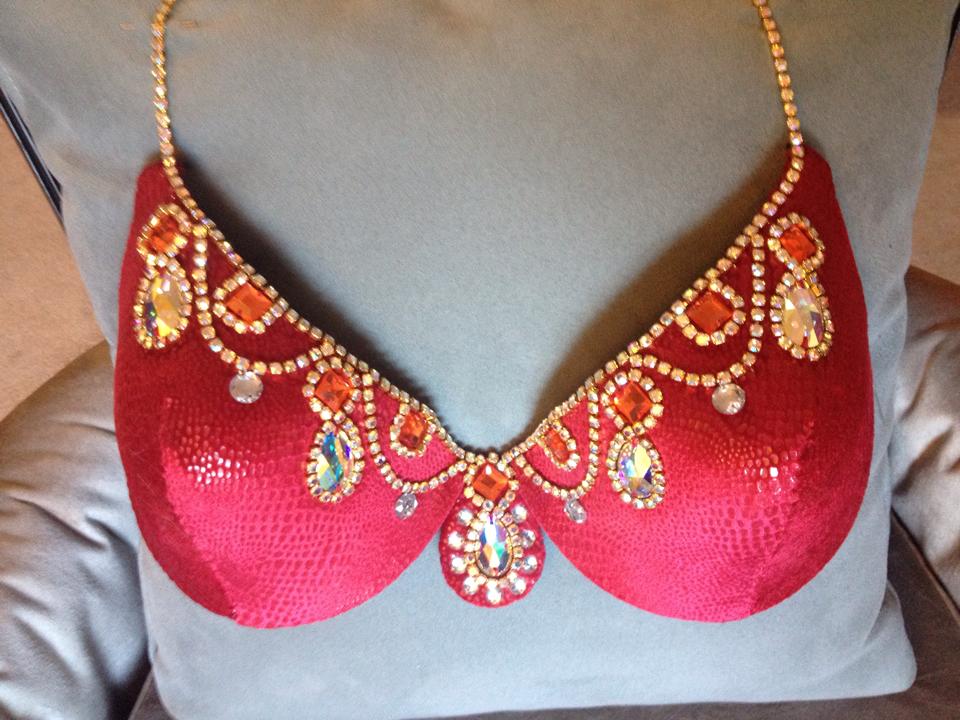
Here's the completed cup embellishment. Notice how I left enough rhinestone chain to continue up the shoulder straps.
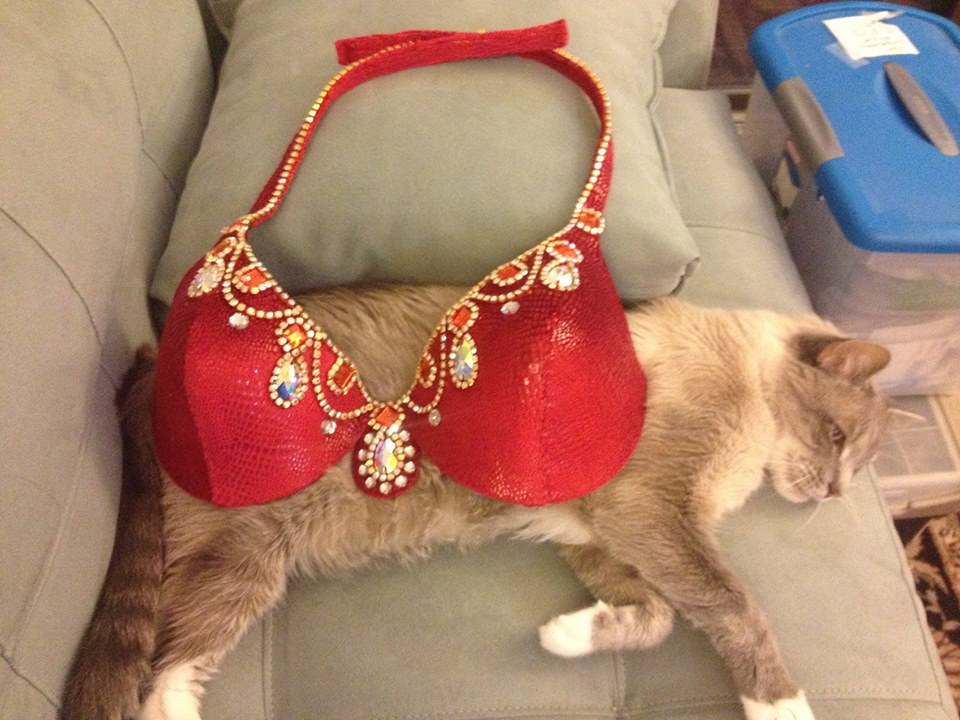
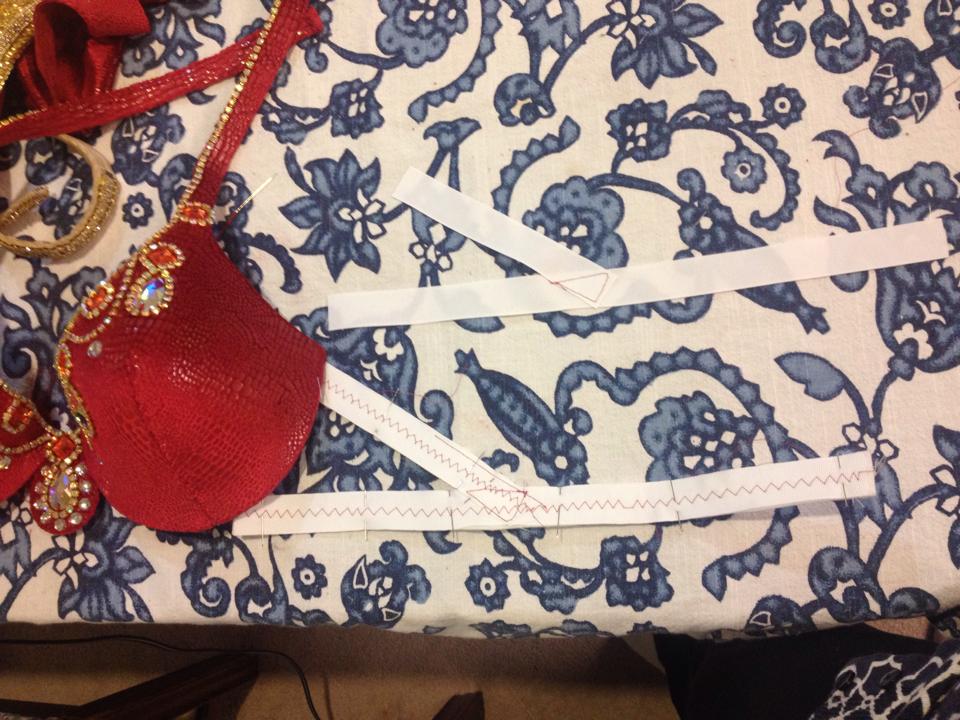
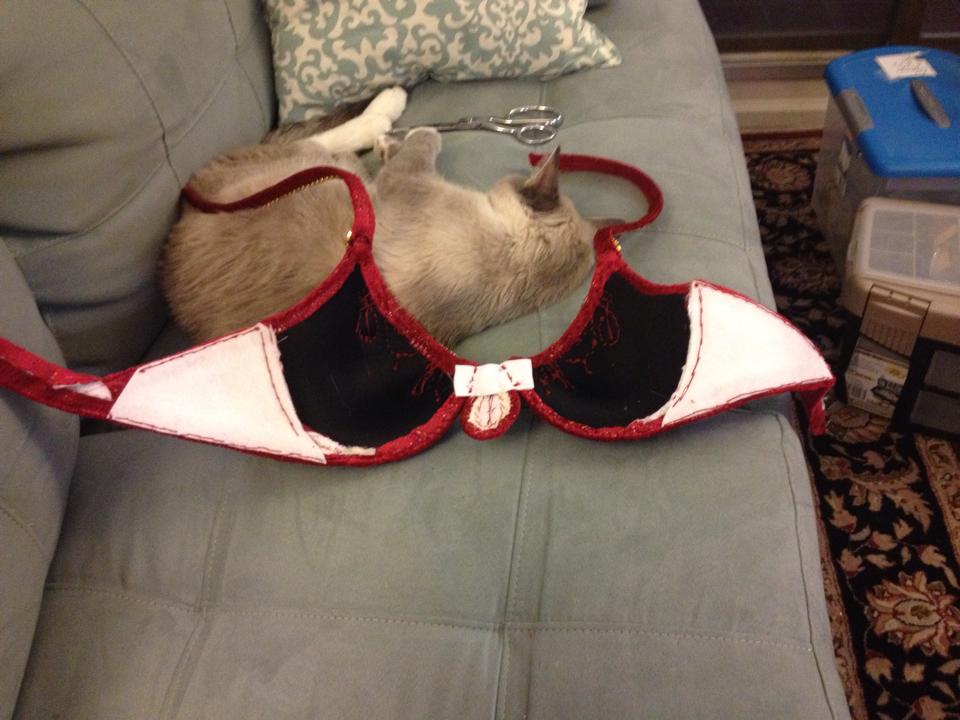
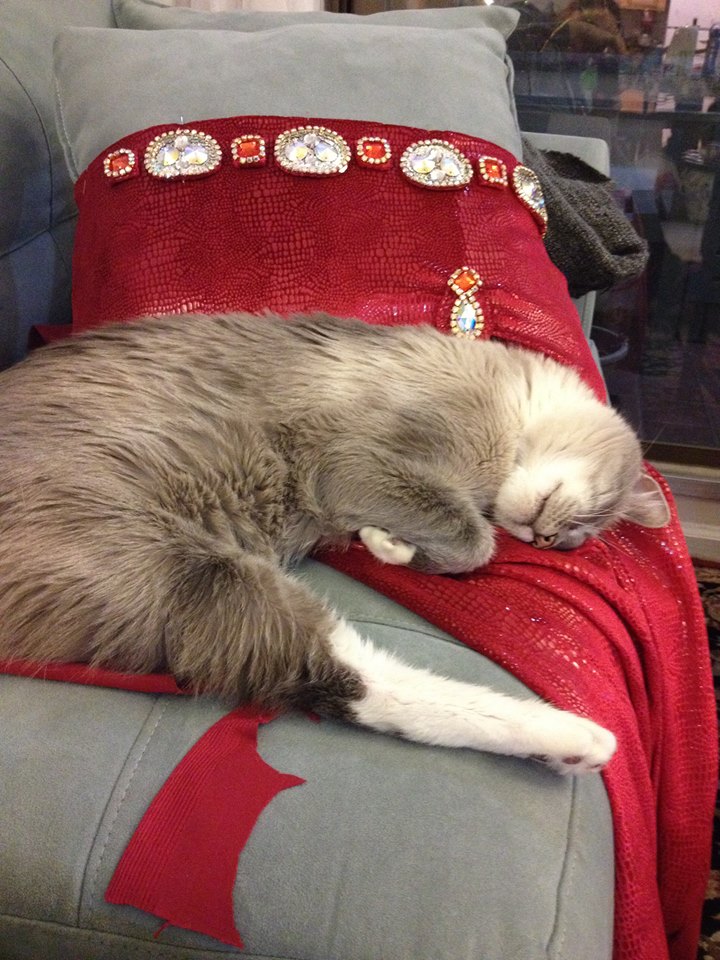
Now to make my shoulder straps I followed the steps laid out in my Bra Strap Tutorial, which involves using a length of grosgrain ribbon (I used 3/4 inch), a strip of stabilizer (thick interfacing) cut to the same width and length as the ribbon, and my decorative fabric to cover it. I wrapped my ruby fabric all the way around and used a machine to stitch it down under where the rhinestone chain would go, careful to make sure my velvet would lay the same direction as the rest of the costume (there's an up and a down to velvet). I folded under and machine stitched the ends of my straps, and then I hand sewed them with red button and carpet thread to the bra cups. Once I attached the straps I hand stitched the rhinestone chain onto them. I put ruby jewels on the attachment points to hide the seams. My cat Pippin was kind enough to help me display my handiwork.
The next step was to construct the side straps. These also involved strips of grosgrain ribbon (in this case, 7/8th inch wide) to bear the strain of the straps, and stabilizer cut to the same size and shape to give the straps stiffness - not unlike how rebar and concrete are combined to hold up buildings. I formed a long and a short strip of grosgrain into a Y shape at about 35 degrees, and then machine stitched where they over lapped. I cut stabilizer to match that Y shape without overlapping but just touching, and sewed the interfacing to the grosgrain with a machine zigzag stitch down the center.
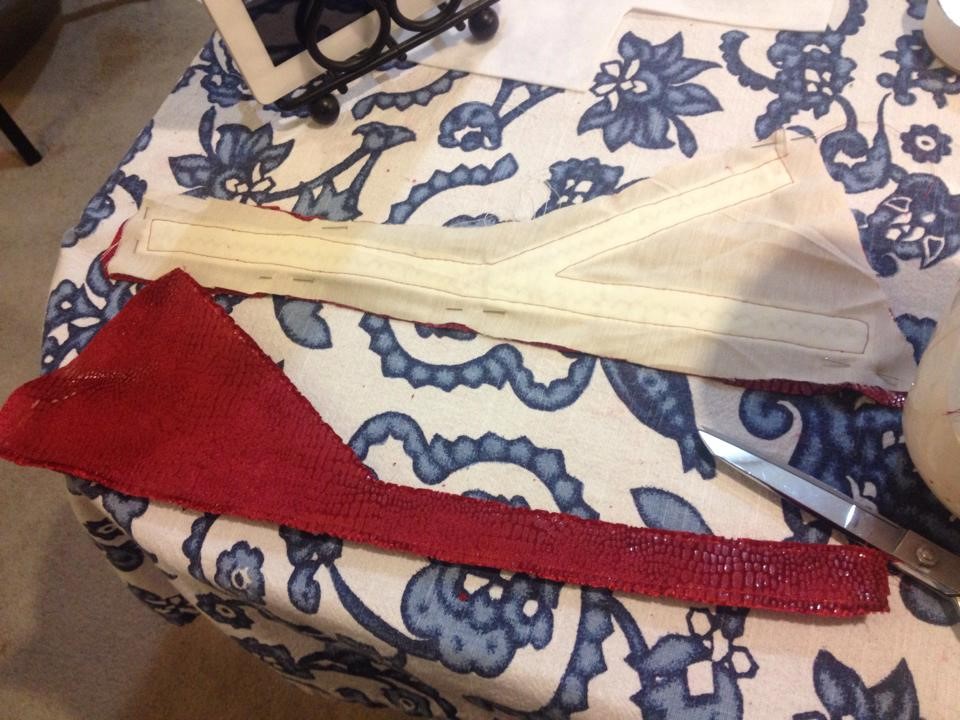
At that point I cut out the shape of the whole side strap in muslin and sewed my grosgrain and stabilizer Y onto it. This helps reinforce the Y and also acts as a non-stretch strengthener for the decorative fabric. I basted the edges of the muslin and ruby velvet together - which is a fancy way of saying I did a strait stitch close to their raw edges so they'd act like a single fabric. And then I folded the raw edges to the inside of the side straps, pinning them in place, and machine stitched them down 1/8th of an inch from the edge. Unlike the shoulder straps, these will need to be lined.
After the side straps were sewn together I attached them to the cups with a hand stitch with red button and carpet thread. In this photo it's just pinned in place. After sewing it I tried it on, cut out the stitches to readjust it, and sewed it back down again until it fit perfectly, then I trimmed off the excess material half an inch beyond the seam inside the cup.
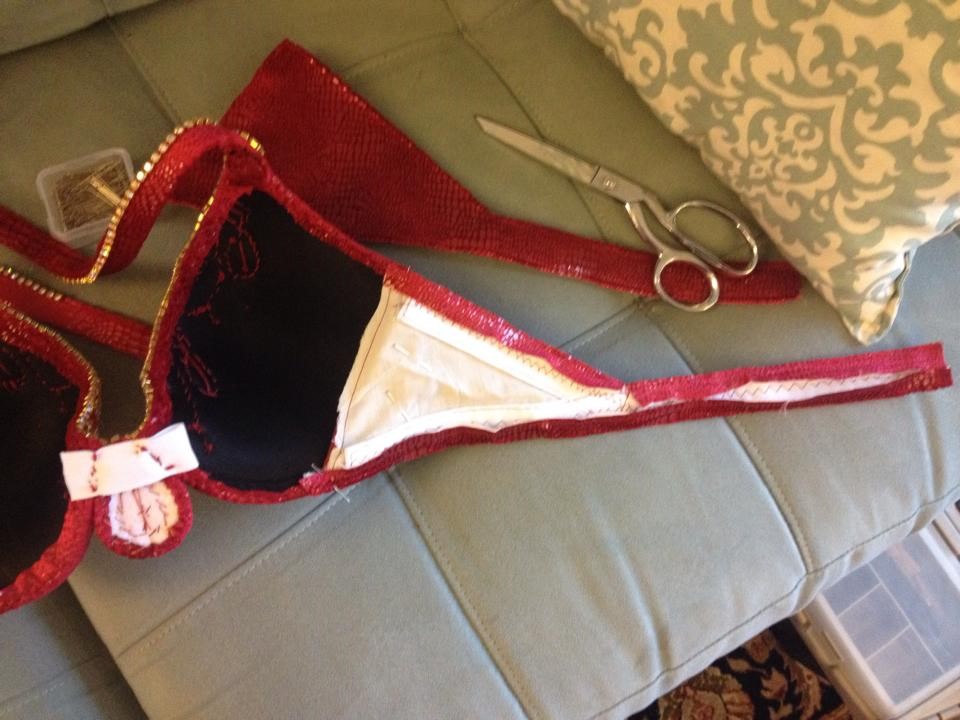
I didn't like how the inside of the Ys where there was no stabilizer didn't lay perfectly flat, so I ended up reinforcing them with a triangles of more stabilizer after I had already attached each side strap to the cups. These are hand stitched in place with small stitches on the outside and long stitches on the inside. Once the lining is attached none of the innards or their seams will be perceivable.
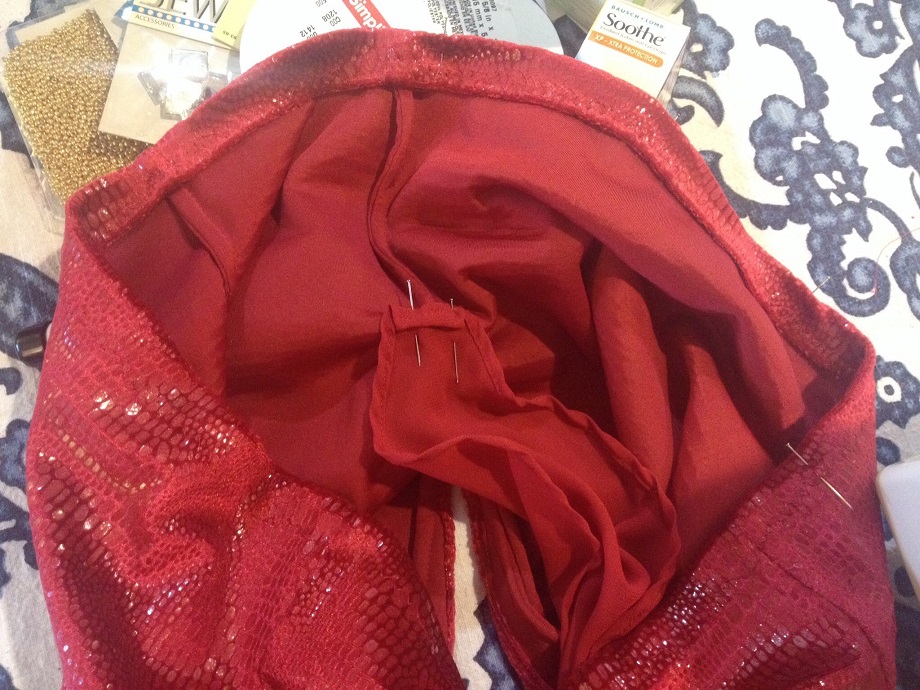
With all the straps attached, the only thing remaining to complete the bra was to line it and add hooks and bars. I had various lining fabric in the house, but I had run out of hooks and bars, so I shifted my attention back to the skirt. Here's a concept image - which is a photo I took in a mirror of the unembellished skirt and then photoshopped to look like a complete design concept. My original thought was to simulate a bejeweled medallion belt, possibly with swags of beads hanging from it. These jewels and rhinestone chain making up the medallions could be sewn directly onto the skirt, or they could be sewn onto fabric covered pieces of stabilizer to make my own appliques. There are pros and cons to each approach. Since the skirt is stretchy, sewing the embellishment directly onto the skirt would allow those embellishments to spread out as the fabric stretched. On the other hand, using un-stretchy appliques would preserve the shapes of the embellishments and be a firmer surface onto which I could attach beaded swags. But if non-stretch things are attached to the waist of the trumpet skirt, I may need to add a zipper to the center back seam so that it's easier to get in and out of. Foreseeing this I had already purchased a red 7" zipper just in case. Though I apparently lacked the foresight to pick up more hooks and bars at the same time.
Now, this fabric is absolutely fabulous, but it's on the thin side making directly attached embellishments to it more likely to adversely affect the way the fabric would lay, so I decided it would probably look better to make appliques than to bead directly onto the skirt itself. I stuffed a throw pillow into my skirt so that I could easily pin gems in place. I counted out all of my gems to figure out how many I'd have to work with of each kind on the front and the back. Half of most of my gems are set aside for the back, and the other half are laying on the costume.

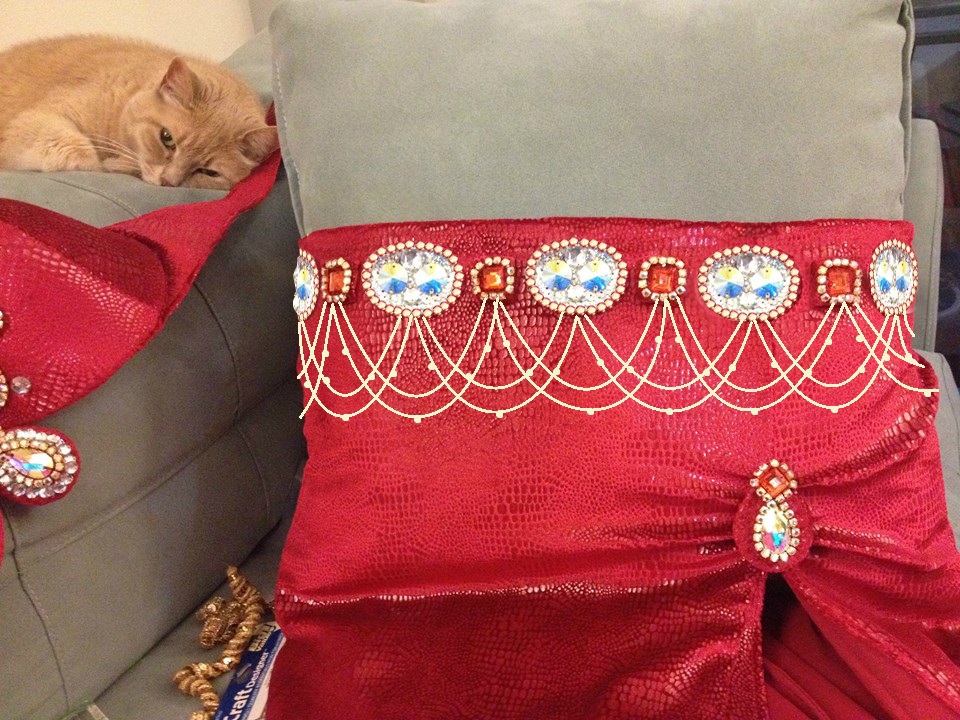
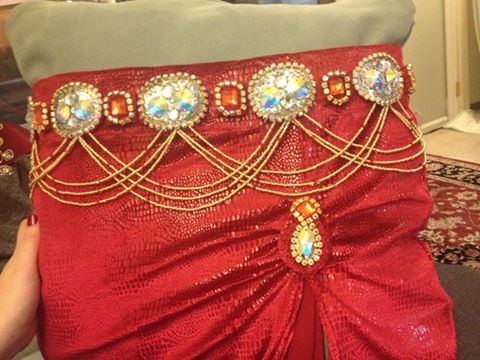
Using straight pins and a measuring tape I experimented with how far apart I wanted the embellishments to be, trying several different designs. Based on the distance between embellishments that looked best to me I determined that the magic number of the repeating pattern of the belt was to be 10, front and back included.
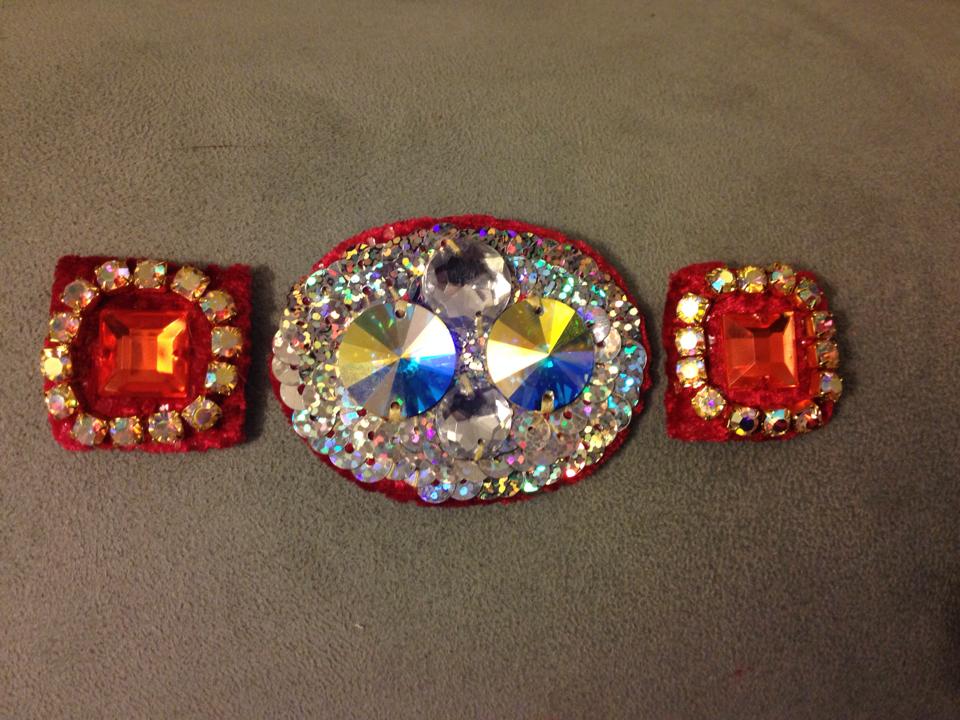
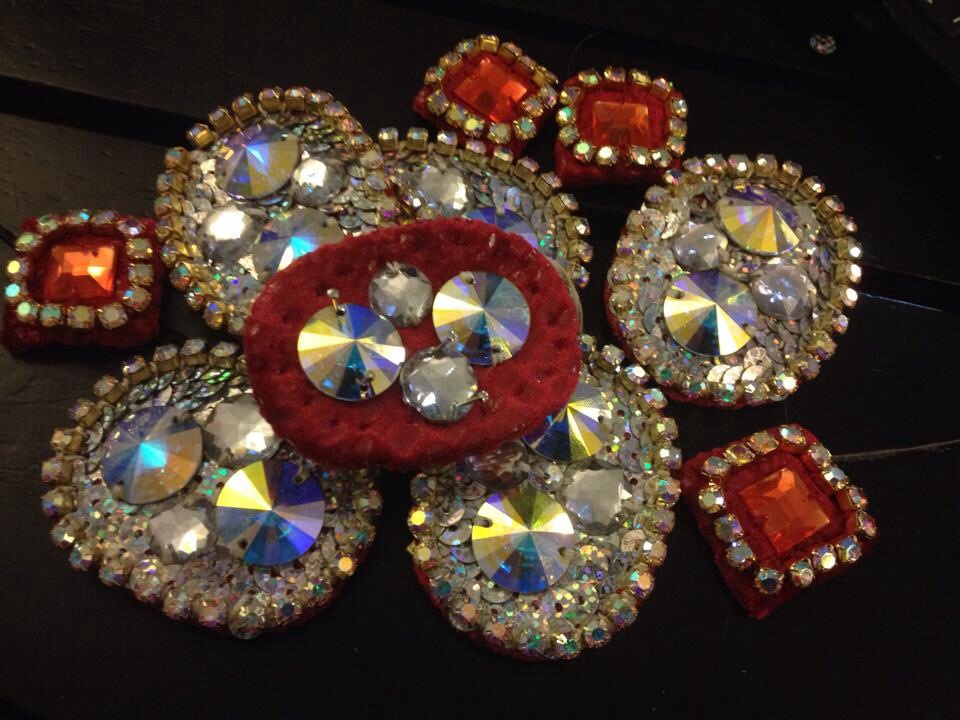
To match the rubies on the bra, I cut out squares of stabilizer, covered them in fabric, then then added a square ruby sew-on gem and some rhinestone chain to each. These ended up being slightly larger than the ones on the bra since I attached the rhinestone chain slightly away from the gems than right on their edge, but I believe they'll appear proportional on the skirt. I didn't have enough tear-drop shaped stones for the pattern (I only had 8, not 10), so instead I used two round aurora borealis gems (of which I had 20) and a few smaller clear gems to fill in the medallions to go between the rubies, with iridescent silver sequins to cover the red around the gems. I had run out of my gold rhinestone chain at this point so I ordered more online, which will be used to edge the rhinestone medallion as well. From a distance those medallions could appear to be one solid larger gem.
Here's a totally photo-shopped image of the skirt, even though at this point I only had one silver medallion made, and it was without rhinestone chain edging. I'm still not 100% certain about the beaded swags, or if I should sew "connector" gems directly to the skirt between the rubies and medallions to better simulate the bejeweled belt concept. You'll notice I've also added a bit of ruching to the skirt just above the slit. My cat Wendy tentatively approves.
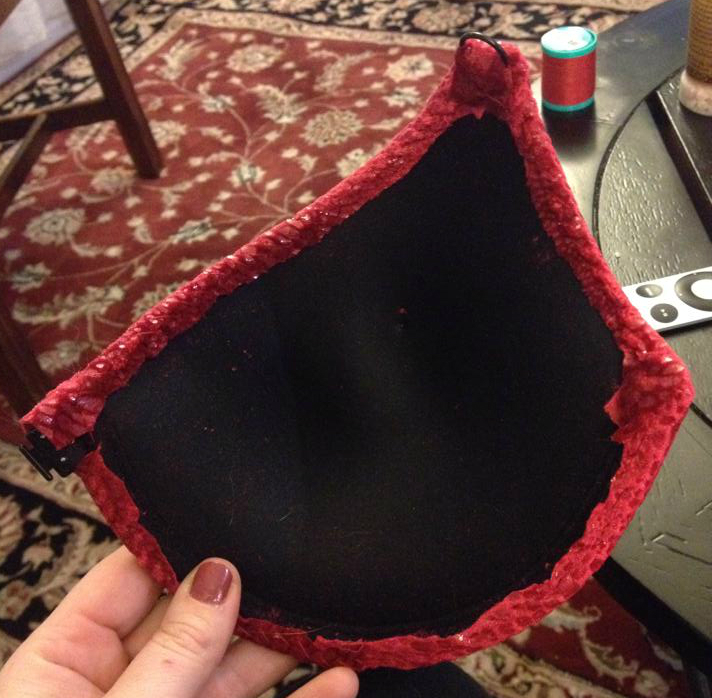
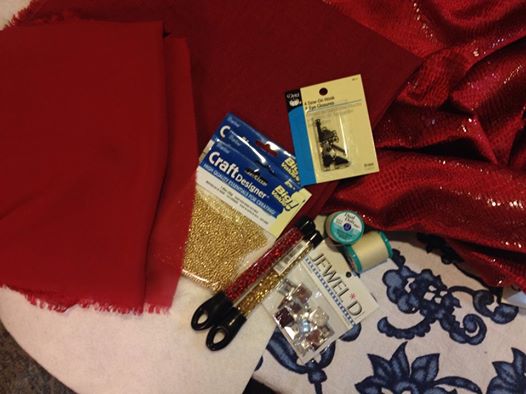
Just in time for Blizzard Juno, I did another round of shopping for materials and I got chiffon for the slit insert and arm drapes, more sew-on jewels, beads, hook and bars, and linen. Now most lining fabrics are polyester or rayon, thin, and smooth fabric, intended to help your clothes slide on top of one another easily, like the inside of a jacket. But the lining of a bellydance bra goes right on your skin, and for that we want breathability. Linen is a fabulous natural fabric that breathes and wicks sweat away from you, so even though it can easily cost quite a bit a yard compared to traditional cheap lining fabrics, I highly recommend it, especially since half a yard is more than enough for a bra.
I pinned one half of my bra to the fabric at a time, folding under a dart inside the cup. A way to make this easier on yourself is to temporarily invert the bra cups so the inside is convex. I cut the fabric about half an inch from the edge of the bra, and then folded under and re-pinned the fabric in place. Then I used red button and carpet thread with a spiral stitch to attach the lining to the bra, after first attaching one of my hooks to the end of the bra band. You can always attach your lining first and then add all hooks and bars, but the one hook on the end can be neatly tucked under the fabric with just the hook on the outside. Then after my lining was attached I sewed on the rest of the hooks and bars. Here's a link to my hook and bars tutorial.
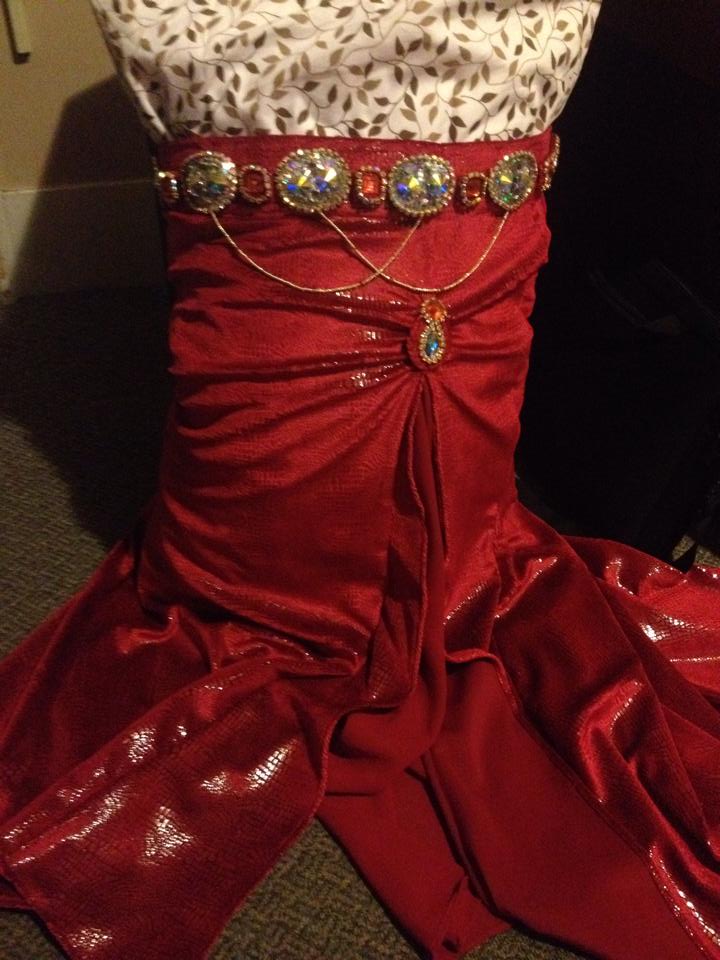
Now, I had a good bra concept, and a good skirt concept, but sometimes you need to look at everything together and see how they match. Questions I had for myself included - do I want beaded swags from the bra centerpiece framing the waist? If so, how does that match up with the beaded swags on the belt? I took a photo I had of myself wearing my smoke costume and photo-shopped it have images of the Ruby bra and skirt on it, as well as what I had in mind for the arm accessories. Keep in mind that the bra and the skirt photos were taken in different lighting, but it does come to mind that there's more of an emphasis on white gems in the belt than on the bra. So this makes me wonder if the bra needs more bling.
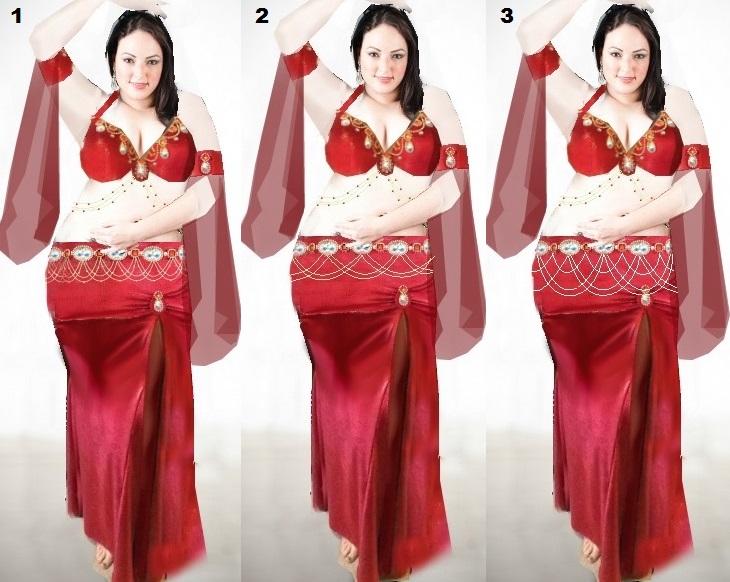
In option 1, there are two strands connecting each consecutive ruby and each consecutive diamond disc. These swags would be about four inches in length, and would not interfere with the applique on the slit. In option 2, the beaded swags are wider to better match the swags on the bra, connecting only every other diamond disc. In option 3, the beaded swags are just as wide as 2 but longer, which better mimics the bra swags but does interfere with the applique on the slit. There are no wrong answers, only personal choices.
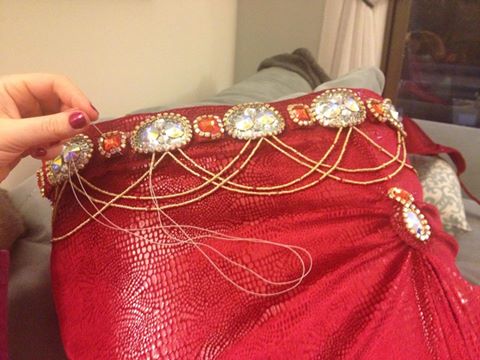
After looking at the bra and skirt together, I determined that the bra definitely needed more bling to look balanced, so I removed the small round gems sewn below each drape of the necklace and replaced them with larger square stones and then surrounded those stones in more rhinestone chain (which fortunately I had just gotten more of in the mail from RhinestoneChain.net). Here's the tricky part though - I had already attached my lining, and I didn't want my stitches to be seen on the lining. This is where the extra special ninja magic happens. As I attached each square gem in place, I hid the thread knot on the outside of the bra underneath where the stone would go, nicking the fabric and the front material of the bra base. Knot hidden. Then for each stitch into the holes of the gem, I went all the way through the bra base and the lining, and then I had my needle re-enter the same hole in the linen lining on the return trip so that the stitch would only secure the gem to the bra base and not the lining itself. Then I knotted my thread also underneath the gem on the front. To attach the rhinestone chain I just nicked the fabric and front of the bra base with a spiral stitch between each rhinestone. This takes time and patience, but the end result is fabulous.

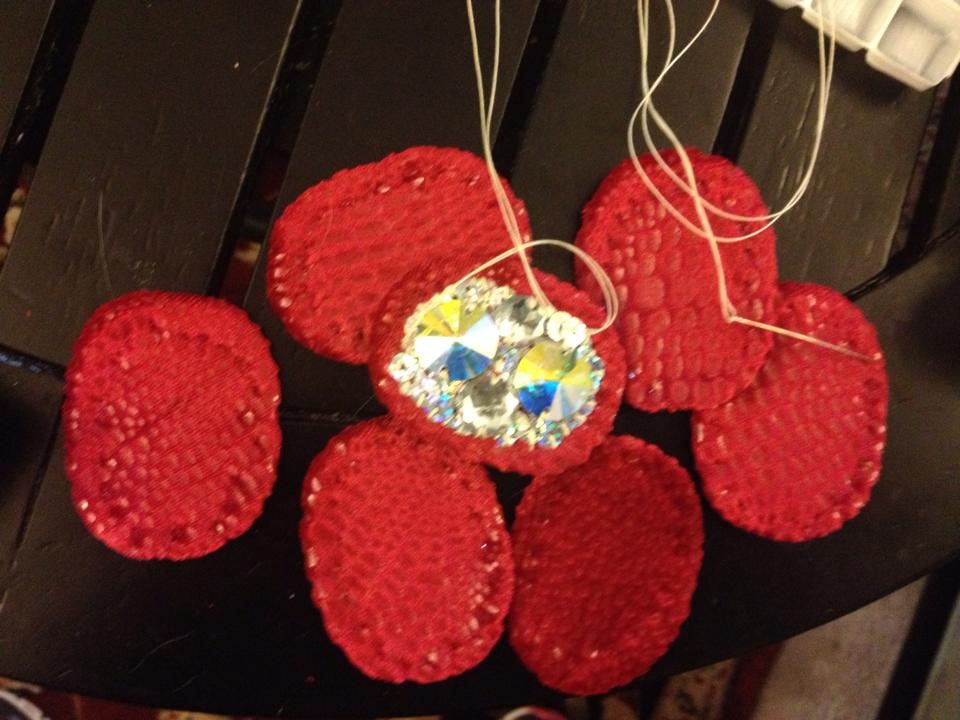
Meanwhile I set about making all my appliques for the skirt. First I cut out ten matching ovals from the stabilizer, then I covered each with the ruby velvet and stitched them by hand with button and carpet thread, then I added the gems in the center, and then filled it all in to the edge with sequins. Lastly I edges each in rhinestone chain. As I completed each one I pinned it onto the pillow-filled skirt.
Then, and this step is very important, Pippin took a nap on the skirt. D'awwww!
The extra six feet of rhinestone chain was just enough to finish my appliques. Then I started lining each of them with the linen. Unlike the bra, these pieces will not touch my skin, but even though they'll lay against the skirt it's best to hide the white stabilizer on the back from view and protect the stitches from friction or damage. I could have lined them in the velvet, but the scraps of linen I had left was perfect for such small appliques.
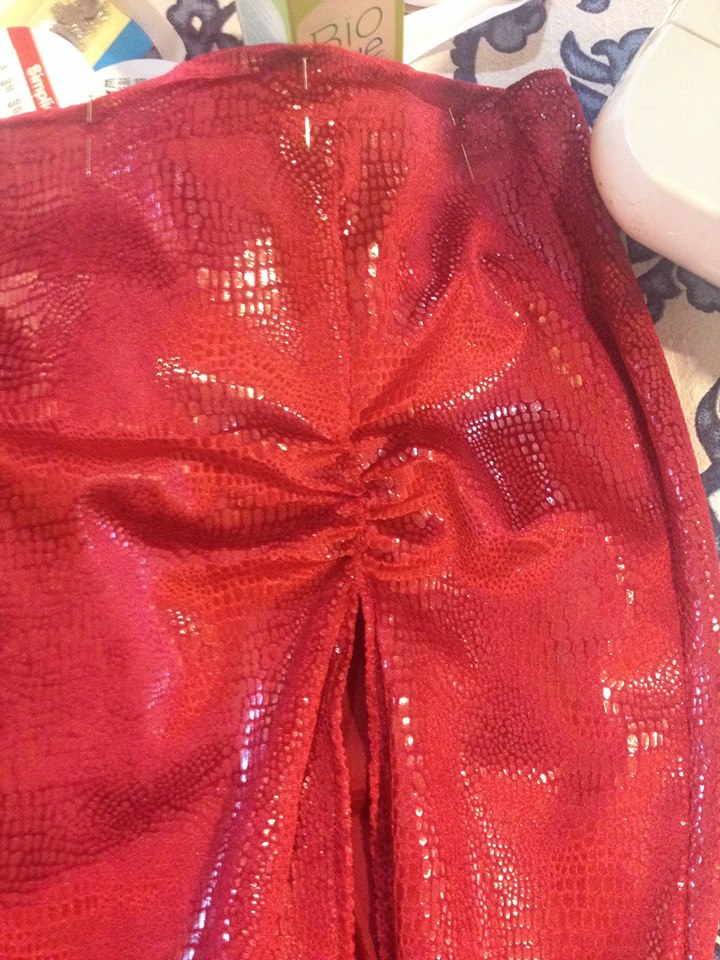
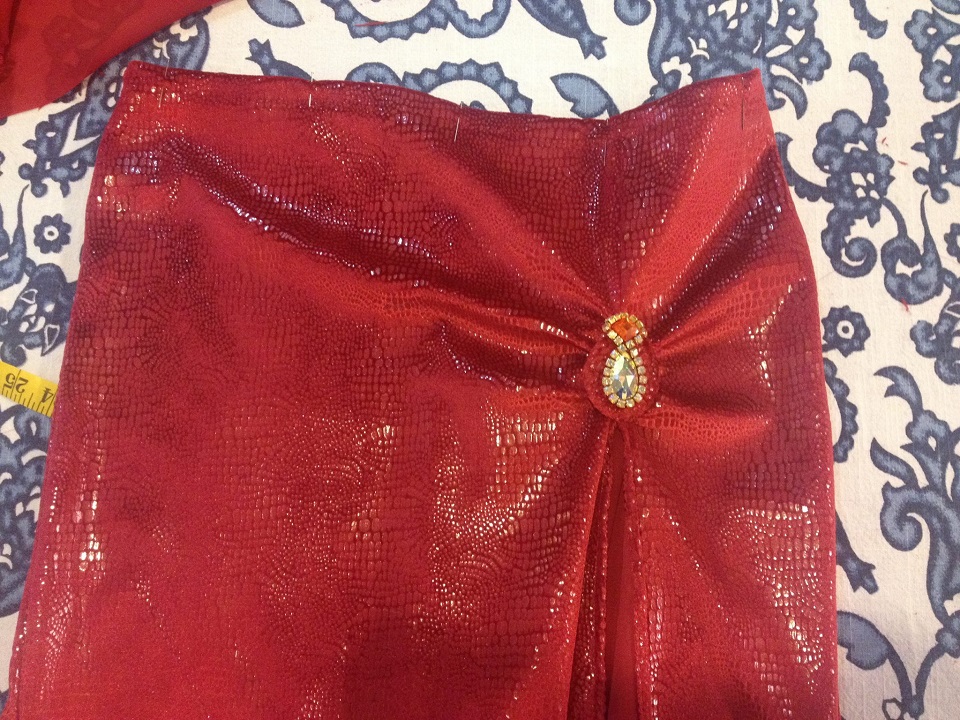
For the ruching above the slit, I had previously used a hand sewing needle and button and craft thread to gather the fabric. But to make the gather point lie more flat, I machine zig-zag stitched it, reversing several time to reinforce it.
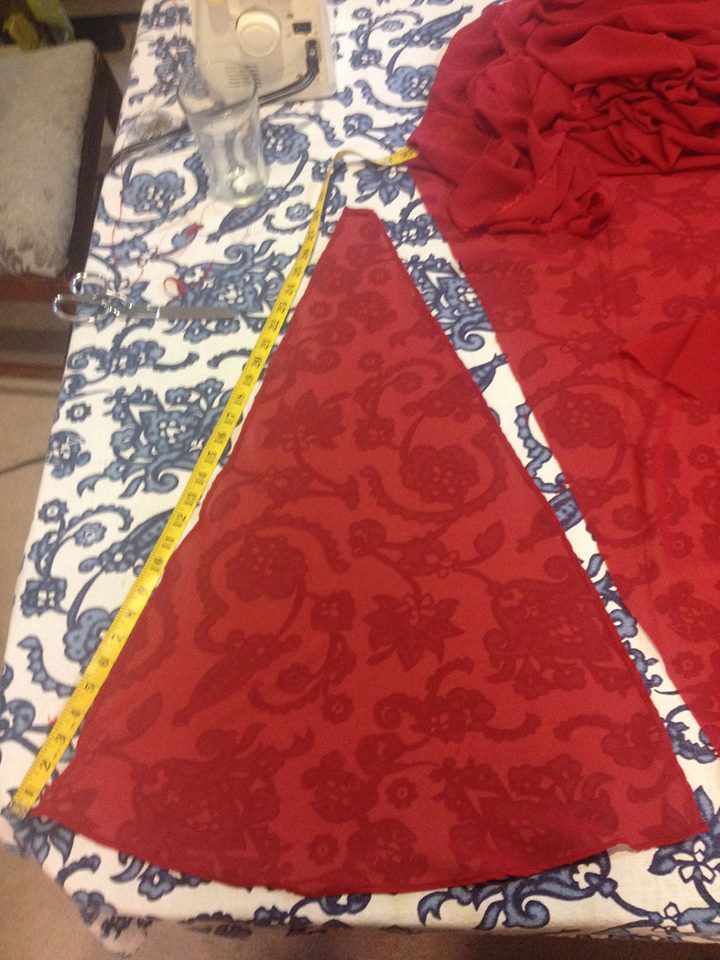
I had planned to put a chiffon insert into the slit - this adds a bit more modesty, and looks very pretty when you spin. The sides of my slit on the skirt measured 31 inches, so I made my chiffon insert 33 inches on a side, at an angle of around 40 degrees. Making sure the center of the insert lined up with the weave of the chiffon, I laid my fabric measuring tape on top of it and cut one edge, then carefully cut the bottom curve by swinging the end of my tape from the top point. Half way through I folded the insert in half, from top point to center bottom of the curve, and cut the right half of the insert to match the left half. Then, not being able to find my rolled hem sewing machine foot, I carefully rolled the hem with my fingers and straight stitched it on the edge.
I rolled down the top point several times and sewed it down. This makes a much more secure attachment point, less likely to tear if the chiffon got caught on something. I pinned it in place and sewed it a few inches above the slit on the inside of the skirt.
The chiffon insert stitches are completely hidden by the applique on the slit, which is attached by hand with button and carpet thread through both the velvet and the chiffon.
And one by one, I attached each of the belt appliques by hand. Looking at the inside of the skirt, I'd have my first stitch start in the top left, then diagonally to the bottom of the discs left-of-center, then the top right-of-center, then the bottom right, in an enormous zig-zag. Though the appliques themselves can't stretch, the fabric will be able to stretch a bit between them. When not stretched the diamond and ruby appliques look like they're touching, but when worn they spread out and create gaps. These I'll fill in with more sew on jewels.

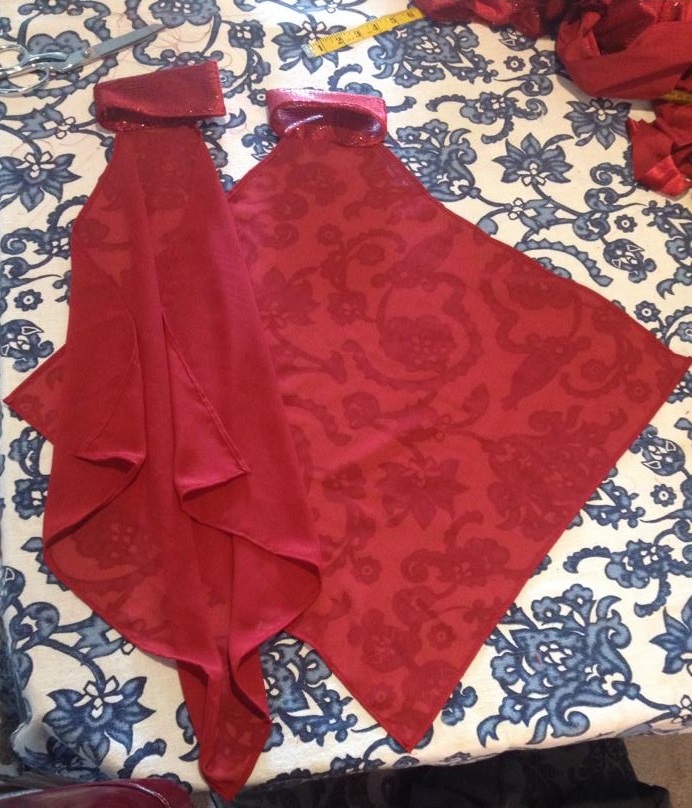
It just so happens that at this point I was about to go on a two week vacation, flying to Canada. Believe it or not, you can actually take pins, needles and round-pointed scissors on a plane. Or just bring nail clippers - they cut thread just fine. But some things are easier to do with a machine than by hand and with big fabric scissors, so in preparation for my trip I focused on getting my arm accessories made. These are two-inch wide bands with 22-inch squares of chiffon hung from one corner in the back. LRoseDesigns sells accessories just like them on their website (upper arm band with chiffon diamond drapes), so if you want something similar but don't feel like making them yourself you can buy them in the color and fabrics you prefer. That being said they're fairly easy to make. Measure your upper arm where you want the band to be, decide how wide you want your band to be (say two inches) and double that width plus an inch for seam allowance (five inches). Now cut out two rectangles the length and width right for you, knowing that the seam allowance on the length will account for the stretch factor of the fabric. Sew the short ends together, good sides facing in. Fold them in half along the long centerline to make a twice-thick arm band with raw edges on the bottom and try it on your arm. If it needs to be tighter or looser, adjust your seam allowance accordingly. Measure out your squares of chiffon - which can actually be ripped instead of cut to size. Then use a rolled hem sewing machine foot, or carefully roll the hem with your fingers, and sew up the raw edges. Stick one of the points into the folded arm band (I chose to have my seam in the back), and then fold in and pin the raw edges of the arm band. Using any stretch stitch (zig-zag, a hemming stitch) on your machine, sew up the bottom of the arm band sealing in the drape. Boom. Arm accessories.
I'm thinking about having more bejeweled embellishments on the arm bands, but I have (yet again) run out of rhinestone chain. For those keeping track at home - yes, that means that so far I've used twelve feet of rhinestone chain on this costume, and I could probably use another three feet or more. So if I go up to 15 feet at $3.50 per foot, that's $52.50 in just that trim alone. I think I may have spent $30 on the velvet, $5 on the linen, $10 on the chiffon, used $40 worth of sew on jewels, $10 for the bra base, $10 for stabilizer and thread, and $5 for grosgrain ribbon and hooks and bars. Total material costs: $162.50. But how many hours have I spent? Probably an average of two and a half hours a night (or four Murder She Wrote episodes) since January 11th, 2015 when I bought the fabric, which as of February 4th would be 62.5 hours. The beaded swags will probably be very time intensive, so when all is said and done it may take 80+ hours: labor cost of $3,600. (Think about that every time you wonder why your tee-shirt was made in a third world country without a minimum wage or fair labor practices. Maybe clothes should cost a lot more than we are used to.) And keep in mind that "profit" is above and beyond "cost", so if like other designers I were to double the costs to make a retail value, that would be around $7,500 for this custom, handmade costume (which after income taxes would leave me with only around $4,500, or a net profit margin of 20%). Rest assured, I'll be keeping my day job as an engineer and not opening up shop any time soon. Even I can't afford me.
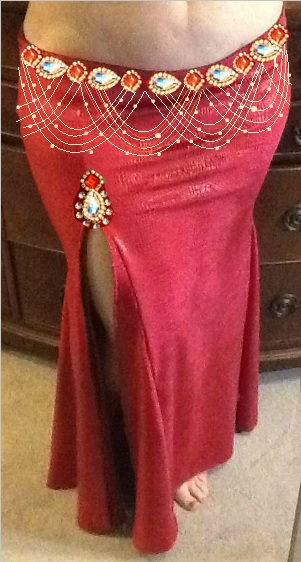
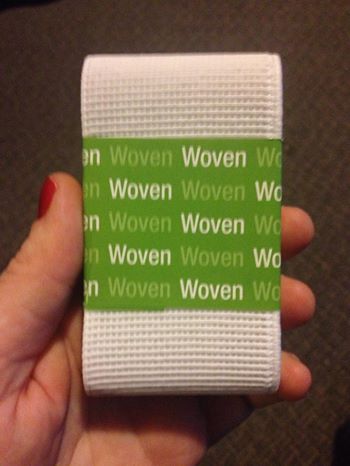
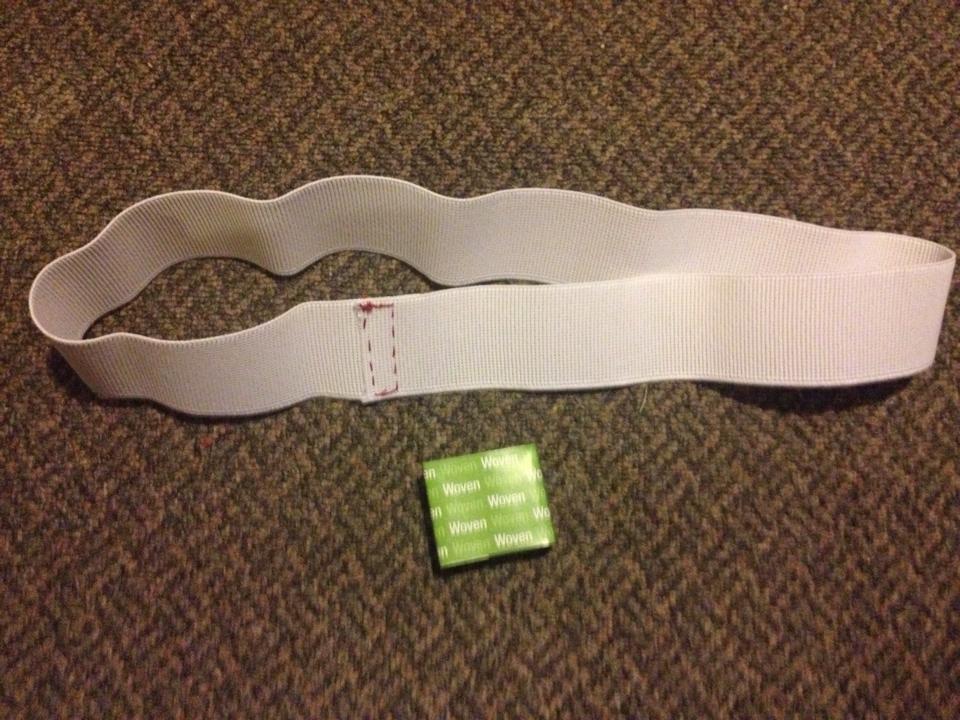
With all of the heavy embellishments on the waist of the skirt, and the low stretch ratio of the fabric, this costume definitely needs the reinforcement of an elastic waist band. Check out my tutorial on elastic waist bands here. The waist band will not only keep the skirt from slipping down, it will also keep the belt appliques in a nice straight line, moving like a belt would. I chose a three inch wide non roll elastic waist band so that it would be slightly wider than the appliques themselves. A single package is typically one yard long.
I wrapped the waist band around my upper hips, where the skirt top will lie, and noted how far the ends overlapped. Using my button and craft thread, I hand sewed a rectangle onto that overlap area.
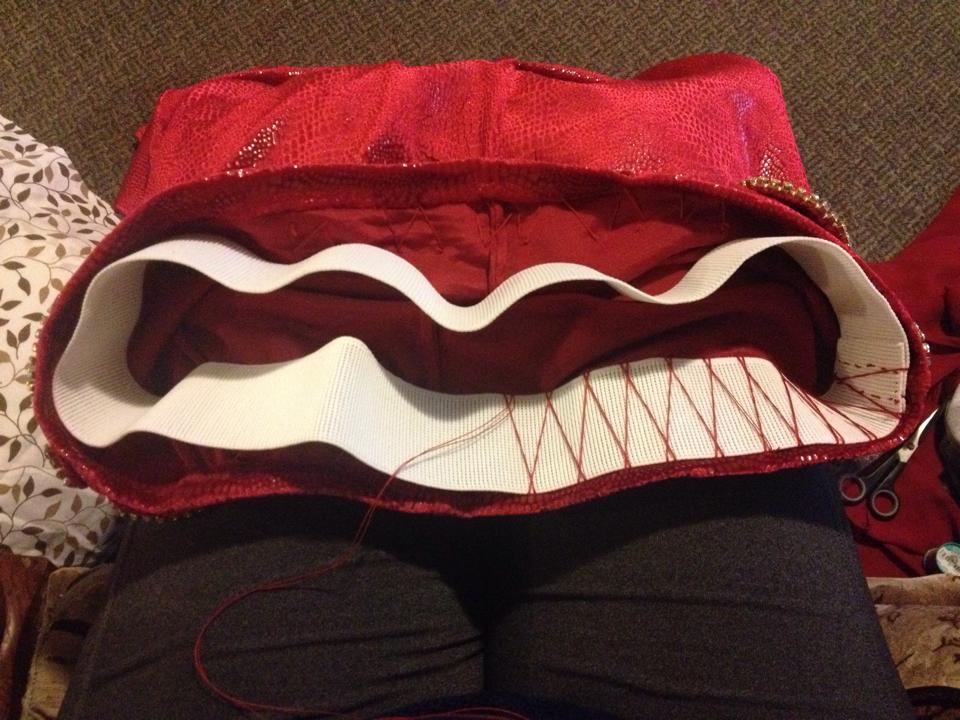
Next I hand stitched the elastic waist band in place with a zigzag stitch casing, never actually letting the thread catch the waist band itself so it would be free to move and stretch evenly. The stitches in the skirt itself are very tiny, but not so small that they'd risk ripping a hole in the fabric. The thread is not pulled tightly so that it will not dent the skirt on the outside - just tight enough so that there's not loose thread.
Once I had the reinforcement of the waist band, I stuffed a pillow into my skirt to make it easier to start my beaded swags. Starting with the one that hangs above the slit applique, I found the ideal length of beads to hang between silver appliques, and made each to match. Mostly I used gold round seed beads, but I also put in around four E beads in gold and red per strand at random intervals.
When you have swags that overlap each other, there are several choices you can make - you can have the right side of each swag be on top with the left underneath other swags, the reverse, or have swags alternating as tops and bottoms. Whatever you choose, it's important to be consistent because it will look better and also allow the swags to swing and move more freely. Also, each of my swags is knotted on both ends. It can seem like you'd be saving time if you just continued your thread to the next swag without knotting it, cutting the thread and starting again. But then if one of your swags breaks, all of the ones attached to it will eventually fall out with it.
After attaching two concentric swags per disc pair all the way around, I put the skirt on. Even though the swags were the right length upstretched, wearing the skirt shortened them, giving me more vertical space to fill. To fill that gap, I added a third swag per disc pair also attached at the center of each disc.
At this point I could call the skirt done, or I could choose to add a few extra embellishments - like edging the chiffon insert in silver sequins. I could do the same thing to the edges of the chiffon drapes on the arm accessories. The only question is which side of the drape should get the sequins? They hang from the back of my arm just above the elbow - so the "inside" faces the audience, and the "outside" faces back stage. Typically you decorate the outside of things, but I'm understandably conflicted in this case. Another embellishment option is to buy more diamond trim and continue the jewelry theme on the arm bands themselves. I could alternate the square rubies with oval rhinestones, each edged in the diamond trim, to match the belt, like bracelets.
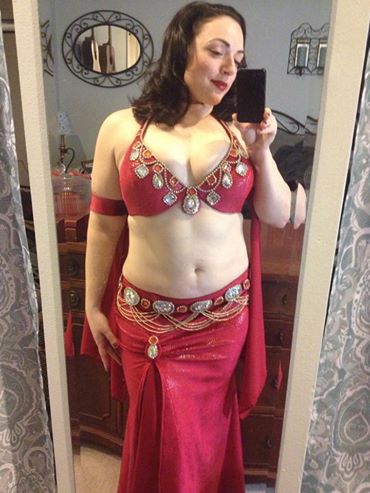
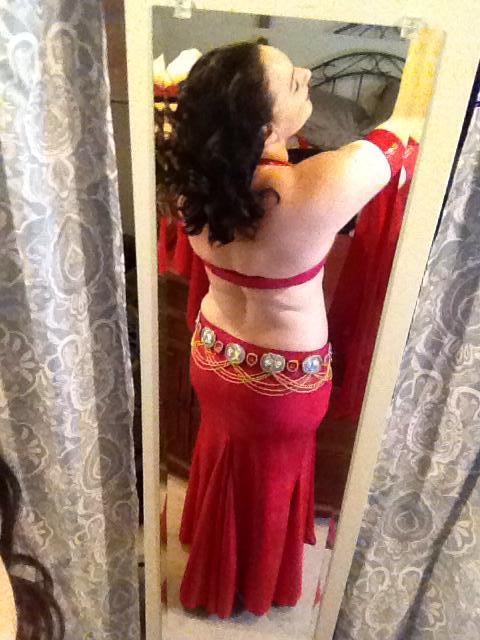
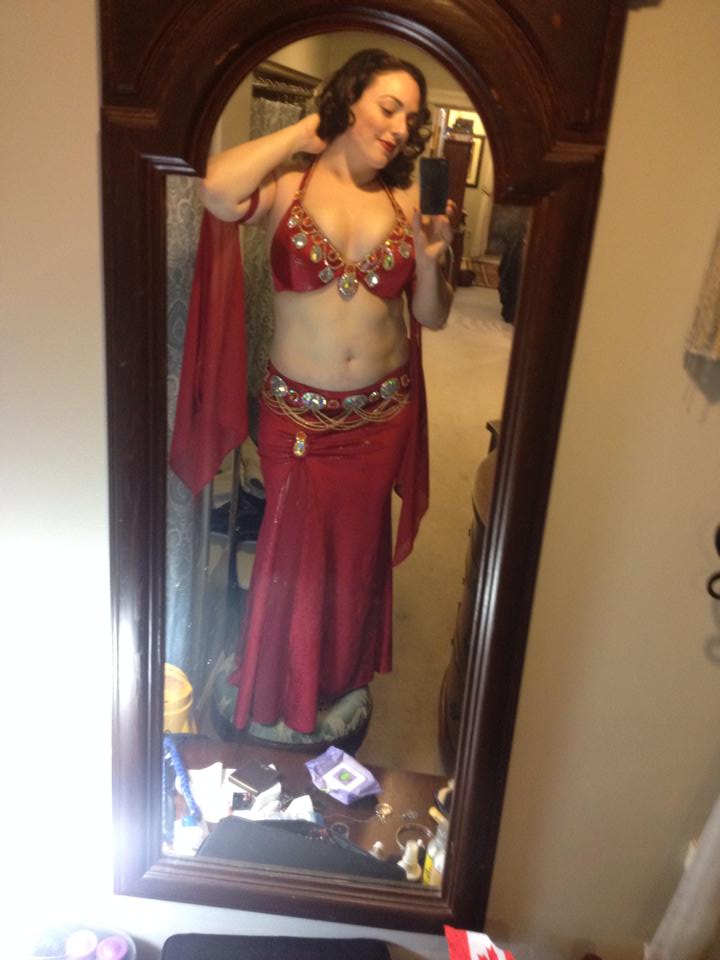
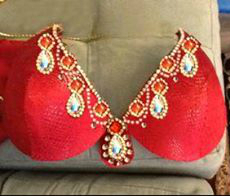
I decided that sometimes less is more. If I added embellishments to the arm accessories or slit insert, the eye might be drawn away from the bejeweled necklace and belt. Here are photos of the finished costume. I plan to perform in the Ruby Costume at Spring Caravan in May, and I'll be sure to post a video of the performance so you can see the costume in motion.