An Original Shushanna Design
Hyperlinks to Page Contents:
~Project Background
~Inspiration & Design
~How It Was Made
Assuit, or Tulle bi Telli, is an Egyptian fabric from the city of Assuit traditionally made of cotton or linen mesh with silver or gold metal thread or narrow ribbon embroidered into it. The word "tulle" comes from the city in France of the same name where the mesh fabric was first manufactured, and French colonists invested in the city of Assuit in the 19th century by giving them tulle weaving machines. "Bi telli" simply means with metal. In the first video I say it's a 1920's Art Deco inspired fabric, and that's not exactly correct. Various forms of mesh have been embroidered with metal threads since the days of ancient Egypt, but the fabric as it is manufactured today became more well known and highly exported after the discovery of King Tutankhamen's tomb in 1922, so it became one of many iconic Art Deco 1920's fashions. It's likely that some pieces made during or after the 1920's were influenced by the Art Deco movement of the time (or at least those that met the artistic tastes of Western tourists inspired by Hollywood 1920's movies like Cleopatra would have sold more quickly).
Assuit comes in many colors and various metals, but is most often found in black with silver colored metal. It's a very traditional gift as a wedding pressent, and is typically woven into rectangular panels used as shaws or decorative table coverings, and also woven into wedding dresses. The designs made in metal are typically geometric shapes when made by Muslims (who avoid the depictions of humans in art) or they are animals, plants and people if made by Copts (an Egyptian Christian sect). Good Assuit is soft to the touch and has well made, even designs. Lower quality Assuit can be stiff, scratchy, or poorly embroidered. Prices vary depending on quality, the size of the peice, if it is an antique or not, and the amount of metal decoration. A great supplier of Assuit fabric is King of the Nile. Ask for Yaz and tell him Shushanna sent you.
Because Assuit is expensive (in the range of $50-$100 a yard), the costumes made from it tend to use it sparingly. Temple skirts (rectangular panels in front and back) are very common, attached to matching belts, and bras are covered in it. These bra, belt and temple skirt combos are then minimally decorated with coins or Kuchi jewelry. You would never see a huge circle skirt made of Assuit, for instance. Not only would the fabric be too heavy to flow as a circle skirt should, the cost would be overwhelming.
My inspiration for this costume was the fabric itself. I have seen many panels of Assuit for sale over the years, but the two panels I bought from King of the Nile were a very lovely shade of ivory. To my eye, it reminded me of the ivory color of pearls, and from there I imagined what an ivory Assuit costume with drapes of pearls could look like. I wanted the design to have an Art Deco feel, with symmetry, clean lines and a form-fitting silouette. After buying the fabric, I brought it with me to a craft store and bought some matching pearls and three round silver pendants with pearls on the center.
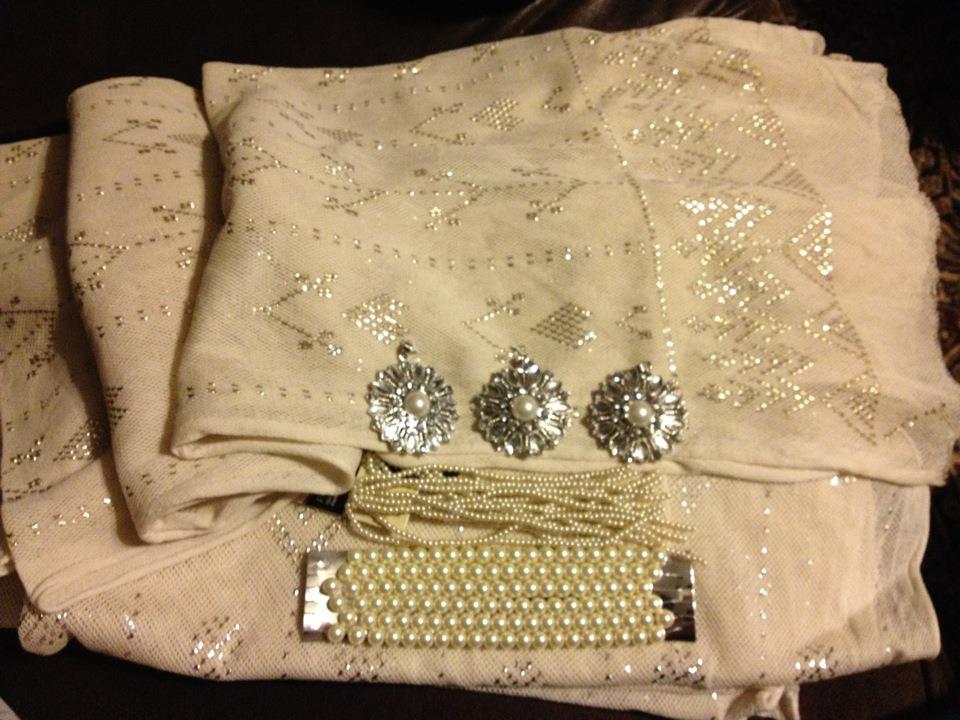
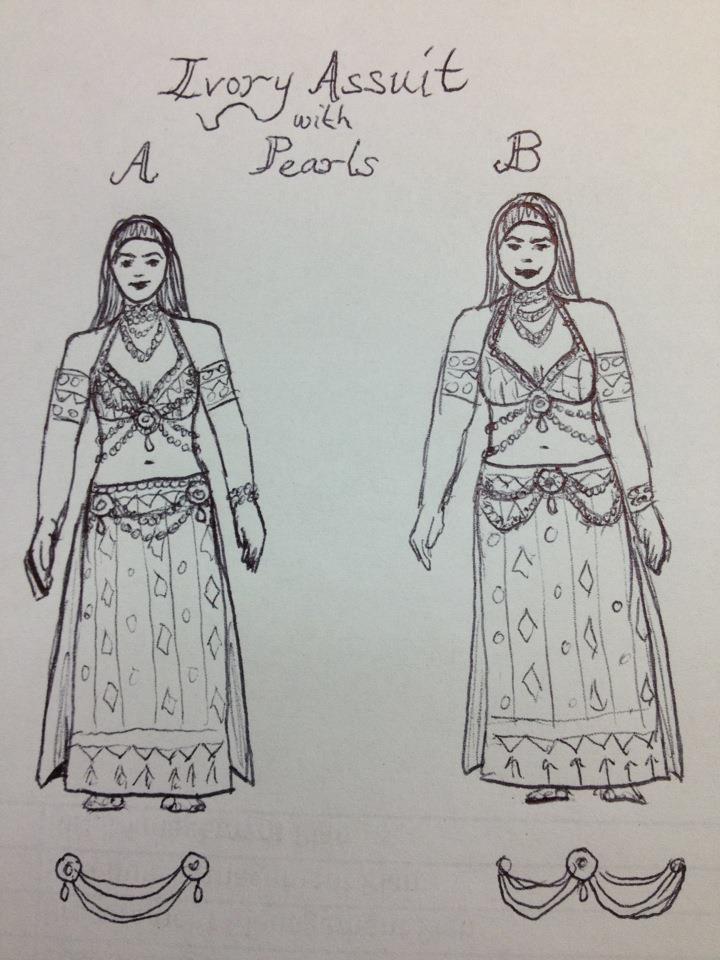
Later I bought some ivory crinkle satin to line the Assuit with (so it would not be see-through). Here's my first set of sketches. I the bras are similar, with only an added swag of pearls on each cup of A. The belts have the emblems and pearl swags positioned differently.
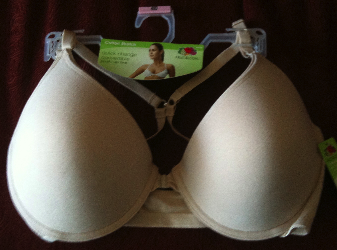
And of course, I used my favorite Fruit of the Loom bra base. I only use the cups, and trim off all of the side and shoulder straps.
In general, costume projects tend to follow a certain path. First you start with an idea, then you find the materials, and then keeping your materials in mind you make a sketch. You could make a sketch first and then go buy materials, but as is often the case, the materials in your mind might be impossible to find, and materials you find may just inspire a whole costume. In Part 1 of the video series, I talk about my design concept, my materials, and my sketch. For more information on How to Design Costumes read my tutorial on the subject.
Architect's often like to design impossible buildings, but if it weren't for the Engineers figuring out how to make them work, they'd never come to fruition. As your own costume designer and seamstress, you have to be both the Architect and the Engineer. It's not enough to have a fabulous design idea - you have to make it work. If you're new to sewing, I have some free online tutorials that can help you get started: the Materials You'll Need, the Tools You'll Need, How to Pick the Right Bra Base, How to Cover a Bra, and How to Make Belt. In Part 2 of the video series I talk about the construction of this bra and how I covered the bra cups with crinkle satin and ivory Assuit.
Once the cups were covered, I started working on the straps. There are three types of straps: side straps, shoulder straps, and the center connector. Find out more about how they're made in the Bra Straps Tutorial. In Part 3 I show the side strap prototype I made out of cheap fabric, and then the two finished side straps that I attached to the bra. To find out what I mean by a "chain stitch" used to securely attached the side straps to the bra cups, go to the How to Sew by Hand Tutorial.
When it comes to decorating a costume, it can come down to personal taste. What's elegant to one person may look bare to another, and what's pretty to one person may look overdone to another. For a full explanation about design concepts, go to the Design Tutorial. For this costume I chose to edge the ivory Assuit with strands of pearls. Although the bra in Design A shows a swag of pearls draped across the cups, I decided to go with Design B instead so that the fabric would not be upstaged. The pearl edging also was very carefully placed so as not to interfere with the hook and bar closures on the halter straps or the side straps. To find out how hook and bars are placed and attached, go to the Hook and Eyes Tutorial. I lined the bra in a peach satin that resembles my skin tone and will feel very comfortable.
There are many right ways to make a belt base and they all have two things in common - they fit well and they're durable. Durability has to do with the materials you use, and that's pretty easy to take care of. I use extra thick interfacing for my belt bases. The hard part is the fit. Since the glute muscles are a curved surface, and our hip joints need the freedom to move in the front, you have to be sure that the back of the belt hugs in the right places and the front of the belt doesn't interfere with motion of the upper leg.
I find the easiest way to do this is to put on a pair of jeans, place a piece of interfacing on the front or back pinning it to the side seams of my jeans, and draw on it with a black permanent marker in the shape I want the belt to be. To fit the curve of the butt, you have two options - adding darts to the top and bottom edges of the back panel, or laying the interfacing flat along the waist band of your jeans and drawing the resulting curved shape. The second option only works with narrow belts, since they only need to hug the top of the butt and not also the bottom of the butt. I used the second option for this costume, and I used the first option for my Blue Faux-Bella Costume Project. For more information about making a belt, go to the Belt Tutorial. Cover the belt bases with your fabrics and straight stitch (hand or machine) along the edges of the belt panels.
For the skirt I planned to use the remaining Assuit fabric to create two rectangular panels - one for the front and the back. To keep Assuit from being transparent, I planned to line it with the crinkle satin. Since my satin is more shiny on one side, that is the side that would be facing the Assuit and visible from the outside (instead of most linings, where the good side faces the body).
To make your panels, trim your Assuit so that its embellishments are centered (if you so desire), lay your lining fabric and Assuit flat on the floor or on a large table - patting them gently to make sure they're not stretched or wrinkled, and pin them to eachother along the edges. Cut them both to make the rectangles of your desired lenth plus a few inches or centimeters. Remember, you can always make it shorter, but once you cut it you can't make it longer. Sew the two layers together on the bottom and sides with a straight machine stitch, and then turn it right-side-out through the top openning. Iron your edges, and use a chopstick or pencil to push the corners out (trim off the corner edges of the fabric on the inside to prevent the fabric from bunching up).
Then you may want to "quilt" or topstitch the skirt panels with a straight machine stitch. This is just a way of preventing the lining and Assuit from billowing away from eachother, like a pillow case filled with air. Lay the ironed panels flat again and pin them together along the lines you will sew them, with your straigt pins perpendicular to your stitch direction (try not to harm the metal embroidery). Because my Assuit had verticle lines on it and a horizontal border on the bottom, I sewed along those lines. Then baste (the exact same straight stitch) the top edge closed. There is no video that shows this, but it's discussed in the previous and next videos.
For most bra and belt sets (bedlahs), the belt is not attached to the skirt so that different skirts can be worn with the same bedlah. Some trumpet skirts are embellished heavily themselves and are worn with no belt at all. However this costume is one of those odd exceptions, probably because temple skirts - another name for rectangular panel skirts, are fairly revealing and you really don't want them free to shift around. So my skirt panels will be attached to the bottom edges of the front and back belt panels.
The question is - do you embellish the belt panels first and then attach the skirt panels, or do you attach the skirt panels first and then embellish. The answer is determined by whether you ever intend to shorten or lengthen the skirt. Since the Assuit will likely have a decorative border on the bottom, you would not want to shorten it from the bottom - instead you'd have to change where it is attached to the belt. If your embellishment stitches all go through the skirt panel, it's more difficult to remove it without cutting or damaging the skirt panels. For my costume, I decided I would never change the length of the skirt, which makes it possible for me to use a sewing machine to attach the skirt panels to the belt panels - which is always more even and flat than a hand stitch.
The belt and skirt combo I designed opens on the right with hook and bar closures and is hand sewn together on the left (I'm right handed). I put the bra and the belt on my dress form and I started attaching my swags of pearls. I wanted the belt to echo the bra - with a center emblem and two strands of pearls draping to either side. Since the two swags on the right side would overlap the closure, I had to make the two strands detatchable from the center emblem. I used hook and eyes, with the eyes sewn to the center emblem, and the hooks attached to the ends of the pearl strands. Then on either side, I attached the front and back skirt panels from the bottom of the belt to about eight inches down for the sake of modesty. On the left side the skirt panels are simply sewn together. On right side I sewed on snaps so that I could get in and out of the costume.
A dress form can be a helpful tool, allowing you to see how strands look when draped, but unfortunately it is not a perfect replica of the human body. When it comes to tailoring, always try it on and mark where things line up with pins or a removable mark (chalk, fabric pencil, soap shard). In the final video in the series, I discuss all of these things.
Here is a video of me performing in the finished costume at the Rakkasah East bellydance festival, in October of 2012. I performed to the band Efendi to the songs Habibi Ya Aini and Samra Ya Samra, with a drum solo in between.