
An Original Shushanna Design
 Hyperlinks to Page Contents:
~Introduction
~Inspiration & Design
~Discussion on Materials
~Skirt Gore Rant
~Questions of Cardboard and Art
~How it Was Made
~The Bodice
~The Skirt
~The Dress
~Spiral Lacing Holes
~Test of Materials
~The Sleeves
~The Underclothes
~The Footwear
~The Jewelry
~The Hair
Though this entire website may lead you to believe it, I don't just make bellydance costumes. In fact I'd go so far as to say that most of the costumes I've made over the years have not been for bellydance, but rather for Live Action Role Playing (LARP) Games, Renaissance Fairs, Steampunk events, Society for Creative Anachronisms (SCA) events, and conventions. And that's if you just focus on my work in textiles.
The thing is - the skill to make things is pretty universal. Take these materials, put them together, make something neat. Boom - the space program. Which, I think, is an important reason to make sure classes like Home Ec and Shop are still available in public schools to all kids, and not segregated by gender. These are some of the most important and practical life skills you'll ever learn, and can encourage imagination, creativity, and independence.
If like most of my readers your focus is on learning how to make bellydance costumes, reading about a non-bellydance costume project may help broaden your understanding of construction methods, structural concerns, how to make design choices, and may just inspire you - as I explain in my Design Tutorial.
For those of you who found this page by searching for Italian Renaissance clothing, here you will find a clearly illustrated and detailed tutorial that will hopefully be helpful to you in your own Italian Renaissance projects. In this tutorial I explain exactly how I made each part of my outfit and why I made those choices, including links to resources. Check out my other costuming tutorials, including How to Sew by Hand.
This tutorial is very lengthy and detailed, but don't feel overwhelmed! Feel free to scan through and look at the photos, or use the hyperlinks above to skip to the parts that most interest you. If you need the details, they're all here. Use what is helpful to you with my blessing.
I'm going to take a moment to talk about language. I try to mention the Italian words as I go, like how sottana is the Italian word for petticoat or gown, but in general I'm going to use the English words. There are two primary reasons why I'm choosing to do this:
The first is that this tutorial is written in English and yet many of my readers from all over the world use Google Translate to read my tutorials in their native languages. I want those translations to be clear. And secondly, there is a very humorous consequence of 16th century Italian sumptuary laws that prohibited certain garments and styles by name: there was an explosion of fashion vocabulary. Tell me I can't wear "apples" and magically I'll call what I'm wearing "oranges." There are many, many words in Italian to describe the same thing, or slight variations of the same thing. And that very interesting academic study is not my purpose here.
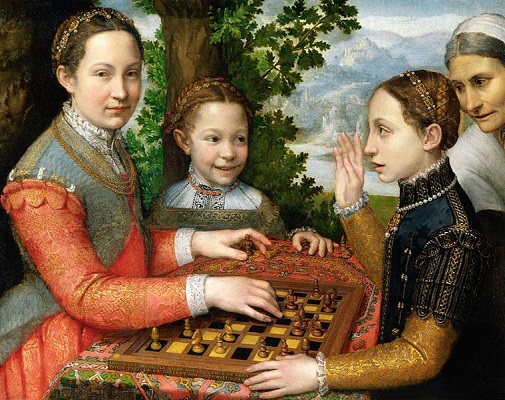
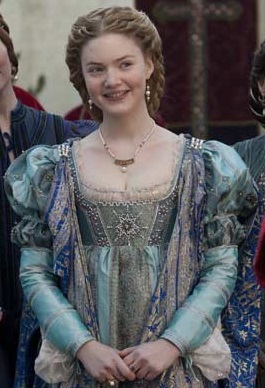 Once upon a time, I was watching the TV show "The Borgias," and my eyes became saucers and I started to drool at the luscious fabrics and lovely silhouettes. Interestingly, Italy was doing a bit of its own thing in the 16th century, fashion wise, with straight waistlines at times and a lack of the farthingale (under-skirt with several hoops) that was common in other countries like Spain, France and England.
It's possible that their softer lines, much like the art of the Italian Renaissance, were inspired by the remaining classical art from the Roman Empire. With the economic boom of the 16th century, many classical structures were fixed up and dusted off in Italy after centuries of decay during the Dark Ages. Allusions to classical art hailed to an idealized time of glory. The same classical inspiration influenced late-18th early-19th century fashion - the era of Napoleon and Jane Austin, and early 20th century fashion with the Edwardians - think Titanic. It ain't called "Empire Waist" for nothing.
Unfortunately, the things that our modern eyes perceive as luxurious don't always correlate with the actual luxuries of previous times, so I suppose I should not have been surprised when after I did research into historical paintings from 15th and 16th century Italy, it became clear to me that the "Borgias" costumes were more "inspired by" the Italian Renaissance than strictly recreating it. (Still super pretty though!)
 In the 1490s when Roderic Borgia ascended to the Papacy as Pope Alexander VI, paintings showed lots of solid-color dresses with form fitting upper and lower sleeves on ladies, attached at the shoulders and elbows with ties showing the white camicia (chemise) below. The waistlines were straight and at or above the natural waist, but not typically as high as the TV show depicts. The puffy upper sleeves seen on some of the female characters in the show would not have existed till 40 some years later in the 1530s. Decorations would typically have been embroidered by hand or attached trim, often of gold cord or velvet ribbon. Though expensive silk brocades were made and used in Italy, if a gown was made of brocade the entire dress would be the same fabric, and not a collection of coordinating brocades as seen in the TV show.
But it's easy to see how the choices the TV show's costuming department made would have been more time and cost effective than hundreds of hours of hand embroidery of solid colored silks - which are luscious in person and very durable but not as translatable on the small screen. And the puff sleeves of the 1530s line up more directly with their audience's modern mental image of "pretty, pretty princesses."
To my 21st century eye, some historically accurate Italian Renaissance fashions look simply ridiculous, like cod pieces (comically enlarged jock straps worn on the outside, sometimes used as coin purses), balzos (1530s ladies' turban thingies made of false hair, jewels, fabric, stuffing, broken dreams due to strict gender roles, and possibly helium), and zibellinis (what looks like a dead ferret with a bejeweled face attached on the end of a long decorative belt called a girdle, intended to distract fleas who weren't buying it, and apparently to creep people out in future generations).
These clashes of culture alone may have been why the TV show veered away from pure historical accuracy, but my intention was to create a dress that would meet both my own sensibilities and those of 16th century Italians. So for my own pretty, pretty Italian Renaissance dress I had several requirements:
~ First, that it have a straight-ish waistline unlike the Spanish and Tudor styles of its time. I figured why go to the trouble of doing Italian if it doesn't look Italian.
~ Second, that the headgear associated with it be not too silly - which puts the 1530s with its balzos of doom out of the question.
~ And third, that the sleeves be interesting to me and not simply a solid color without trim. The sleeves get more interesting as we get closer to 1600, but by 1550 Spanish rule of Northern Italy had started to cause the bodices to lose their unique Italian qualities, becoming U shaped and then V shaped. This was called the International Style.
 So in order to have what I considered the best of all worlds, my focus shifted to 1540 - 1545. Waistlines were a variety of shapes at the time, from straight at the natural waist to U to slight V. Sleeves with slashing, trim, panels, and higher smaller poofs, had started being worn by 1543. And the head adornments were gold and pearl cauls (hairnets) or elaborate braids and twists intertwined with pearls and trim and pinned on the head.
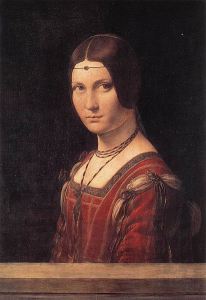
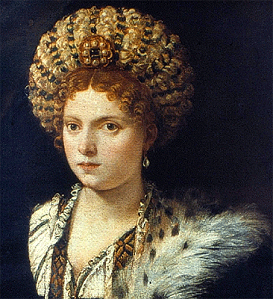
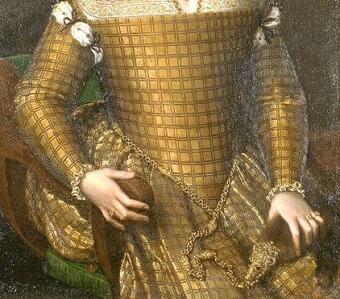
To the right is a lovely painting of Eleonora Di Toledo, Duchess of Florence, from 1543 with the sleeves, trim placement, and general hair shape I found most lovely. It's likely the waistline of her dress, unseen in the painting, was not straight since in all her other portraits they were U or V shaped. (Not surprising considering she herself was Spanish.) However there were other paintings from the same time period that did have straight waistlines. So my gown, or sottana, is from that pocket in time centered on Florence, Italy.
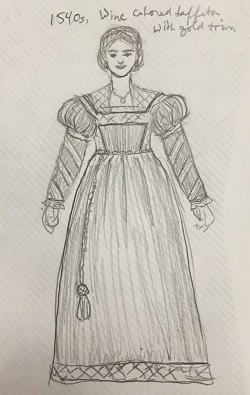
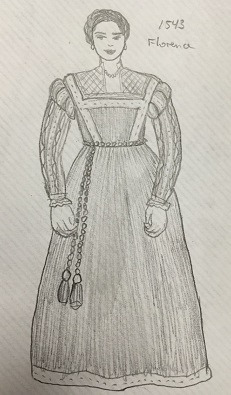
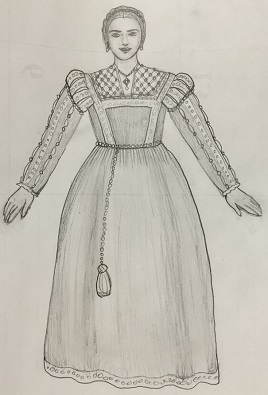
As always, I started with a sketch. In fact, I did several as I went, playing with different ideas. Higher waistlines, natural waistlines, different sleeves. In total I made half a dozen sketches ranging from the 1530s to the 1590s, some even colored in. Here are some of the last few closest to my final design.
Once I decided what I was aiming for, I purchased two patterns from Reconstructing History, which include not only the patterns but valuable historical notes and descriptions on how these dresses were assembled and stitched in their time: RH513 -- 1540s-60s Florentine Lady's Outfit and RH508 - Fruitseller or Common Woman's Dress. I've used their patterns before, and I highly recommend them. Read them cover to cover so that you fully understand them, though, before you cut anything out.
I also purchased The Italian Lady's Underpinnings pattern by Margo Anderson for the underclothes. This covers a chemise, knee length drawers, a partlet (decorative dicky), an underskirt, and a free hanging pocket you'd wear under your dress accessed through the side-back skirt vents. I recommend Margo Anderson's Technique Manual which explains 16th century tailoring methods for use with her patterns.
But let me state clearly that the methods I use below do not strictly adhere to any of the patterns. I've made a variety of choices based on a broad array of information and my own specific requirements, which I explain in detail.
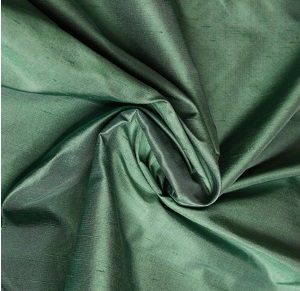
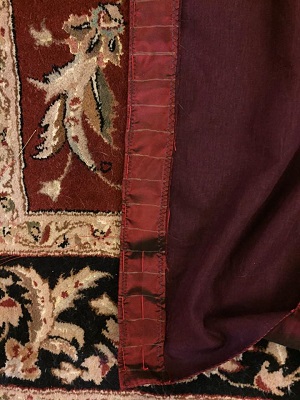
 I picked a wine colored changeable taffeta, which means that the horizontal threads (wefts) and vertical threads (warps) were different colors, in this case red and black. That causes the perceived color of the fabric to change based on the angle at which it's viewed. Very lovely, and appropriate to the time and place.
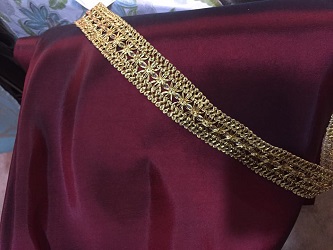
I also picked a 1.8" wide trim that is similar to the goldwork embroidery that would have been done at the time. Typically cord or thread wrapped in fine gold plated silver wire would be laid on the fabric and stitched or "couched" down with regular thread. It was not uncommon in the 16th century for pre-assembled trim to be sold and applied to dresses that a tailor made, or for dresses to be sent to an embroiderer after they were constructed. This embellishment along the edges and lines of the dress are called "guards".
I purchased pearls in a variety of sizes, linen for lining to match, wool, canvas, and stabilizer interfacing (to stiffen my bodice in lieu of carboard, see more info below). Though my linen is in fact real linen - because it wicks away sweat and breathes well - I did not purchase real gold trim, real pearls, or real silk for this project to avoid the expense. You know, Henry VIII spent around $3 million a year on his clothes. I just don't have that kind of budget.
Some historical garb creators refuse to use man-made fibers like polyester or acetate, but see no problem with using fake gold trim or faux pearls. Arguably, real silk is stronger, breathes better, and will singe vs. melt if exposed to a flame. These are very practical reasons to prefer the fabric. If the expense is no issue for you, I recommend silk for its practical benefits.
But if instead the goal is "complete authenticity" in materials, I'm afraid that's a fool's errand. Is it 100% silk? How about the right thread count? How was the thread spun? Is it hand woven? Did you make your own loom? Is it the right kind of loom? Is it made from the right kind of silk worm? Is it dyed with the right kind of vegetable based dye? Did you make the dye yourself? Is the fabric carbon dated to the 16th century and containing the isotopes unique to its location at that time? You can see how, taken to its ultimate conclusion, there is no such thing as "complete authenticity" in materials, unless you rob a museum.
Keep in mind - we're not trying to make counterfeit clothing to fool people with microscopes. Motivations to make historical garb range from "It's so pretty and I want one that fits me," to "I like the academic challenge," to "I need something to wear when I practice other historical arts and sciences at special events." If creating or finding the closest you can get to historically accurate materials is part of the enjoyment for you, do it. If you find a fabric of questionable fiber content at the discount fabric store that you think needs to be turned into a gown, use it. Do what works for you.
 One of the difficult things about making historical clothing is even finding suitable materials to begin with. For instance, real silk comes from silk worms, and certain species have gone extinct over the past 500 years.
A typical weave of silk found in stores today, called Shantung, has little bumps in it to prove to our modern eyes that it is an organic fiber including the cocoon in the making of the thread. Ironically even 100% polyester shantung has those bumps meant to make you think that a cocoon was involved.
But in the 16th century fabric with such lumps would have been consider low quality silk, unsuitable for nobles. They would have preferred the smooth appearance of what we'd perceive as inexpensive polyester taffeta and duchess satin.
Fabric would have been woven by hand on looms, the width of those looms varying from city to city, decade to decade, and also by the type of material woven. The width of the loom can affect where your seam lines would be on the garment.
The type of velvet of the time, very densely woven and made of 100% silk, is nearly impossible to find today, and of the three or so manufacturers worldwide the cost is hundreds of dollars a yard. Given that one dress can take six yards of fabric, that's a lot of money. Even if you're okay with using velvet that isn't made of silk, the looser density of modern weaves creates a very different appearance than you see in paintings, and the fabric is more likely to crush when sat on (silk is much stronger than man-made fibers).
Renaissance satins were thicker and heavier than our satins while not as shiny, and the lovely types of brocades easily found today with realistic depictions of flowers were not manufactured till later centuries. Out of frustration, many people resort to upholstery fabric, which may be much thicker and stiffer than the fabrics used at the time. There are few easy solutions.
Fortunately, lightweight wools worn by the middle and lower classes can be easier to find. Look for solid colors (no pinstripes or prints) or woven patterns in "vegetable dye" colors and weaves like gabardine. When going to a fabric store, look in the suiting section.
As for the undergarments, they most likely would have been made of 100% linen in a very fine "handkerchief" weight, which is incredibly difficult to find today. The closest I've found is 60% linen, 40% cotton "tissue linen" at Joann Fabrics. Most stores today carry thicker, easily wrinkled, coarser weaves of linen. Lord knows why. I think it's like the shantung phenomenon - that the coarseness is intended market the naturalness of the fiber to modern shoppers.
Undergarments could also have been made of cotton. Unlike in England where there was no domestic cotton production till the end of the 16th century and even then the domestic wool industry campaigned against it, cotton was very common in Italy in the 16th century and had been manufactured domestically since the Middle Ages. (Read more about the extensive Italian cotton industry here.)
Cotton would have been solid colored, not printed like we see in the Regency Period, and not painted like it was in India. Italian cotton was woven in a wide range of quality levels, and nearby Germany also produced a smaller range of low-end cotton fabrics that Italians would import. There were also a blend of linen and cotton called fustian, made with linen warps and cotton wefts and used for various purposes, including undergarments and linings.
Aside from the unavailability or unaffordability of the materials we can identify, there are also materials whose true identities may have been lost to time. In the 16th century, Italian women did not wear corsets or "stays" underneath their gowns and yet as can be seen in the portraits the bodices did not wrinkle like they would if made of just the soft outer fabric.
Based on 16th century descriptions, tailors reinforced the bodices with something that they referred to as "cardboard." Now, what comes to our mind at that word might be a Honey Nut Cheerios box or a corrugated U-Haul moving box, but what they actually meant was linen (the specific type or weave we don't know) reinforced with glue (the specific type or strength we also don't know).
Unfortunately, plant based fibers such as linen and cotton do not tend to survive the tests of time as well as animal based fibers, like silk and wool, which are made of proteins. Even if we had extant examples of the "cardboard" that were relatively un-decayed and intact, it is likely it would no longer have the consistency and stiffness it did when first made, and though a test of its material content might tell us some valuable information about the type of linen and glue used, it might not allow us to accurately deduce and reproduce its manufacturing process.
This leaves us with looking at the evidence of the paintings, perceiving the level of stiffness and give portrayed, and substituting modern materials that can behave in as similar a way as possible. This may be by using modern linen and modern glue, or reinforcing a bodice with other materials. I discuss my solution to this in depth below.
 But what about existing Italian dresses from that century, you may ask. Can't they be looked at for information? Yes... and no.
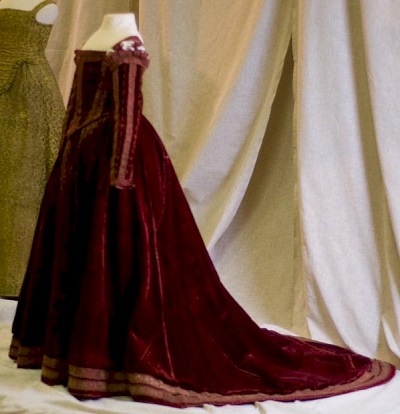
There are only three extant Italian dresses from the 16th century: the crimson velvet Pisa dress made for one of Eleonora Di Toledo's ladies in waiting that was kept on a wooden statue of the Virgin Mary for several centuries and decayed to the point of great fragility; Eleonora Di Toledo's ivory funeral dress, buried with her and greatly decayed; and the third is a plain house dress made of wool and linen. (I don't count the funeral dress of Giulia Varano because it's barely more than dust at this point.)
None of these could be said to be a good example of "cardboard" stiffness due to the fragility of age alone. The first two dresses are from around 1560 and meant to be worn at court and have trains for that purpose. To the left you can see the burgundy velvet Pisa court gown on a dress form, and below you can see the remaining portions of Eleonora's funeral gown removed from her decaying corpse. (Injury: dying at 40 from malaria. Added insult: having your grave robbed by historians and now being dead AND naked.)
As a pair these two court gowns are a great example of the pattern pieces laid out and a similar garment fully assembled. Also due to their association with the ruling house of Florence they have received a great deal of attention and been thoroughly documented by historical costumers. Check out Janet Arnold's beautifully illustrated book "Patterns of Fashion 3: The Cut and Construction of Clothes for Men and Women C. 1560-1620".
However, it is very important to not extrapolate too far from them. Even though these two dresses were likely made by the same tailor, in the same five year time period, for the same household, for the same purpose (presentation at a royal court), the two dresses are not identical in cut and construction method or even materials used.
There is no evidence to support the assumption that either of their cut and construction methods was ubiquitous for the entire 16th century, especially since the appearance of gowns in many portraits from that century vary widely from the appearance of the two extant court gowns.

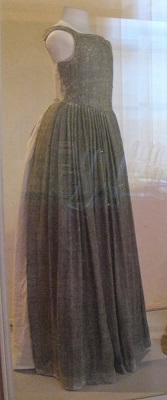 The third gown is an example of a non-court gown that would have been worn in more practical circumstances. It has a much simpler construction, the skirt of which is made of rectangular panels. It is from the mid or late 1500s and was found in the San Matteo monastery in Pisa.
Like the burgundy velvet Pisa gown, this dress was also preserved on the statue of a saint, and because of how it was tied in place on the statue the original back of the bodice and skirt are missing. The back of the dress has been restored in a way consistent with the rest of the gown, and it is on permanent display at the Palazzo Reale in Pisa.
Sadly to my knowledge there is not more documentation on it, even though of the three extant gowns this type was likely worn more often in the day to day lives of people. Instead various books and patterns that focus on the time default to the prior two court gowns, and often fail to mention the third at all.
With so few extant gowns, and yet so many paintings of the era, it is important to weigh evidence realistically and to apply such evidence appropriately. Unless you are specifically making a 1560s court gown for Eleonora Di Toledo's household, you should probably use other valuable resources than the extensive documentation on the two Eleonora di Toledo household court gowns - like the third gown, paintings of women from a variety of social classes and locations, detailed estate inventories and books about them, woodblock prints, personal letters, sumptuary laws, and publications (even the satirical ones) on the fashion from the era in question.
There was an actual "Tailor's Pattern Book" by Juan de Alcega published in Spain in 1589, and even though Spanish fashions were different from Italian fashions in certain ways, to read the book is to put yourself in the mind of a tailor of the century. An Englishman named Andrew Borde published the "Fyrst boke of the Introduction of knowledge" in 1550, discussing in part fashions all over Europe, as well as giving several phrases in different languages to aid travelers. Though, take Andrew's opinions with a grain of salt - he'd probably fail a geography test. Here's a link to searchable text, but it doesn't have the pictures. Sadly his treatise on beards (he was against them) has been lost to the ages.
There is a wealth of knowledge out there. Use all of it.
"And as I know that many have written on this point,
I expect I shall be considered presumptuous in mentioning it again,
especially as in discussing it I shall depart from the methods of other people."
Nicolo Machiavelli, The Prince.
And to that end, let's take a moment to discuss a HUGE pet peeve of mine - skirt gores. Gores are panels of fabric, in this case roughly triangular, that are added between rectangular panels to create a specific shape. Imagine a long rectangle of fabric, sewn together on its short edges to create a wide tube. Gather the top edge of your tube, and you have a skirt that is simple, an economical use of fabric, and true in appearance to the dozens of paintings of the era, the skirts of which were pleated in various ways over the decades.
Fabrics were sometimes woven with precious metals in them or with complicated brocades. Italian families would at times go into great debt to afford the exquisite fabrics used for wedding gowns (which were made in all colors), showing off their family's importance and wealth to the rest of society, and then selling the fabric from the dress after the wedding.
Clothing was a huge expense, and considered an investment in socially mobile 16th century Italy, where the clothing you wore could directly impact who you might be able to marry. Author Carole Frick in "Dressing Renaissance Florence" estimates that Florentines would spend up to 40% of their total wealth on clothes, and yet according to Elizabeth Birbari's book "Dress in Italian Painting", at the time even wealthy people would only purchase one new set of garments per year.
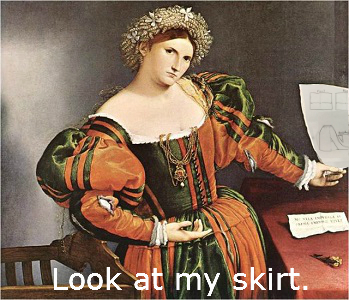
The Venetian artist Lorenzo Lotto was said to have borrowed money to purchase a woolen cloak for 8.5 ducats, which would have been the equivalent to 43 days of labor. Think about that. At even the modest estimate of $10 an hour and 8 hours days, that would be equivalent to $3,440 for a cloak. This is the historical context and economic reality in which we must understand 16th century clothing construction.
Meanwhile in the nearby Ottoman empire at the same time, expensive fabric would be weighed first, given to the tailor, and weighed after to ensure no scraps were stolen. Janet Arnold mentions the same concern in Europe in her "Patterns of Fashion 3" book, referring to the stolen scraps as "cabbage," and that the theft of such cabbage was a genuine concern. The less a fabric is cut in the first place, the less risk of waste or theft there is, and the more resale value there is for the fabric afterwards.
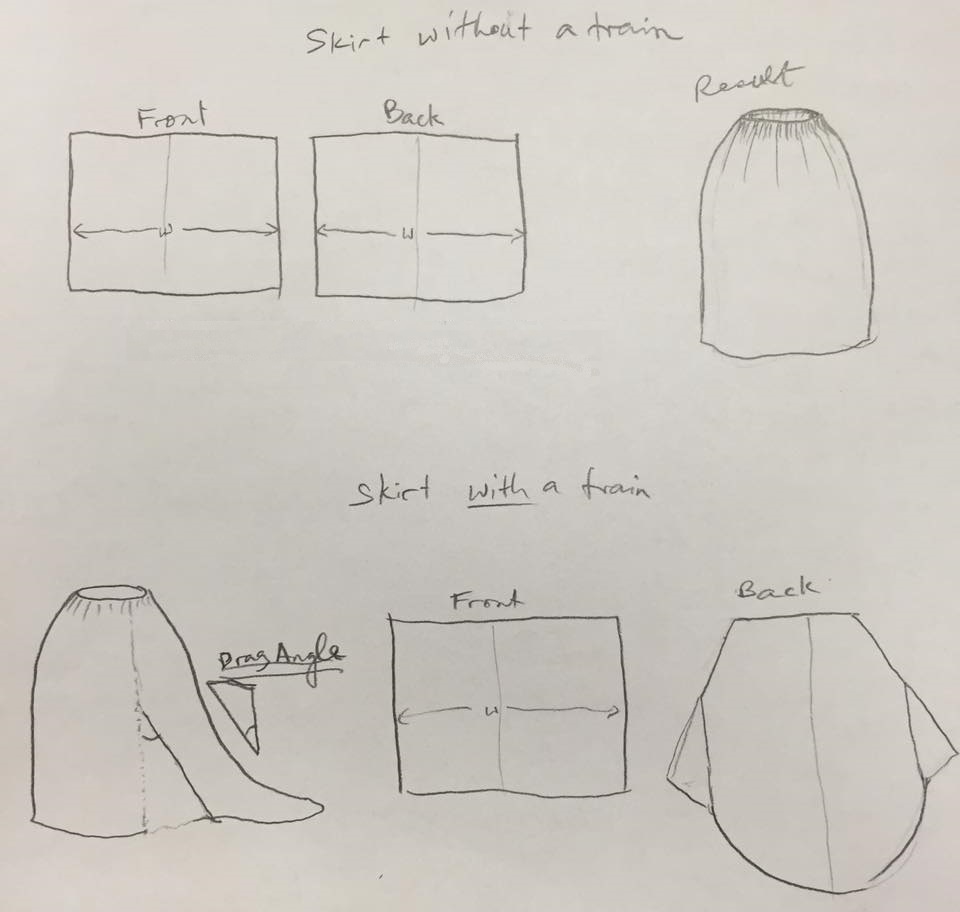
So knowing that gores have an associated cost and risk, what is their benefit? Let's consider the purpose of the skirt gores in the two extant court gowns. The long backs of these dresses, called trains, would have dragged on the floor. If you had our rectangular tube gathered skirt from before and merely slapped a train on the back of it, as it dragged it would pull the sides of the skirt backwards, distorting the shape of the skirt. There would also be a point of stress on the spot at which the train met the normal skirt hem on either side, with a higher risk of tearing. There would not be the graceful slope of the train at the back, but rather something closer to a right angle. This is not the line that we see in the court dresses. Instead, the court dresses have the triangular gores added to them on either side of the back panel which compensate for the drag angle of the train and spread out the stress. Here is an illustration of what I mean:
Keep in mind, this was a society moved by horses, not internal combustion engines, and where chamber pots were thrown out the window onto the street. Trains if worn outdoors would get dragged in sewage. Court gowns were worn at court indoors, or if briefly outdoors with a servant carrying the train behind you. To have a train is a sign of status to show that: 1. you can afford the extra fabric, 2. you can afford the carriage to drive you through the city, 3. you can afford the servants to carry your train till you can get inside, 4. you are part of the nobility allowed to present at court. In order to display that status, which has both political and economical value in the culture of the day, people would choose to allow their resource of expensive material to be cut and formed as needed to meet that function and provide the desired benefit.
Gores are part of the cost of having a court gown, and a court gown is part of the cost of being a well-to-do noble. However, since many of us creating these costumes do not have those handy servants, and yet we wish to wear our outfits outdoors where mud may lie in wait, we often very sensibly create gowns without trains. And it is realistic to believe that not every gown a noble woman wore was intended for court, because there are documented inventories for clothing owned by the households of the time.
 Now you may ask me - what would happen if the gores were present in non-trained skirts? What does that look like? Okay, I'm going to help you visualize this. You're in a bathroom with a standard sized imbedded tub and shower, and there is a curtain rod. Put four shower curtains on the curtain rod, side by side. That's a lot of fabric, right? It's kind of like a gathered skirt made of rectangular panels.
Now, in the middle of the far right curtain, cut the curtain from the center bottom to the center top, and then add a 20-40 degree gore to it of the same material. It will look like a pie slice, point at the top, wider at the bottom. But the curtain material is all going to continue to hang straight down regardless, just like a skirt without a train would. Nothing is pulling it to the side to reveal that extra gore (like a train would), so it would just blend in. There are so many shower curtains so densely gathered, that the bit of extra fabric isn't even noticeable... until of course you try to sell those shower curtains to somebody and they don't want that one because it's been cut up in the middle. So, no opportunity in the function of the piece to show off the gore, and only the cost in damaging the resale value of the material.
So... if you're not making a dress with a train ... why would you include train-enabling skirt gores? Why would you reduce the resale value of your expensive fabric in the competitive economy of 16th century Italy, increase the labor time of the tailor who would sew every seam by hand and the risk that he might steal expensive fabric from you, and due to the abundance of pleated fabric in the skirt - create no perceivable difference in appearance by the presence of gores in a non-trained skirt, providing no opportunity to display socio economic status? You wouldn't. You simply would not do it.
There is no reason to conclude that gores were used in non-trained gathered skirt simply because two dresses with trains happened to survive. In fact the only extant dress without a train does not have gores. The existing evidence does not support such a leap.
But people making 16th century Italian dresses without trains put in gores all the time. Why, you ask? I believe it is social pressure. Regardless of the field, whenever there is social status or authority within a society to be gained by creating work that will be judged by peers, there is a great deal of pressure within the academic circle to be able to point to documentation in support of your work, even (apparently) when that documentation is not correctly applied. Read scientific papers anywhere and you'll see the same phenomenon. (How about all those articles saying you shouldn't eat cholesterol, when the study they reference did not actually conclude that, and in reality dietary cholesterol has no bearing on blood cholesterol levels.)
Even though there are other centuries for which we don't have extant pieces where we have to rely on the other evidence that exists, because there are two extant pieces for this century and location that have been extensively documented they take on an unwarranted gravitational pull. Even the presence of another extant gown that does not have a train and also does not have skirt gores does not seem to be sufficient to dispel this broadly held assumption. Because of the mere existence of two documented court gowns, people have incorrectly extrapolated them to cover an entire century and non-court gown applications, ignoring all other evidence, because such documentation is emotionally comforting. And I firmly disagree. Form follows function, and if you don't require that function, it does not take that form.
My project is a 1540's dress without a train that I could wear outdoors without a servant, and therefore there would be no gores in my skirt. I suppose if someone demands for my documentation on that, I could show them my mechanical engineering degree, hundreds of paintings from the era, a history of the 16th century Silk Road textile trade, and a brief explanation of Occam's Razor: keep it simple.
 Okay, so we don't know what kind of linen, what kind of glue, or what manufacturing process was applied to make the "cardboard" that stiffened bodices in 16th century Italian gowns. But, we do know what many of those gowns were supposed to look like - and by "supposed to" I mean, we don't have photographs, we have oil paintings and wood block prints.
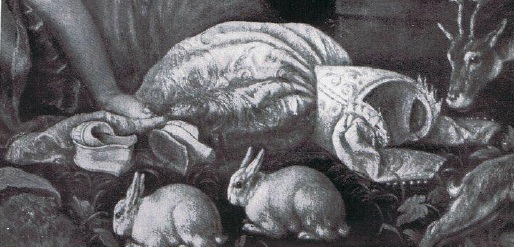
In this black and white print in which we can see a dress on the floor, it is clear that the bodice is stiff enough that it almost looks like a body is still inside it, whereas the sleeves and skirt drape differently. This seems to be a clear indication of the level of stiffness that the bodices of the time would have had, in addition to all the other portraits of the rich and the poor alike showing fairly flat fronted bodices without signs of creases. (Read this awesome paper by La Signora Onorata Katerina da Brescia on the subject.)
 You may wonder since these are paintings and not photographs, how faithfully can we assume they depict their subjects. People think "Photoshop" is a purely modern concept, but let me tell you, you've never seen anyone in an oil painting with a bad hair day, a pimple, underarm sweat stains, or caught mid blink. And though the New Testament does not mention crunches specifically, Jesus has a rocking six pack.
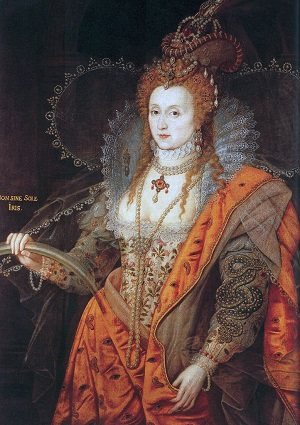
Make no mistake - paintings were propaganda - idealized images intended to expand the political capitol of the subject or their associations. But that in and of itself does not mean they are not valid historical documentation of fashion. The liberties taken would have been put in for a specific purpose, like making Queen Elizabeth I look some 30 years younger than she was in the painting where she's holding a rainbow in her hand. Pretty sure you can't hold rainbows. Pretty sure a 60 something year old queen in the 16th century did not have easy access to facelifts.
But the level of detail and realism in these paintings was ALSO a display of status - look how talented and capable this artist is and how we can afford to hire the best. You see the details of lace, the presence of seams, the weight of fabric, and even the intricacies of how hair was styled. And considering the great cost nobles would have invested in their clothing and jewelry, they would have wanted the artist to have depicted every single detail. These paintings would have been viewed by contemporaries quite familiar with the fashion of the time, and it's likely that what was depicted in paintings of rulers would then spread as fashion trends to the nobles under them.
 To include the detail of a seam in a painting in a place it logically could not be when it would be the easiest thing in the world to have an actual gown in front of you for reference, and then to present that painting to an audience who would notice such a discrepancy, would be to make the painter and the wealthy subject of the portrait objects of ridicule. "He can't even paint a dress?"
Not to mention that it would be adding difficulty without benefit if the artist were asked to invent such details instead of relying on an existing dress in front of him or her to faithfully portray. Change the color - easy. Make it three strands of pearls instead of one - sure! But invent how such a fabric would drape and how light would reflect on it? Not so easy.
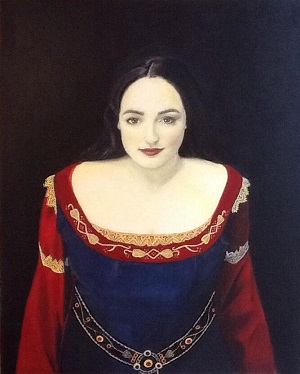
I say this not only as an experienced dress maker, but as an experienced portrait artist. This is an oil painting I did of myself in a costume I made for a LARP, which was a variation on the Arwen Blood Red gown from Lord of the Rings. You can see exactly where my princess seams catch the light on the very fine blue corduroy just under the red velvet neckline.
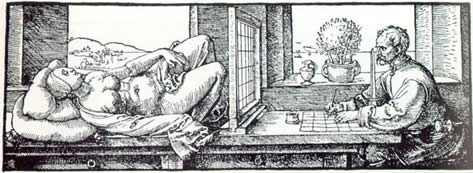 During the Italian Renaissance, painters would use an apparatus with a rectangular frame and metal wires strung in a grid formation, with a view port positioned at a set distance in front of the frame. View your subject through that apparatus and you'd see a grid in front of it. Then you could lightly sketch a corresponding grid on your canvas and draw each square of the subject at a time, able to keep both the proportions and perspective absolutely perfect, while simultaneously documenting all the details in your charcoal under-drawing. Here is a translation of an extract from "On Painting" by Leon Battista Alberti, written in 15th century Italy, where the author describes the use of drawing grids.
I use the same method by printing digital photos of my subjects and drawing a grid on them with a pencil and ruler. So in my well educated opinion, the paintings of Italian gowns are a valuable historical resource for gauging the stiffness of the "cardboard" involved, as well as other important details of dress construction. They're probably more realistic than the photos you'd find in any modern fashion magazine.
 Now let me just point out that the verisimilitude of paintings for fashion is not always the case. A prime example of when the painter is less trustworthy is in the Victorian Orientalist movement, when Europeans would depict people from other cultures (the Middle East) and other times (Arthurian legends) - subject matter that was foreign to them and interpretations of those subjects through the lens of their own cultural perspective.
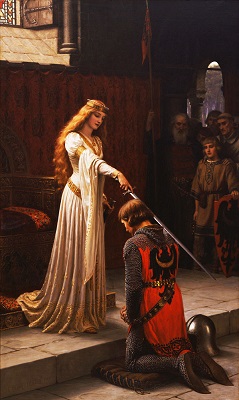
When Edmund Blair Leighton painted "The Accolade" in 1901, he had his models wear rented costumes so that he could depict the drape of fabric as realistically as possible - but that doesn't change the fact that the costumes were made by Victorians with Victorian dressmaking practices, preferences, and flights of fancy, and they were not historically accurate Medieval garb. Is that an S shaped corset under there? Possibly.
It may not occur to the average person, but in the Renaissance when artists made paintings depicting even Biblical scenes, very often the saints were shown in the fashion of the day, and not what the people would have worn in history. Imagine seeing the Virgin Mary in skinny jeans and a knit top, holding a baby Jesus wearing Pooh Bear footy-pajamas.
But Victorians, on the other hand, had a fetish for the "exotic", purchasing actual mummies to unwrap (no really) at dinner parties, and literally destroying extant historical garments by altering and wearing them to fancy dress parties. Don't trust the Victorians. They're jerks. But when a painting is made for 16th century Italians by a 16th century Italian... we no longer need to worry that there is a miscommunication of cultures.
 I've read about the efforts of many other people online and their solutions to the cardboard question - what to use. Some people choose to make fully boned corsets to wear under their gowns, and ultimately if that's what an individual prefers for the sake of comfort or to cajole their body into a particular shape, more power to them.
Others have tried to stay more faithful to the historical gowns which were stiffened themselves and not (to our knowledge) worn with stiffened undergarments. Methods of stiffening the bodice have included making small fabric casings for plastic zip-ties, sewing down rows of rope, adding plastic or metal boning to the bodice, using layers of stiff buckram and/or canvas, and even making your own glue reinforced linen. You can see the application of many of these solutions by various people on the website RealmOfVenus.com.
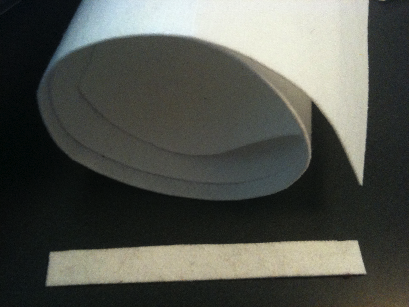
I chose to use stabilizer interfacing, which coincidentally is what I use to make bellydance costumes. You could say that this entire costume project is an experiment to determine if stabilizer is an effective solution. Interestingly, on the strip of paper that stabilizer is labeled with it actually says among other things that it is to be used "in place of cardboard".
This was my first attempt at this type of gown, so the first thing I did (before I even had a pattern) was attempt to drape and fit a bodice. Patterns are an awesome starting point, but bodies come in an infinite variety of shapes and sizes, and having experience making bodices before, all I really needed to know was where the lines should be (waistline, neckline, side seams).
Now in my Ghawazee Coat tutorial I show a method of making your own torso pattern out of soft fabric, but in this case the stiffness of the bodice material will very directly affect the fit and the resulting shapes involved. If the garment is to be stiff, the mock-up material also needs to be stiff.
An easy trick is to put on a solid colored, fitted, knit shirt (not white) and put masking tape on it where you want your seams to be. This shows you the general shapes your pieces will end up as. Finding a piece of stabilizer big enough to fill that space, I took my stabilizer and pressed it against my front, and I drew on it with sharpie over where my masking tape was on my shirt. I then folded my stabilizer front panel in half along the center front line, held it up to the light, and cut out the average of the lines on the right and left sides. This makes the panel symmetrical.
I couldn't as easily do this on my own back, so I used a measuring tape to figure out the desired height from waist to top back, between my shoulders, and across the back waist to where the front panel ended at the side-back seams, and then I cut out that trapezoid. My stabilizer-only panels, front and back, omitted shoulder straps at this point.
After trimming and adjusting those stabilizer panels, I reinforced them. In the image below, my bodice under-structure is a single layer of stabilizer cut to the final shape of the piece (no seam allowances), covered in canvas (with a seam allowance) and edged in grosgrain ribbon along the waist and shoulder straps, which were added after the fitting was done. The canvas is intended to bear the strain of tension on the bodice, with extra help at the points of the most stress from grosgrain ribbon.
Stabilizer is best thought of as very stiff felt - a bunch of fibers going in all directions, unlike a more organized weave. For structural purposes, think of it like concrete. It's stiff and it resists compression, whereas the grosgrain ribbon and canvas are like our iron rebar reinforcing the concrete and taking on the strain (pulling force). Without the canvas and grosgrain ribbon, the thin taffeta would be left to bear the strain of being tightly laced up, and though actual silk taffeta may in fact be up to the task, polyester taffeta would probably not fare well over time.
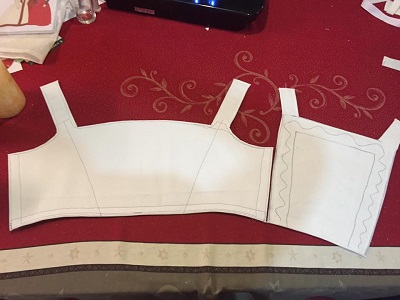 The bodice has a front panel and back panel, with side back seams that just meet (no overlap) and would be laced when finished. It took me two front bodice mock-ups and two days of finagling to get the fit just right. Final fittings were done without a bra on underneath, while wearing a light chemise, with trim placement drawn on in marker for perspective.
Not wanting to put holes in the side seams until it was fully assembled, I held the sides of my bodice closed with extra scraps of fabric and straight pins for the fitting. I used grosgrain ribbon alone for the shoulder straps while fitting the bodice pieces, and only after the bodice fit was perfected did I cut out stabilizer and the rest to assemble and attach my straps to ensure they would be attached at the correct angle for my curves. The single layer of stabilizer seemed at this point to have just the right amount of stiffness and give to reproduce the appearance in the paintings, but there would be no way to be sure until the strain of being laced up was applied.
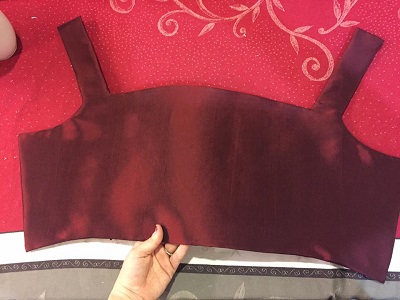 Once the structure of my bodice pieces were complete, I covered them in my changeable wine colored taffeta. For each panel, a single piece of taffeta was cut to match with a half inch seam allowance on the edges, except for the sides of the bodices where the lacing holes would go. There I made the seam allowance an inch or more so that the lacing holes would not damage any stitches.
The seam allowance was folded over to the back of the bodice and hand stitched in place with a spiral stitch which I believe is also referred to as a "slip stitch". This is just like covering a bellydance costume in decorative fabric. The stitches are not visible on the outside of the bodice panels.
Once my front and back bodice panels were covered, I hand stitched them together at the shoulder seams, meeting the front and back straps without overlapping them. Fortunately, since my attachment stitches included the combined strength of all the layers (canvas, stabilizer, grosgrain and taffeta), I am not concerned about the strain experienced at these points.
 My "goldwork" trim is actually not too dissimilar to the appearance of actual goldwork, a type of embroidery I have done in the past on other projects (sometimes with real gold) and was widely used on the clothing of nobles, religious figures, and liturgical textiles. Typically the gold cord would be laid onto the fabric in interesting patterns, and stitched down as you went with regular thread. The pattern could be carefully marked on the fabric underneath ahead of time with soap or chalk to keep it even and consistent.
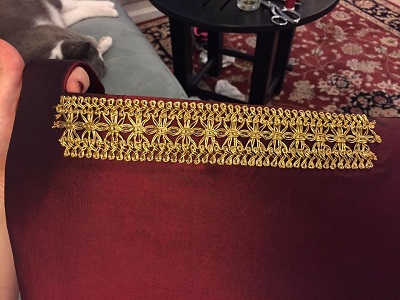
In the case of my pre-made trim, it's been held together in its formation with invisible plastic thread. Yay industrial revolution and material science! Pinning the trim in place, I carefully centered it and trimmed the edges in locations less likely to unravel, and which would line up with the placement of the remaining trim. There is a single piece on the top of the back panel, another across the top of the front panel, one going from the front waistline to the back waistline on the right (over the shoulder strap) and another on the left. The raw edges of the side pieces are cut an inch longer and folded to the back of the bodice panels where they are secured in place and kept from unraveling with hand stitches.
The trim was attached with burgundy thread with a single stitch by hand over the invisible plastic thread between each loop on the outer edge. Yes, it took a while to do. But the invisibility of the attachment was worth the time and effort. Is that a historically accurate method? Yes. Couching - which is using thread to hold another embellishment in place - could be done with contrasting colored thread or gold-colored thread, and could be done where the thread is purposefully seen to create a visual affect, or where the thread is hidden strategically under loops and intersections to be less noticeable. It's a choice you can make to suit your own tastes.
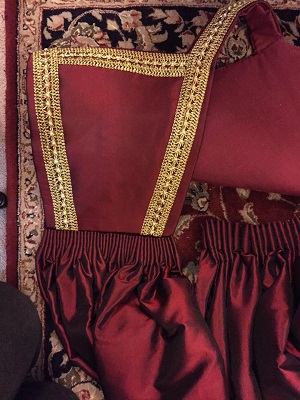
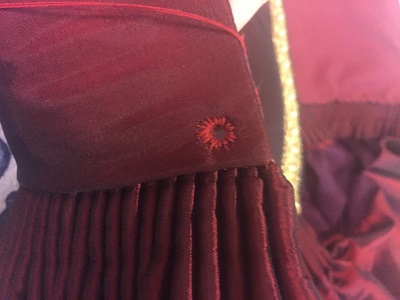
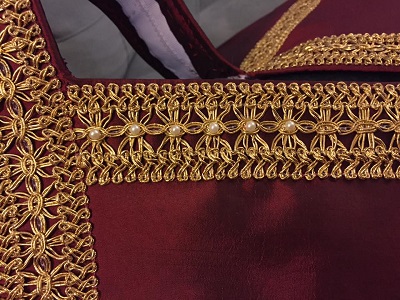 Once all the trim was attached to my bodice, it appeared to me that the centers of the starburst like formations in my gold trim could use some pearls. As you can see in this image, it almost looks like the trim is empty without them. So using white Button-and-Carpet thread and small faux pearls, I filled them in all along the trim on the bodice. This had the added benefit of securing the trim in place along the centerline, whereas the previous stitches were just on the sides of the trim.
Though I've used all the same size pearls on the bodice, I could choose to vary the use of pearls elsewhere on the dress - say by alternating the size of pearls, or skipping starburst, or forgoing them altogether. I could even break the goldwork trim up into three strips - the center starbursts and the outer figure 8 twists, which are only secured together by the plastic thread. Fortunately, at the point that the pearls were added, the lining had not yet been attached.
This is a spot in which I definitely veer away from historical accuracy. Tailors making dresses were not also the embroiderers embellishing them, and attachment of expensive goldwork might be desired to be easily removed from one gown and then later attached to another, making it preferable that the stitches holding the trim on could be easily accessible over the lining on the inside of the dress. But this "goldwork" is not a fortune in real gold, and above all I love comfort - so having my stitches protected from friction and my skin protected from stitches is the preferred solution for me.
If at this point you're thinking, "good lord that's a lot of hand sewing," then let me assure you - this is child's play compared to making bellydance costumes. I could probably whip out four or five of these dresses in the same time it takes to make one bedlah. Fo' realz yo. Check this shit out.
 To decorate the edge of my neckline, I cut inch wide strips of taffeta, cut on the bias. The bias means it is cut at a 45 degree angle to the weave, allowing the fabric to stretch a bit as needed, and for its edges to be less likely to fray since the cuts would not be parallel to the weave.
I folded the bias tape in half (but did not iron it) and did a machine straight stitch along the raw edges just to keep it in place - this is called a basting stitch (which is funny because it looks nothing like basting a turkey). Then I cut the bias tape at even intervals only part of the way through, which is called pinking (which is funny because it's not pink). This creates a lovely textured edge. I then attached the trim to the inside of my neckline by hand.
You may wonder - why would you want such raw edges exposed and vulnerable to be snagged and frayed? That's a good question. It is somewhat silly, isn't it. The thing is - it was the style. Ever since a certain Swiss army survived a great battle in the 15th century, and repaired their slashed and torn clothing with tent canvas, the Renaissance fashion trend of "slashing" exploded all over Europe faster than a bout of syphilis.
 Perfectly good fabric would be slashed and pinked in patterns, often with contrasting fabric pulled through the slashes to make them more noticeable. I'm sure some early 15th century parents threw up their hands in exasperation and exclaimed "kids today!"
With my pinked trim attached, I cut out linen to line the inside of my bodice. To conserve fabric, I have a single piece of linen for each shoulder strap, and a piece each for the rest of the front and back bodice panels. I folded the seam allowance under, sandwiched between the lining and the bodice panels, and spiral stitched it all together.
I left the waistline un-attached though for the attachment of the skirt. I made my seam allowance for the bottom of the lining panels extra long in case I wanted to give the top of my gathered skirt more protection. I suppose I could have at this point made the holes for my spiral lacing, but since the bottom most holes could be very close to where the skirt would be attached, I figured I may as well wait until the skirt was sewn on.
At this point it was time to start making the skirt. It's important to note that changeable taffeta has a definite vertical and horizontal alignment, so I made sure that the panels of my skirt and the fabric for the bodice were aligned with each other. As I explained in great detail in my Skirt Gore Rant, my skirt panels were to be simple rectangles without any triangular gores involved. Though skirts were not typically lined at the time, since my polyester taffeta may not have the same heft and body as silk taffeta, let alone breathability, I decided to back the fabric in a layer of linen.
You could say that "backing" vs "lining" is semantics, but let me explain what I mean by the difference. When fabric is backed, you baste the edges of the two fabrics and then treat them like one fabric going forward. This is a great solution if your decorative outer fabric is delicate and you want something stronger to reinforce it. When something is lined, it's more like you make an outer garment and a separate inner garment and then attach the two together when each is mostly done. A skirt lining usually hangs free at the hem of the skirt from outer fabric, whereas a backing would be included in the hem of the outer fabric.
I cut out three panels of taffeta and sewed them together, and then cut out three panels of linen and sewed them together, and then backed the taffeta panels with the linen panels, basting the raw edges. The length of the panels was roughly from where the waist of the bodice would be to the floor plus about seven inches.
The added length would be to fold down the top two inches over a two inch wide strip of wool which pads the pleating at the waistline, and the bottom two inches would be folded over another strip of wool which would stiffen the hem making it less likely to interfere with my legs. Any extra length could be taken up with a fold sewn down just above the trim on the skirt hem - a common style at the time. Think of it as the equivalent of cuffed pants.
Interesting twist - the taffeta fabric width was wider than the linen fabric on the bolts, so when I laid out my long attached panels on the floor to pin the taffeta and linen together at the edges (seams facing in), I centered the linen on the taffeta and cut off the extra taffeta on the sides, reserving the fabric for the sleeves. Why didn't I just line up one raw edge and cut off the extra taffeta on the other end? Because then my skirt seams would not be symmetrical, and I'm the kind of nut who that would bother.
Every step on the skirt was simple, but due to the enormous amount of fabric, even with a sewing machine each step took a while. First, baste the linen to the taffeta. Then cut out a whole bunch of two inch wide strips of wool. Pin the wool to the top edges of the skirt panels, zigzag stitch the top and bottom edges of the wool to the skirt. If you want to lock away the raw edges of your skirt panels, do so at this point by folding them under before the zigzag stitch. Pin the wool to the bottom edge, zigzag the crap out of that too.
To stiffen the bottom edges of the skirt making it less likely to tangle between your legs as you walk, fold up the bottom edge of the skirt with the wool on it making sure the edge of the wool is at the fold, and pin the gold trim to the outside of the hem, which is difficult considering how many layers of fabric we're talking at this point. Straight stitch the trim and the wool hem in place simultaneously with yellow top thread and a dark bobbin thread on the top and bottom edges of the trim.
To thicken the eventual pleats at the waistline, fold down the top edge of the skirt so that the wool edge lines up at the fold, and baste it closed at the raw side edges. At this point, my modern sense of quality dictated a French seam to turn my long rectangle into a tube.
Now, as I've mentioned before, Italian Renaissance tailors would use every last scrap of fabric and avoid cutting it as much as possible, so their skirt panel seams would often be the selvage edges of the fabric with perhaps only a quarter inch or less seam allowance. There is no need to reinforce or protect such a seam, because the selvage edge - the woven shut sides of the fabric - will not unravel. But to back my taffeta in linen while keeping my panel seams centered, I was left with two raw edges of taffeta. And since my skirt was backed and not lined, it's not like my raw seams would be protected by a lining.
But this is where a "French seam" can save the day. Sew your panels together, good sides out, sewing a straight stitch very close to the raw edge. Then turn the panels good sides in and sew the seam again a little further from the previous stitch. Bam - your raw edges are locked away and protected. There is evidence that what we call French seams were used in a variety of cultures and times, as far back as the Vikings, which is long before the 16th century. But I do not know of this seam being used in Florentine skirts. I determined to center my French seam on the center back of the dress, so that the front of the skirt would be the center of a solid panel.
 Originally, I thought I'd have my seams lined up with the side back spiral lacing of the bodice, but after crunching the numbers, there was no easy way to do this AND have my skirt panels all be selvage edged, AND not have a seam in the center front of the skirt. I'm an engineer. I know math. So my solution was to make a three paneled skirt, center the back seam, and cut the side back openings where no seam was present. This worked out beautifully.
Knowing the bottom edge of my back bodice panel was nine inches wide, I calculated that the proportional amount of skirt was 42 inches, so I pinned the taffeta and linen together at 21 inches on either side of the French seam, and cut it very carefully in a straight line from the top edge down eight inches. Then I trimmed the wool 1/4 an inch in on those raw edges, folded under the raw taffeta and linen, and spiral stitched them shut. I had to trim the wool because it would have been too bulky in the seam. Once my two back side skirt vents were finished, I could pleat the skirt.
 There were several types of methods used to gather a skirt in the time period - box pleats, knife pleats, rolled pleats, simple gathers, and cartridge pleats, among others. I chose cartridge pleats because they were often seen in the 1540s and because of all of the other types of gathers, cartridge pleats are the only one that cannot be done by a machine. For that reason, cartridge pleats were rarely seen after the Industrial Revolution, and though there's nothing wrong with the other solutions, that makes them more appealing to me for this application.
In order to do it you thread a needle with a very long piece of very strong thread. I used red Button-and-Carpet thread and doubled it. You mark your fabric at even intervals and sew a straight stitch, what some call a running stitch, in and out at those intervals. Then you do a second and a third long thread maybe a quarter inch below the previous stitch, being sure to go in and out at the same intervals. When you drawn your threads taunt and gather the fabric along the threads, the result is cartridge pleats.
Of course the chosen length of your intervals can vary. And lining the top edge of your fabric in thick wool or felt, as I did, will help those pleats look fuller. I started by marking the inside of my skirt waistband with a gold pen at one inch intervals. See, the difficulty is that it's hard to guess how many inches long pleated fabric will be based on its non-pleated length and thickness. Both variables, as well as the stiffness of the fabric where folded, and the interval of the straight stitch, will determine the end result. We could derive a mathematical formula to reflect the interactions of these variables. It's doable. Or, we could rely on empirical evidence - in other words, give it a shot and see what happens.
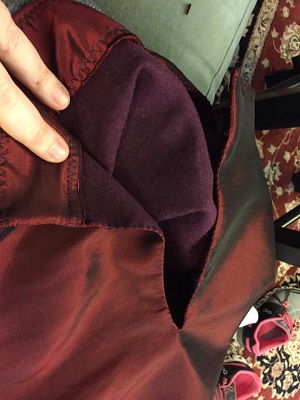
 In this photo I show two different cartridge pleating intervals. On the right, you can see the result of one inch intervals, which means that every inch my sewing needle either went into the fabric or out of the fabric, alternating. The skirt panel on the right is the front of the skirt, and the threads were pulled just tight enough to make them match the length of the front bodice panel waistline. You want the two the be the same length for when you sew them together. On the left is the back of the skirt merely lined up with the back bodice panel, and this part of the skirt was pleated at half inch intervals. The smaller pleats are more densely packed, and what you can't see is that the pleats are also less thick.
Logically, the one inch pleats are one inch thick, and the half inch pleats are half an inch thick. The thickness won't directly affect the fit at the waistline because only the top outer edge of the pleats is sewn to the inside bottom edge of the bodice. You could actually hold the top of the skirt at a right angle to the bodice while sewing it together. The skirt then puffs out from the body at less than a right angle.
I decided I preferred the look of the half inch pleats. I found the easiest way to do the cartridge pleats was to have doubled Button-and-Carpet thread that was a bit longer than the full width of the panels. I sewed three rows of the thread at the half inch intervals with about a quarter inch between each row. Once the pleats were gathered and compacted along those threads, I double knotted them and cut off the excess. Fortunately that excess thread, of which there is a great deal, is not wasted - I set them aside and used them to attached the skirt and to make my lacing holes.
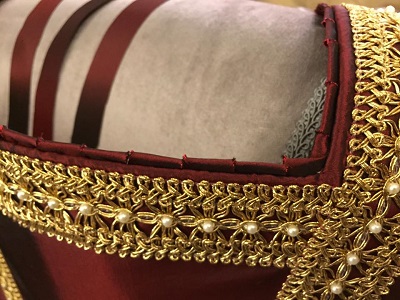
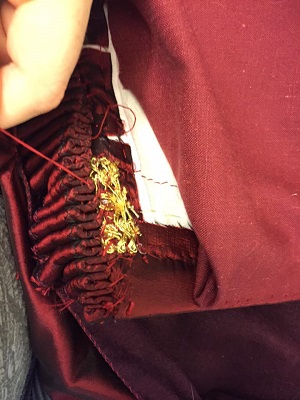 Once the whole skirt was cartridge pleated at the half inch interval, I lined it up with the bottom edges of my bodice panels and hand sewed them together with red Button-and-Carpet thread, catching just the top front edge of the pleats. In this photo you can see the folded-over cut edge of the goldwork trim on the inside of the back bodice panel, as well as the white of the stabilizer interfacing reinforcing the bodice.
As you know, I had previously lined the bodice with linen, but I left the bottom edge of the lining unattached. The lining could just be folded up or pinned away while you're attaching your skirt to keep it from interfering. I made sure my stitches did not just catch the thin taffeta inside the bodice, but were solidly through the canvas, grosgrain ribbon, and stabilizer as well. Otherwise the weight of the skirt could simply cause the stitches to rip through the taffeta.
With the thickness of the fabric involved, at times I used needle nose pliers to help pull my needle through. Now the first time I attached the skirt, I actually sewed the whole thing on a quarter inch too high inside the bodice, which caused the bottom edge of my bodice to bulge when I tried it on (without lacing, but held in place by hand). So I ended up having to snip off my stitches and reattach the skirt just on the edge as you see in this photo. Remember that it's okay to not get things perfect the first time. And this is why you should always check the fit after a major step before moving on. Had I not checked it, attached the lining and moved on to making the lacing holes, it might have been even harder to fix.
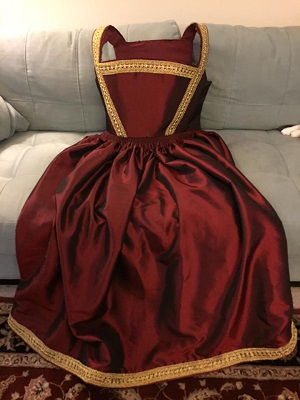
When a bodice and a skirt love each other very much,
they share a special kind of hug and become a dress.
 Unlike stitches that can be undone and redone, the next step was a place of no return: lacing holes. To poke a hole into your lovely garment that's taken countless hours to make is a giant leap of faith. You need to decide what lacing scheme you want, measure the space, calculate the desired distance between the holes, measure and mark them on the inside of the bodice, and measure them again to be certain.
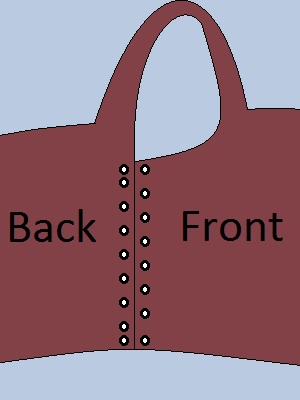
Let's take a moment to discuss the first step - the lacing scheme. Whenever you see costumes sold at Renaissance fairs, the typically have holes that line up with each other and are laced like a shoe, with two laces crossing each other like Xs. Oddly enough, that's not the typical lacing scheme that was used in Renaissance Italy.
Instead, they would have a lace knotted on one end, and laced continuously in a spiral from top to bottom or bottom to top. Then to tie the single free lace end they'd use a slip knot (no, not the band). But in order to have your two panels line up on the top and bottom, the lacing holes are started and ended with pairs directly across from each other.
For my bodice, I decided to have nine holes on the sides of the back bodice panel, and eight holes on the sides of the front bodice panel. The holes were just over an inch apart, except for the closest ones on the back bodice panel which were just over a half inch apart. The span from the top holes to the bottom holes was 7 1/4 inches. I placed my holes half an inch from the edge of the bodice, and the lowest a quarter inch from the bottom of the bodice.
 Once my holes were marked, I started the first hole by piercing it with my sewing needle. Just like when you want to hammer a thick nail into something, it's good to prime that hole with a smaller nail. I inserted my thick hand sewing needle and pushed it in and out a few times, yanking it sideways while holding onto the fabric, to prime a pathway. Then I centered that desired hole location over the hole of a spool of Button-and-Carpet thread placed on my dining room table, and I used a hammer to drive my metal awl through the bodice and then through the spool.
My awl looks at first glance like a screw driver, but instead of having a Phillips or flat head, its head is a sharp point and the shaft has a wider circular cross section the closer you get to the handle. You could think of it as a very sharp cone. If you don't have an awl, you could use an ice pick or even rounded chop sticks. Upon piercing the fabric, it creates a circular hole. The further you hammer it into the fabric, the larger the diameter of the hole becomes.
To avoid damaging my table, I would flip my rig over once it was half way though the spool and hammer onto the spool itself, pushing the fabric further down the awl. The benefit of using the spool is that it spreads the pressure of the hammer blows out evenly on the fabric around the hole. By aiming the hammer to the side of the spool hole, I could have the tip of the awl go a bit through the spool. Have it only go a set distance above, and all the holes will be exactly the same diameter. Yay tools!
Once the hole was made, I'd knot my doubled Button-and-Carpet thread, and start my stitches on the inside of the bodice on the side of the hole furthest from the edge. All of the strain on these holes will be perpendicular to the edge of the sides of the bodice panels, so it's good to have your knots as far from possible from there, and to have enough thread on your needle to complete the hole reinforcement. The stitches were simple - through the fabric on the inside, then directly through the hole, repeat all around the hole. This holds all your layers together, locks in their raw cut edges protecting them from the friction of the lace, and keeps the holes a set size and shape. As you stitch you may need to re-insert the awl from time to time to re-establish the hole. Till the stitches are in place, the hole will have a tendency to shrink a bit.
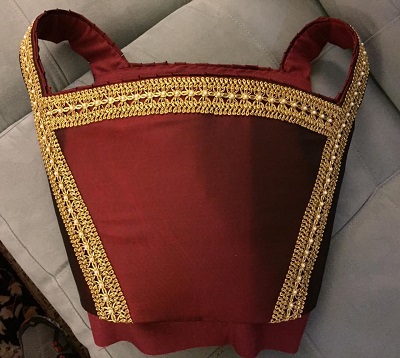
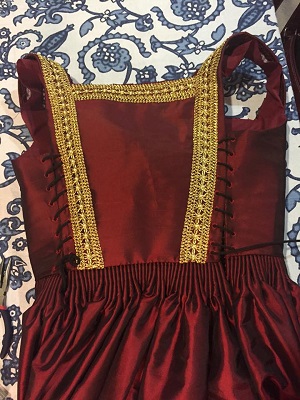 With all thirty-four of my holes completed, I laced them up. I started the lace on each side at the top inside of the back bodice panel, knotting the end. All of the lacing then go down into the front bodice panel holes, and then back up through the back bodice holes. It ends on the outside of the back bodice panel by the waistline. This is where you'd put your slip knot, as can be see on the left set of laces in this photo. My bodice was fitted so that when the edges meet they fit me perfectly at the time, but if I lose or gain weight the laces can be tightened or loosened to compensate.
As for the laces, I have a large spool of the black cording you see in the photo. I used regular scotch tape to reinforce their ends so they'd be easier to thread through the holes, not unlike shoelaces. You could in fact purchase boot laces for this. The key is to make sure the laces are long enough so that while the laces are loose but without unlacing any of the holes you can get the dress on overhead.
The required length of those laces depends on lots of factors, including how many holes you have, how broad your shoulders are, how large your bust is, and how small your waist is. Boot laces come in a variety of lengths above or below eighty inches long, so they will work for this application. I haven't measured mine, but I think they were at least five feet long. The extra length can be tucked inside your skirt at the side-back openings, and even tied in a loose bow inside the skirt over your butt to keep them from dragging on the ground.
 With the laces in, I could finally try my dress on and see how everything fared. Since underpinnings matter for fittings, under the dress I wore a light chemise (I hadn't yet made my 16th century Italian chemise), no bra, a yellow petticoat (skirt) that was knife pleated, and a pair of knee length yoga pants I already had on.
Great news - the fit of the bodice which had been checked with the understructure of the bodice alone was still perfect with the taffeta, trim, lining and skirt attached. Also great news - the skirt appeared to be just the right length. Not great news - the single layer of stabilizer reinforcing the bodice did not appear to be sufficient stiffening to prevent the bodice from buckling or creasing just under the breasts, where there is a gap between the bodice and my skin.
My modern bra size is 36D which gives you an indication of volume, but women who wear the same size come in a variety of body compositions, which affects how easily things compress or conform when under pressure. My particular pair of breasts are more firm mammary glands than pliable subcutaneous fat - which gives you an indication of density and their resistance to the pressure of the bodice. Clearly the girls were fighting back.
It's possible that one layer of stabilizer would have been enough on another person with either smaller or less firm breasts. A single layer was certainly enough on the sides of the bodice, but I was dissatisfied with the level of buckling I perceived in the photo above, which you can see if you look closely at the lines below the breasts. There was also some buckling on the bottom of the back bodice panel, which may have been caused by the higher-waisted petticoat I wore underneath, the fullness of which started too high for this dress. That can be solved by adjusting the waist band of the yellow petticoat.
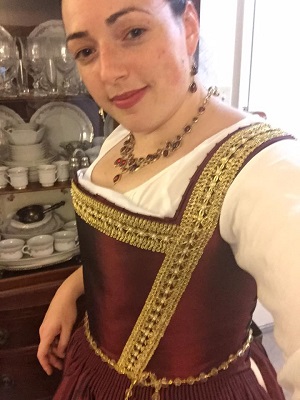 My solution for the buckling was to take another piece of stabilizer, cut it to the shape of the center front portion of the bodice (framed by the trim) and shove it down underneath the dress with a wooden rule. You can see the result in this photo, with the top edges of the additional stabilizer panel peaking out over my white shirt.
With just one additional layer of stabilizer, the bodice front became the desired flat shape. I want to point out that this is a perfect example of the scientific method - come up with a hypothesis (stabilizer can be used as "cardboard"), test the hypothesis (single layer buckles a bit), make adjustments (add a second layer where the buckling occurs), and test it again (looks good, so far).
To permanently implement the solution, I took off the dress, snipped off the spiral stitching holding my linen lining in place on the top edge of the front and back bodice panels, cut two stabilizer panels to fit (which on the back had to be narrow enough to fit between the lacing holes), hand stitched the stabilizer in place, and then re-sealed the linen lining. I then tried the dress on again without the petticoat underneath.
The front and back were more smooth, and without the petticoat the back buckling was significantly reduced. It's possible the fit would be even better if I raised the bottom edge of my back bodice panel by half an inch, but the lacing holes cannot be undone at this point, and that would mean the waistline of the front and back would no longer perfectly line up. It is something to consider.
Another possible tweak to the bodice might be to add padding inside the bodice underneath my breasts to fill the natural gap. I experimented with a tube sock before I added the second layer of stabilizer, and it did reduce the buckling by more evenly distributing the stress along the whole front bodice panel. I may find after a day of wearing the dress that a combination may be required - both the dual layers of stabilizer and the under-bust padding. Interestingly, such under-bust padding is sometimes used in costumes in the theater, especially operas, where support for the bust without excessive restriction of the diaphragm is required.
On this dress, the sleeves are where the party's at.
For my sleeves, I relied on the expertly researched and well presented RH513 pattern by Reconstructing History. In their pattern they present the two types of sleeves - the rushed ones with large puffs, and the slashed ones similar to the extant Burgundy Pisa gown, both illustrated on the front of their pattern.
But (agreeing with early 15th century parents who may have thought slashing was silly) I wanted my sleeves to be solid panels attached with closures as you see in this painting of Eleonora Di Toledo, and not slashed ones. They're far less likely to tear or fray, and I'm afraid I'm no delicate flower. All of my costumes are designed to survive fricken ninja battles.
The general shape of the sleeve with such panels would be consistent with the pattern, but of course I'd need to add a seam allowance where I'd have seams instead of slashes. A neat trick I use to preserve my patterns is to use baking parchment paper and a marker to trace the pattern shape instead of cutting out the pattern itself. Scotch tape can join parchment paper together for larger shapes. It's cheap, somewhat transparent, and can survive being pinned to fabric. You can see a part of one of my pattern pieces under the sleeve on the right of the photo. We all changes sizes over time, so why lock your pattern in to one size for the rest of time? I cut out a solid sleeve in the parchment paper, cut it where the slash lines were marked, and then added a seam allowance on those edges when I cut out the fabric.
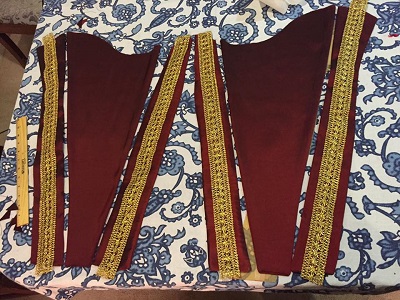 As I've mentioned before, my polyester taffeta likely lacks the same body and heft as silk taffeta, so for the sleeves I lined it. However, instead of using linen, I used another layer of taffeta. The smoothness of the taffeta will allow the dress sleeves to slide more easily over the chemise underneath, and coincidentally taffeta was often used as lining in 16th century Italy.
I also chose to include a layer of very light fusible interfacing in the between the layers of taffeta under the goldwork trim, but not in the underarm portion of the widest sleeve panel. This choice was in part dictated by how much light fusible interfacing I happened to have in the house at the time, but also because who wants a stiff underarm. I steam ironed the interfacing to one taffeta panel, basted the edges, sewed it right-sides-in to another taffeta panel, trimmed the corners and the seams, and used a wooden ruler and a chopstick to turn my pieces right side out. The end closest to the shoulder was left open.
There's something so satisfying about ironing. It makes things look so crisp and pristine. Once my panels were ironed, I pinned my goldwork trim in place on the narrow panels. After the photo was taken I also pinned another strip on the larger panel from where the highest point of the shoulder is to the wrist. The lowest slope of that curve is where the armpit is.
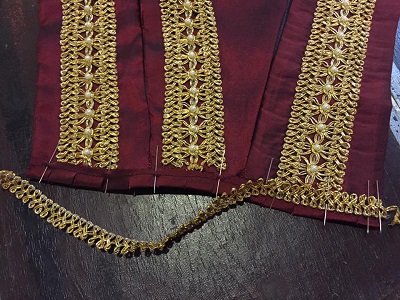 Even though it takes a great deal of time, I decided to sew my goldwork trim and pearl accents onto the sleeves by hand just as I had on the bodice (but not the skirt hem). To my eye, there is a noticeable difference in appearance within three feet between machine and hand sewing. I only attached the small pearls in the goldwork trim about 3/4 of the way up, leaving the puff tops to be differently decorated.
Once my three panels were decorate, I attached them at the wrist with burgundy thread in spiral stitches. It was at this moment I realized that the wrist measurement was nine inches, instead of seven - a bit too loose for me. This was my own fault for not tailoring the pattern to meet my measurements, but it was easy to fix. I took them apart again, and I folded under and pressed the edge. These narrow triangles of folded-over fabric were half an inch at the wrist and went eight inches up the forearm. I secured them on the inside of the panels with spiral stitches that just nicked the inside taffeta lining. Then I reattached the panels and added my trim - pinked bias trim and a portion of the goldwork trim carefully separated. (This photo is from before I reduced the wrist size from 9 to 7 inches.)
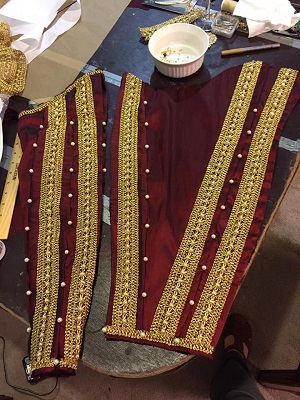 Next I attached my panels together at the top as well (the armhole), and then I carefully measured 2.5 inch intervals from the wrist trim up the edges of the panels, marking them with dots from a gold pen. Where ever the dots were, I attached the panels together with half an inch of spiral stitching, on top of which I put large pearls. To close it into a sleeve, I attached the first and third panels in the same way, but not at the wrist which would be left open for a pearl button closure.
Originally I thought to do eight sets of pearls from the wrist to the bottom of the puff, because so often in paintings that's the number I had observed, but when I got to the top I felt the puff was too large, so I added one more row of closures. At the top of the sleeve, I added the same trim that was at the wrist, and I alternated small and large pearls to decorate the goldwork on the puff.
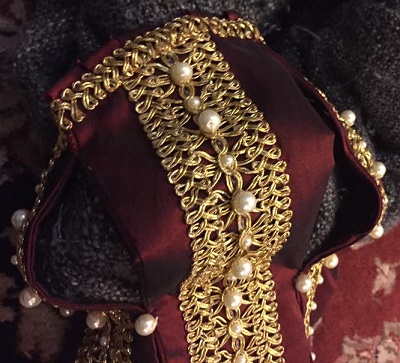 Here's a close-up of the puff. I've stuffed a gray blanket into the sleeve to fill it out. Of course when worn it will be the white chemise that's visible in each of the gaps, slightly pulled through. But an interesting thing to note is that the chemise sleeves are simple rectangles - they're just as full at the top of the arm as the wrist. So it's realistic to assume that the chemise alone would not have supported the structure of these puffs.
Unfortunately, of the extant dresses remaining, only one of them had sleeves - the burgundy Pisa gown from the 1560s. And the puffs on that gown are fairly minimal and appear to be made of trim attached to the top of a fitted, slashed sleeve.
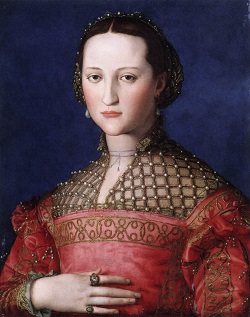 But in my sleeve, what would keep the fullness of the puff from just being stretched into a longer arm? Nothing really. Though I made my forearms fairly fitted, the elbow and upper arm areas have room for movement, meaning the sleeves could simply slouch down with nothing firmly holding them up. But that's not what is seen in the paintings.
As we can see in this painting of Eleonora Di Toledo, something appears to be holding the puff in place, and keeping the upper arm of the sleeve from slouching down. My supposition is some sort of fabric support structure like ties or suspender ribbons - either on the outside in the form of decorative ties, or on the inside in the form of an under-sleeve with gaps. The challenge with either solution is insuring that the support structure doesn't prevent the chemise from filling the gaps.
Some costumers have solved this by making faux puffs filled with stuffing and material that isn't actually the chemise. This is actually a separate fashion called "shoulder rolls" widely used in England and elsewhere in Europe during the century, but not typically seen in Italy in the 1540s, based on the portraits of the time.
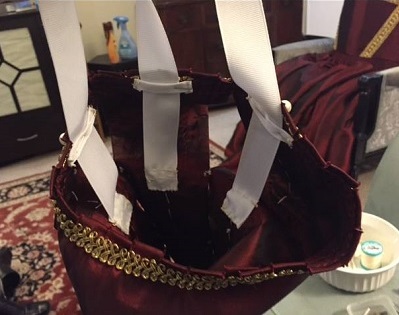 Another question to answer is how to attach these removable sleeves to the shoulder straps of the dress. Undoubtedly, upper class ladies would have had servants helping them dress, so a historically accurate solution involving pins or ties might be hard for me to accomplish when dressing myself. The front connections would be easy enough, but the ones on the back of the shoulder might be too hard for me to reach.
So for my dress, I'd need an attachment that could be strong enough to not come undone while putting the dress on with the sleeves already attached, but that would also be visually consistent with the fashion of the time, AND that will keep the lower sleeve from falling down and the puff "inflated". My solution was to make suspenders of white grosgrain ribbon, sewn to the inside of the sleeve directly underneath the goldwork trim.
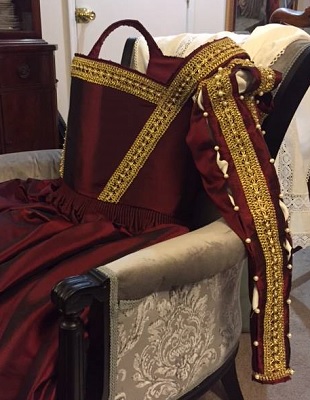 In order to determine the perfect length for the suspenders, I sewed smaller strips of grosgrain ribbon on the top of the sleeve to act as a casing, allowing me to change the length of the suspenders while keeping them connected to the top of the puff. When I determined what length I needed them to be, I removed the casings and sewed the ribbon directly to the top inner edge of the sleeve.
For this photo, I pinned the three suspenders onto the inside of the shoulder strap, and I put some linen fabric inside the sleeve to fill it out and show white fabric in the gaps. The appearance is consistent with the look in the portraits.
The dress is a work in progress. I'll update this page as my progress continues.
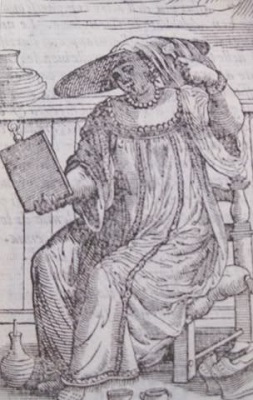 The underclothes of the time were a calf-length chemise called a camicia, and knee length drawers with a drawstring waist. Nope, no bras or corsets were worn at the time. All support was provided by the bodice of the outer gown itself. Something called "a pair of bodies" that looked like a metal bodice existed, and Eleonora Di Toledo herself had one, but it's believed this was a brace for medical purposes. After giving birth to eleven children, she had a huge calcium deficiency.
Typically the chemises would be made of linen, possibly cotton, though none of the cotton ones have survived. Here's a link to a collection of photos of extant Italian chemises from the 16th century. The few extant ones that still exist are all made of linen and often have either embroidery or lace on them, but it's important to consider several things about extant pieces.
First of all, how did they survive this long? Vegetable based fibers like linen and cotton deteriorate much faster than animal based fibers, and these garments would have been worn right against the skin day and night, and would have been washed in harsh substances like lye and bleach. Their purpose was to protect the expensive outer clothing from the sweat, oil and dirt of the body, so it's not unreasonable to consider them sacrificial garments, and consequently they took a beating. Garments would have been repeatedly mended if damaged and worn till they were either given to servants to wear, sold to a second hand market, or used as scraps and cleaning rags.
So if underclothes somehow avoided such a fate ... the question is why? What would make a 16th century person set aside and not use a perfectly good chemise, preventing its otherwise inevitable destruction? Is it because they were unusually elaborate - more beautiful embroidery, lacework, or smocking than other garments? It's likely. That would mean that the extant ones, though perfectly valid, might skew from what was more typical of the time.
Another question to ask who is wearing the different types of chemises and when? If round neck chemises start to get replaced by square neck chemises in paintings after a certain point in the century, it's a reasonable conclusion that the fashion evolved. If the chemises of the upper classes in paintings show signs of embroidery on the neckline and cuffs, and yet the Fruit Sellers of the same time period whose whole chemise sleeves are visible do not show such embellishment, then it is a reasonable conclusion that the elaborate extant chemises were not typically worn by lower class people. It's also a reasonable assumption that lower class people could not afford to set aside and preserve a chemise instead of wearing it.
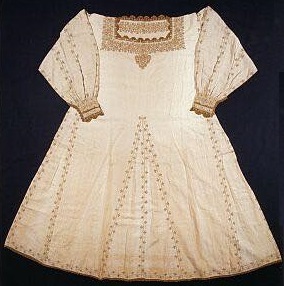 The styles of underclothes actually varied a bit. Unlike the outer garments, the underclothes were made in the home. Their method of construction and embellishment could vary from family to family, or even person to person. And let's face it - it's not like people were comparing underwear construction methods on a regular basis. The collars and wrists of the chemise would be visible on noble ladies, but who would know if your drawers were green velvet with gold embroidery? (Such drawers were actually listed in the inventory of Duchess Giulia Varano of Urbino.)
For my chemise I used Joann Fabrics tissue linen in white, and I decided to have a square neckline and triangular gores that would make the chemise flare out below the waist. This extant chemise to the right is a perfect example of those lines, and it is embellished with red embroidery. Another popular style was for the chemise to be made of rectangular panels gathered at the neckline, as we see in the block print above, but this adds bulk under the bodice.
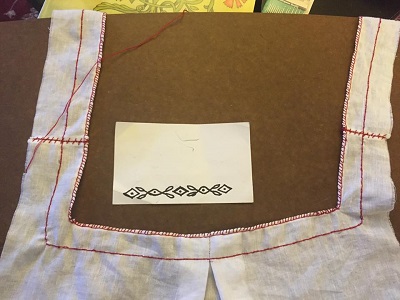 To make mine I cut out a front and back panel 16 inches wide and as long as the fabric width - which in my case was 52 inches. Using red thread, I rolled and spiral stitched the raw edges at the shoulders, and then spiral stitched the front and back together at the shoulder seam. This created a neat looking stitch pattern. I used red Button-and-Carpet thread. I measured the dress neckline and cut a smaller rectangle out of the chemise.
To get my chemise neckline to perfectly edge the neckline of my gown, I pinned it inside the dress bodice, lining up the shoulder seams of the dress and chemise. Due to the shape of the dress bodice neckline, the space between the straps is narrower on the back than the front (because boobs), so I added a box pleat in the center back of the chemise. I trimmed the chemise neckline to be about an inch away from the dress neckline, which included an allowance for the hem.
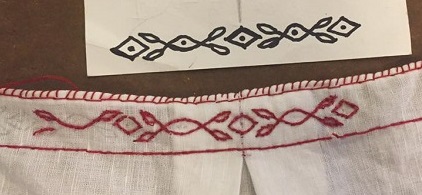 I then rolled and spiral stitched the neckline, and used overlapping straight stitches - called a double running stitch - to make strait lines framing my neckline area. The two lines were 3/4 an inch apart, and I used a ruler and pencil to make sure I kept them straight.
Next I drew an embroidery pattern on an index card with a sharpie. My pattern was inspired by the embroidery on Eleonora Di Toledo's chemise in this painting, with a close up in the image below. Holding the index card under the fabric, I could lightly trace the pattern and then sew over it. For these shapes I used a chain stitch and a doubled strand of red embroidery floss. This means my embroidery is not reversible - the back has broken lines of stitches whereas the front has solid lines.
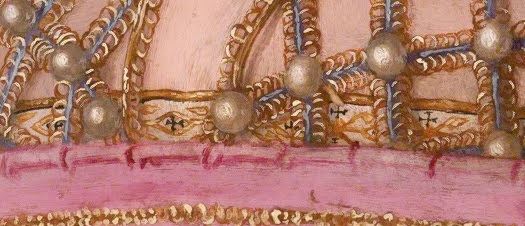
Like the Eleonora chemise, I decided to fill in the top edge of my neckline with a solid band of color. To get this effect, I laid down two lengths of un-separated embroidery floss (total of 12 strands) on top of that spiral stitched edge, and used a doubled embroidery strand to do a buttonhole stitch over it.
A buttonhole stitch is essentially a spiral stitch where there is no space between stitches. They're right next to each other. The floss underneath the stitches helps fill in any gaps and adds a rounded appearance. This takes a lot of time and materials, but it's super pretty. It also would hide the spiral stitches I used to hem my neckline.
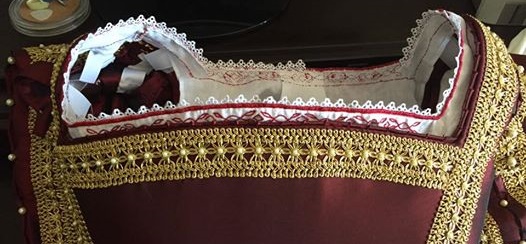 On the back of this red line, I attached white lace with red embroidery floss. Though neither my example extant chemise with red embroidery, or the example from the portrait, have lace, other extant chemises and portraits from the time do. And I just think the lace is pretty. Both bobbin lace and needle lace were common at the time.
Since the back of the embroidery and the lace might feel scratchy, I planned to line the neckline with a strip of linen when all my embroidery was done. This is not historically accurate - extant pieces show just the back of the embroidery work on the insides of the chemises. But I like me some comfort.
To save time, I used my sewing machine and white thread to hem the raw edges of all my chemise panels, double folding under the raw edges, and then I used a spiral stitch with doubled red embroidery thread to join pieces together. Typically I'd pin two pieces along a straight seam, either good sides facing in or out, ensure my starting and ending knots were on the insides of the garment, and then open the seam like a book and press it with my iron.
To make my center front and center back gores, I measured the length of the slits I made and added four inches, and measured by eye how wide I wanted the resulting triangle to be on the bottom and added two inches. The idea is to cut out a rectangle of that size, and then cut it again from bottom left corner to top right corner to get two identical triangles. I folded my rectangle along that diagonal line and ironed it so I'd have a cutting guide. Naturally the hem will shorten your resulting triangles.
Here is an illustration breaking down the pieces of my chemise construction. Their relative sizes is really dependent on your own body and preferences. Each piece is hemmed and then sewn without overlap to other panels.
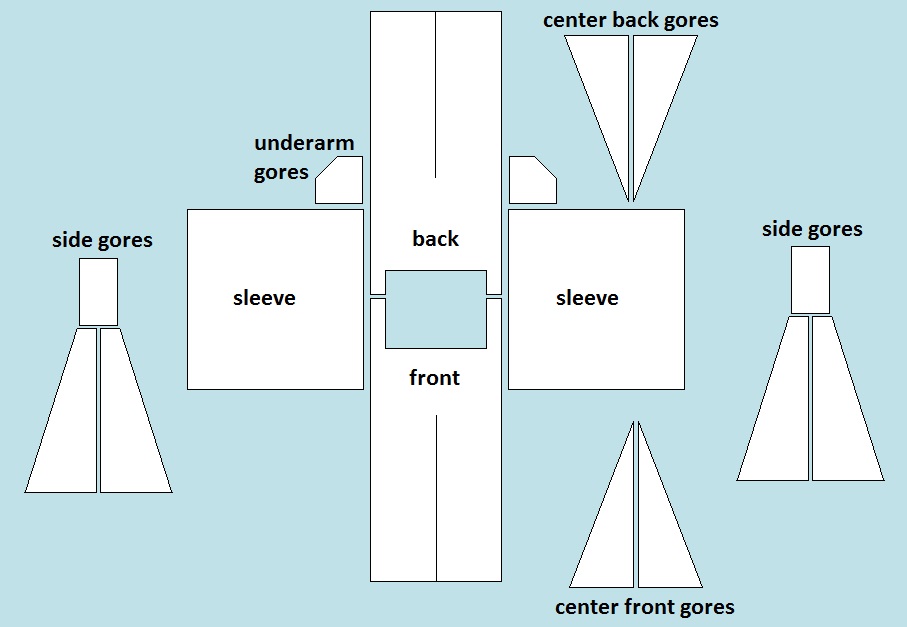
Now if you look closely at the extant chemises made of triangles and rectangles, they vary from my version in a very specific way - instead of having a baseball plate shaped gore in the underarm area, they have a perfect square with one corner around the middle upper arm and the opposite corner around the narrowest point of the waist. This creates more range of motion, but with the drawback of more bulk under the bodice. I made my bodice area of the chemise no looser than it absolutely had to be.
My sleeve panels are squares, 26 inches on a side, but the edge that goes on the shoulder is gathered to eight inches. The underarm gore makes up the rest of the distance around the armhole area. For decoration purposes, I cartridge pleated that top edge of the square sleeve panels and then used my red embroidery floss to add honeycomb smocking. This isn't necessary, but it's fun. Oddly enough though, I found the honeycomb smocking a bit rough to my skin when worn, so I may take out all the stitches and reattach the sleeves with box pleats.
To help you visualize the finished product, here are some illustrations of the pieces fully assembled. Notice how the underarm gores give the upper arm freedom of movement.
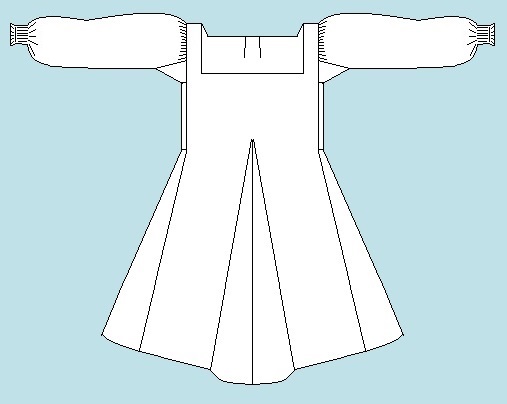
For my baseball plate shaped gore, the flat edge caused by cutting off one corner lines up with the top of the rectangle on the side of the abdomen, and the opposite arrow-side of the gore points towards the elbow. The right and left corners line up with the right and left corners of the sleeve square. Here's an illustration from the side with the arm held up over head to help explain what I mean. The handy brunette ponytail is for reference. Note that the sleeve is formed into a tube, meaning that our baseball plate gore will appear stretched out vertically.
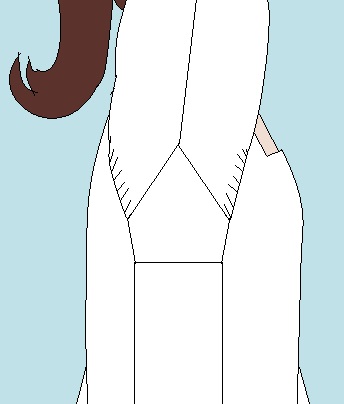
The chemise had actually proven to take much longer than the dress itself. Hand embroidery takes a lot of time. Here's an image of all the pieces attached, with the embroidery on the neckline and the right cuff.
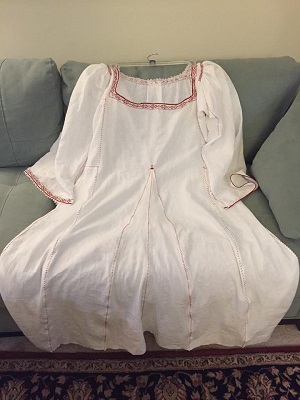
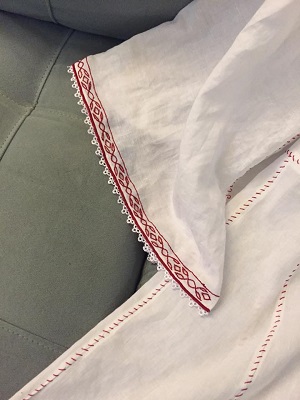
And here is an image of me at the Pennsylvania Renaissance Faire in the dress and the unfinished chemise. I found that even though the sleeves were the right length by themselves, when I put the taffeta sleeves of the outer gown on top of them and pulled the linen through the slashes, it shortened the linen sleeves. Also, the fullness of the linen sleeves under the tapered taffeta sleeves was a bit tight around the wrist.
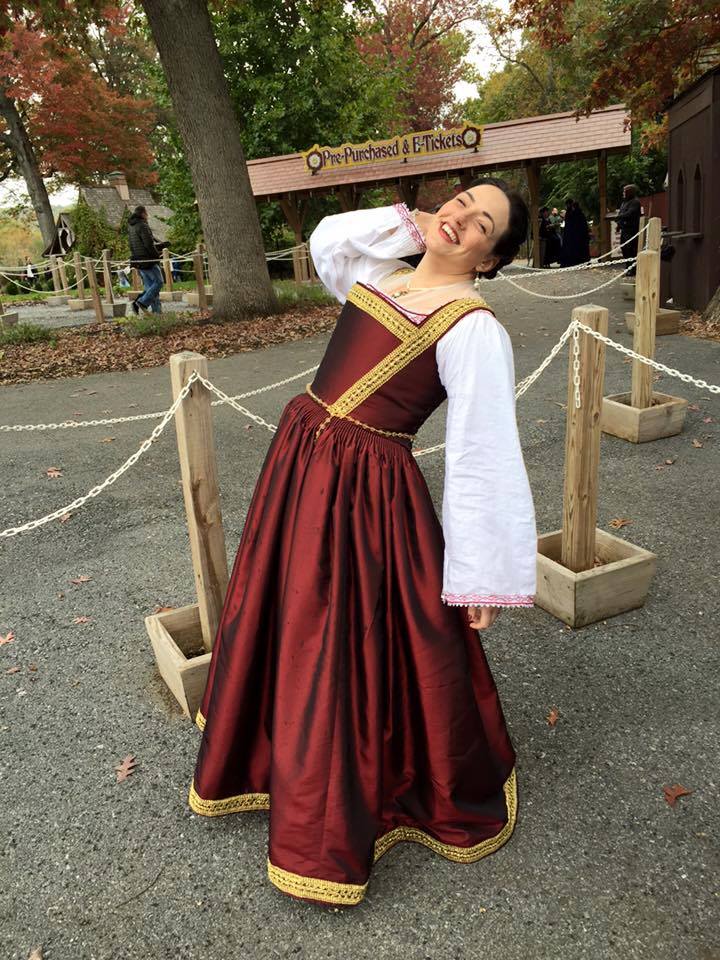
My solution to both problems was to cut of the embroidered edge of my chemise sleeves half an inch from the embroidery and add a tailored cuff. I started with a rectangle of linen 9 1/2 inches wide (to fit the circumference of my forearm) by 6 inches long (from wrist to mid arm), and then folded it in half to trim the wrist end to 6 1/2 inches. This removes narrow triangles of fabric from the sides. I double rolled, ironed and hemmed my raw edges of the fitted cuff and embroidered edge, and then carefully box pleated my embroidered edge so that it would fit the wrist of the cuff. These were joined with red embroidered floss in a spiral stitch.
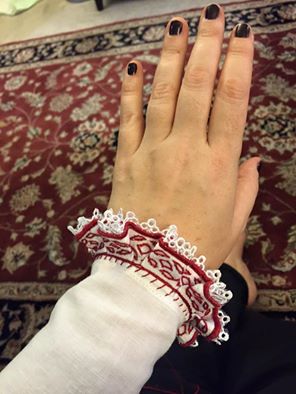
I did a buttonhole stitch over one of the cuff seams and along the opening, and braided embroidery floss to make button loops. The buttons I used were little metal acorn shaped charms I found in an AC Moore that look distinctly like this 16th century acorn shaped button found in the United Kingdom.
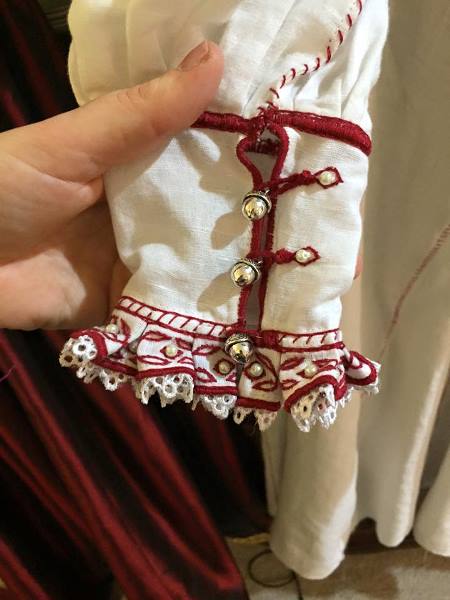
And as a finishing touch, I added tiny pearls into the red embroidery on the cuffs and collar of the chemise with white button-and-craft thread. I carefully kept my thread inside the lining of my neckline. By adding these pearls after pleating the cuff embroidery, the stitches helped pin down the pleats and made them look more tidy.
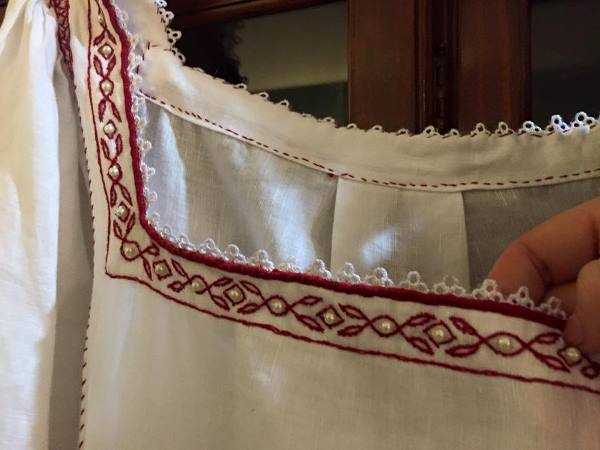
And finally, I hemmed the bottom edge. Since it won't be seen, I have not at this point decorated it with additional embroidery. I'd rather focus on finishing other elements of my costume first.
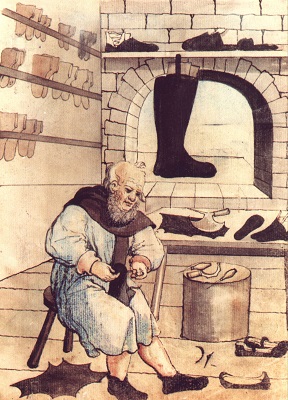 When it comes to historically accurate footwear, we tarry into the land of great expense and moderate discomfort. Science is a marvelous thing, and the advances in material science specifically have created wonderfully supportive modern shoes, cushioned and padded, with non slip soles. Shoes are manufactured with machines in large quantities with astounding uniformity at far lower costs than handmade goods could support.
In contrast in the 16th century, shoes in Italy were made by hand by cobblers, one at a time, similar to this illustration from "Das Hausbuch der Mendelschen" ("The House Book of the Mendel") published in 1531. Their creations were varying concoctions of leather, wood, cork, fabric, paint, embroidery, beading, and dyes or varnishes. Nary a silicone gel insole to be found. Comfort might only come after the shoes were broken in, and they would have been worn till they either fell apart or were sold.
The range of period styles is too broad to list here. Here's a link to a Google Image search though to give you a quick impression. Heels did exist, but they were short and chunky, not stilettos. Toes came in a variety of shapes, including pointed, round and square, but never peep toed (except perhaps for chopines that were worn over other shoes). Shoes could slip on, or use laces or straps with buckles to close. Buttons also existed at the time, but I'm not certain if they were used on shoes. Slashing was commonly used as a decorative element.
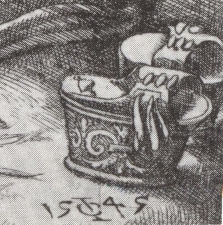 Chopines were a particularly interesting shoe from the time - think of clogs or flip flops with platforms ranging from two to twenty inches in height. They were inspired by similar platform shoes worn in the nearby Ottoman Empire. At first their purpose was practical - to avoid the mud and sewage in the streets. But it wasn't long before they were used simply for fashion, and their heights went to extremes.
Many people who create historical clothing tend to gravitate towards those elements that were unique to their time, just like how I chose to have a straight waistline and cartridge pleating. But when it comes to footwear, as a dancer I veer on the side of practicality and safety. My intention is to be able to walk around at Renaissance fairs for hours at a time in my outfit, which requires comfortable shoes without the necessity of an escort to keep me from falling.
Fortunately, there are modern manufacturers of historically appropriate and practical footwear. American Duchess is one, which has a few Renaissance models to choose from ranging from $160-$190 a pair. They're made with historically accurate materials and methods, and they're based on extant shoes from Elizabethan England. But even though they're worth the money, that's too rich for my blood.
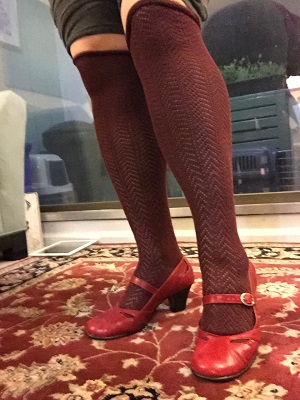 Other alternatives include finding modern shoes that can pass for the styles of the time. I actually already own some hand made leather shoes, some of which are even elaborately embroidered (go to Indian apparel stores), but though they're good for indoor events, they won't work for extensive outdoor walking.
For that I chose to start with a brand known for comfort - Aerosoles - and searched their models for something that met the general characteristics of the styles of the time. I found their Marimba model, a low heeled Mary Jane with faux leather uppers, visible stitching, and gaps that resemble slashing. They come in a variety of colors. At $50 from DSW.com, and with the ability to wear them to work, they were a sound investment.
With my shoes, I needed some form of stocking or sock. It's funny - what they wore at the time were referred to as stockings, but when you see images of the extant ones or read their descriptions they seem far more like finely knitted socks than a pair of modern pantyhose. They would have been knitted by hand out of wool, silk, or a combination of the two, in a variety of interesting patterns. Here is a link to a knitting pattern by Anne DesMoines for stockings like those worn by Eleonora Di Toledo when she was buried. I took the easy route and found this over-the-knee pair online at SockDreams.com. With the addition of garters to keep them from rolling down, they do the trick.
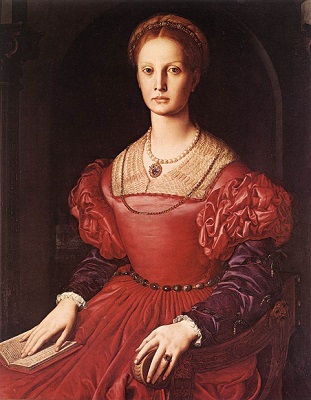 Jewelry, like clothing, was a way to display your station in life in 16th century Italy. Fortunately there's a huge amount of documentation about the jewelry of the time. Not only is there a wide array depicted in portraits, and sumptuary laws that dictated limits on what could be worn by whom, but there was also an autobiography by Benvenuto Cellini, a famous 16th century jewelry smith, discussing the materials he worked with and the pieces he crafted.
Based on portraits, we can see that jewelry was almost always a part of the accoutrement of the Italian noble men and women in the 16th century. It could be theorized that they didn't wear it everyday or around the house, but paintings display the public image, and individuals would not just represent themselves but their entire families with their appearance in public. Even the lower classes depicted in Vincenzo Campi's Fruit Seller paintings sometimes wore jewelry.
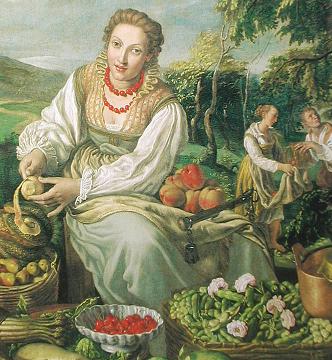 Most typically women's jewelry would be earrings, necklaces, rings, girdles, and occasionally brooches. Bracelets may have been worn, but they're not often visible in portraits with such long fitted sleeves. The only time jewelry would not have been worn would be during mourning, when attire would be all black.
Pearls were a huge favorite of the era, especially with the upper classes. Lower class women who may not have been able to afford pearls can be seen wearing coral beads, as in the Fruit Seller painting. Precious gems and gold chains were common as well. But one thing to keep in mind is that certain cuts of gems had not yet been invented - specifically the "brilliant" cut often seen on modern diamonds, which didn't come around until the 17th century. (Read more about the history of gem cutting.)
Unfortunately when looking for jewelry solutions today, brilliant cut diamonds (and their imitations) are everywhere. And there's a good reason why - without a brilliant cut, diamonds aren't all that brilliant. The cut itself helps bend the light, bounce it inside the gem to shine it back out again creating the bright "fire" we know so well. Without that innovation, even the highest quality diamonds at the time were a bit dull looking. And for that reason (and the fact that De Beers commercials hadn't been invented yet), other gem stones like rubies, sapphires, emeralds and garnets were preferred. Gems would have been smooth rounded cabochons or angular table-cuts, as well as a few other cuts.
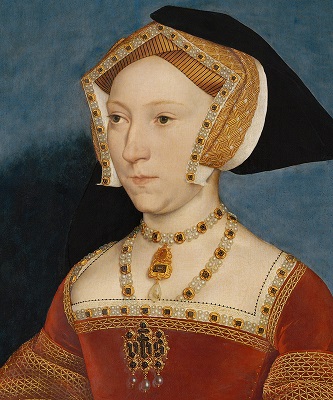 There are jewelry makers on Etsy that make reproductions of Renaissance jewelry, but often their focus is on the royal family of Tudor England and not the nobles of Italy. Even if you argue that the jewelry of the upper classes may have followed international trends, there is a bit of a difference between the incomes of the King of England and the Duke of Florence.
A simple strand of pearls all the same size is an easy solution that can be bought or made. I already have one that would work, and ultimately that may be my solution, but just for fun I decided to make a strand of pearls with a pendant.
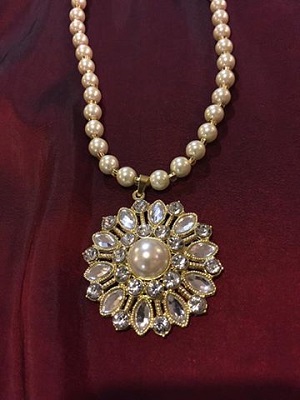 Sadly the right kind of pendants have proved themselves particularly hard to find in my experience. The image to the left was the closest I was able to find at Joann Fabrics, which I bought for $4 and strung temporarily for this photo with imitation pearls and gold beads. It's made by Blue Mood Beads and comes in silver and gold. Here's a link to where it's sold online. I used the silver version of this pendant for my Ivory Assuit Costume.
What's right about it - general size and shape, symmetry, the cabochon shape of the pearl in the center, the use of gold. What's wrong about it - the cut of the diamonds.
There is concept called The Law of Diminishing Returns. Invest time, energy and resources in something, and at first you'll see an impressive increase in the object's value. As the amount of investment increases, the increase in the value occurs at an ever slowing rate. Crack an egg and put it in a frying pan - you get breakfast. Carefully etch an eggshell into filigree with a computerized laser, whip your egg into a souffle with the adornment of hand crafted flowers made out of vegetables, and handcrafted vegetables made out of flowers - you still get breakfast.
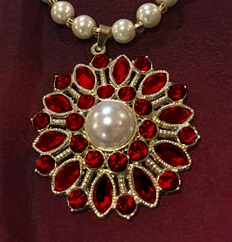 There are people out there who will spend hundreds of dollars and weeks of their time to literally forge their own "authentic" Italian Renaissance pendant. I'm not that person. But I do own some nail polish.
My plan, Photoshopped for illustration, was to turn my diamonds into garnets. Alchemy! Sure, some of them would still be brilliant cut, and the pointy ones would still be 18th century marquise cut, but that would be less noticeable from a distance. From three feet away, and viewed in the opening of a partlet, they may appear to be flat cut or cabochons. The hard part is keeping the nail polish off the gold. This could have all end in tears, but I like a good adventure.
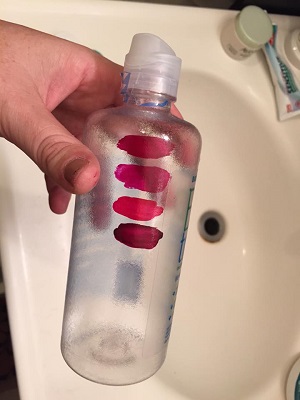 First I tested four colors of red nail polish I owned by painting them on clear plastic. This would let me check their color, translucency, and tendency to streak. I chose to go with the bottom most color, even though some level of streaking can be seen. But the richer, darker color while remaining somewhat translucent was exactly what I was hoping for to make my garnets.
I placed my pendant on some scrap paper and carefully painted each gem, ensuring the brush had a moderate size drop of polish on the end to prevent brush marks. My major concern was that I'd get polish on the gold, but because the gems stuck out above the fitting it was fairly easy to get just the gems. I did one coat of burgundy, and immediately the piece was transformed. Not only did the paint simulate the appearance of garnets, but the varying thicknesses of the paint coating caused the appearance of natural variations in stones.
Also - and this is huge - unlike in my photoshopped planning photo above, the layer of paint made the gem cuts less noticeable. Once I added a layer of clear nail polish on top of the burgundy, my gems looked very much like cabochons! Here are photos of the piece with just the burgundy coat and then with the clear coat. You can see what a difference it makes.
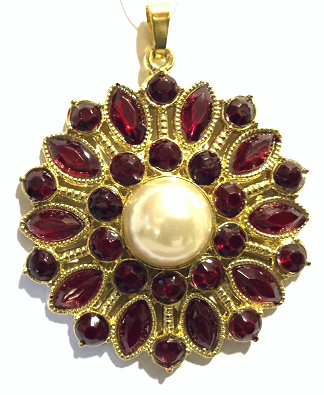
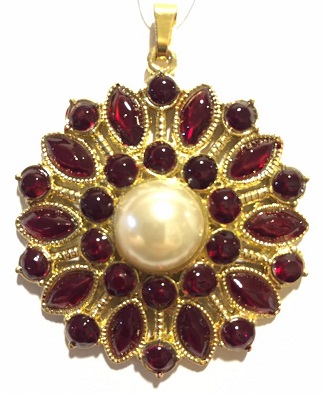
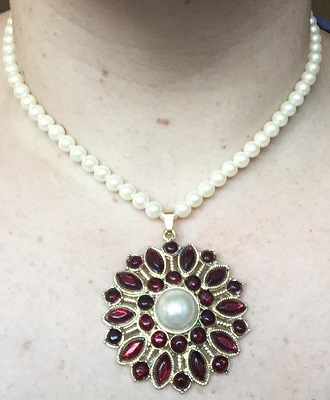 Unlike in my mock up above, I decided to use smaller pearls in the necklace than the very large ones on the shoulders of the dress, and I omitted the gold beads. I already had a broken necklace I could scavenge for parts. I used a single strand of white Button-and-Carpet thread, double knotted inside the clasp findings. There are two tiny pearls in the center front of the strand to protect the thread from the bail of the pendant.
I attempted to knot the thread between the pearls, which both strengthens the strand (strain tightens the knots instead of breaking the strand) and keeps the pearls from getting lost if the strand breaks, but the holes in the pearls were too large for the knots in the thread to hold.
To go with this necklace, I could either wear pearl teardrop earrings common in the paintings of the era, or the garnet and gold earrings I wore in the photos above where I tested my materials. I could wear rings in a variety of gem colors - they wouldn't need to match. But as with the necklace, it's best to avoid more modern, brilliant cut gems.
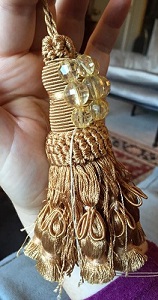 Next I concentrated on my girdle - the decorative belt worn over the dress. Fortunately I was able to find trim at Joann Fabrics on clearance that was made up of amber colored beads strung on gold-colored metal links. Instead of $15 a yard, it was only $3 yard. Score! The general shape of the beads is similar in appearance to the girdles in portraits of the time.
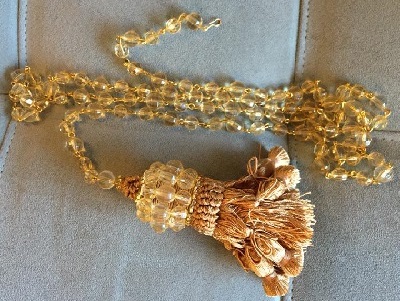 Only two things would turn my trim into a belt - a closure, and a decoration for the end. In the era, girdles were often embelished with tiny books, dead animals (the zibellinis mentioned above), and tassels.
I found a similarly colored tassel at Fabric Row, and to make it better match the beaded trim, I used needle nose pliers to remove several of the amber beads from their metal wires and sewed them in place on the head of the tassel. I then used smaller gold beads to hide my stitches.
I cut off the rope at the top of the tassel, and sewed the tassel directly to the metal loop on the very end of the trim. To make my closure, I took one of the metal wires from the beads I removed and bent it into a hook. I attached it to the other end of the trim. This makes the belt completely adjustable. The hook can attach between any of the beads. Here is the finished girdle.
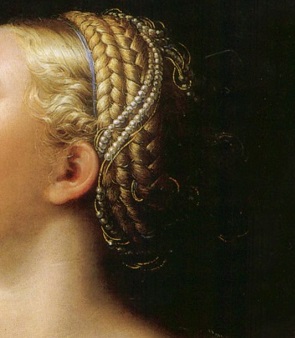 Upper class ladies in 16th century Italy, already covered in luxurious fabrics, extensive embroidery, and opulent jewelry, made sure that their hair was equally lovely. In portrait after portrait, we see braids and twists with pearls and ribbons intertwined, gold hairnets with pearls, and even jewelry in the hair.
Like most modern women, however, I have not been growing my hair out my entire life. Mine tends to be just below shoulder length, and at the time of making this costume I wore bangs. But 21st century ladies are not alone in this dilemma - 16th century ladies used false hair (from another person's head) to fill in their hairstyles. Fortunately, I live in Philadelphia, and an ample supply of false hair in every imaginable shade was only two blocks from my home.
I purchased three items - a braided chignon, coarse braiding hair, and much more silky hair intended for weaves. The coarseness of the braiding hair actually helps it hold a braid better, but since my hair is very smooth and shiny I wasn't certain how well it would match. At the time of my purchase I wasn't exactly sure what I wanted to do with it all, but I like to have raw materials nearby to experiment with.
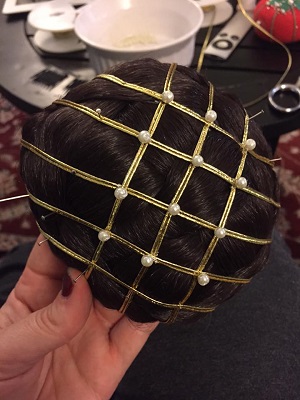 Now, unlike Eleonora Di Toledo, Duchess of Florence, I do not have an army of servants to dress me and do my hair. Instead I have three cats and a handsome fiance who does not happen to be a hairdresser. Getting into the dress involves putting it on overhead, which means that any hair efforts would need to be done while in the dress, which may limit my ability to reach behind my head. This means that pre-constructed pieces that I can easily attach myself are the way to go.
The chignon was my first project. Instead of constructing a pearl and gold hairnet that I'd then fill with faux hair and carefully pin in place, I created a faux hairnet directly on the braided chignon. The inside structure was a relatively firm plastic mesh formed into an angular half dome, the rim of which was reinforced with black bias tape. It came with two plastic combs sewn in place, which I removed.
To mimic the look of a hairnet, my strains of gold trim were attached at each end on the inside rim of the chignon base with thread and strung freely over the braids. I used pins to hold the trim in place while I worked, and then used thread with a small pearl to attach crossing trim together.
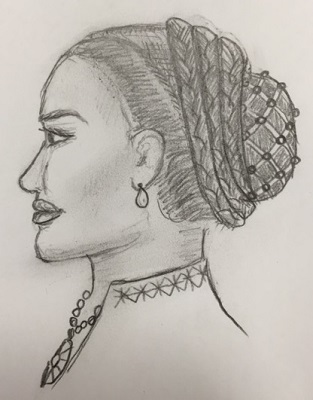 With a center part, I could use a twist on either side to hold my bangs in place, and then bring up the rest of my hair into a mid-height bun. This chignon could go over that bun, held in place with combs and hairpins. Then I could use the braiding hair to make either braids or twists with strands of pearls or gold trim interwoven, secured with dark hairbands. I could secure those braids in place with more hairpins, creating concentric rings around the chignon. It's a concept at least.
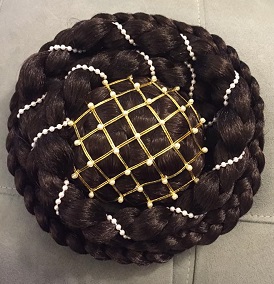 The braiding hair I purchased came in five foot lengths. I took half of it and looped a hair band through itself on the midway point, hooked the band on a chair back and braided it, securing the loose end with another hair band. I then wrapped the braid in some pearl trim I had. Of the remaining hair I used half of that (one quarter of the original package) and made another smaller braid in the same way. The smaller braid seems more consistent with what is seen in paintings. Here are the two braids and the chignon together on a cushion.
No, there's no formal bibliography. I link to several of my sources in the page above, and I encourage you too look into them yourself, but please don't stop there. This tutorial is not an end, it's a beginning. You have Google. Nullius in Verba. Go research and see for yourself.