An Alteration Project
Hyperlinks to Page Contents:
~Project Background
~Why I Did It
~Videos Documenting the Process
I bought this half-finished costume project on Bhuz.com, a bellydance community website with a message board that dancers use to buy and sell costumes and share information. The dancer who made the costume had at one time owned a very expensive costume in the same colors from a Turkish designer called Bella. She eventually sold the Bella, but later she wished she hadn't. Since Bellas are all one of a kind, and getting back her original costume was probably too difficult or expensive, she decided to try to make a costume like it herself.
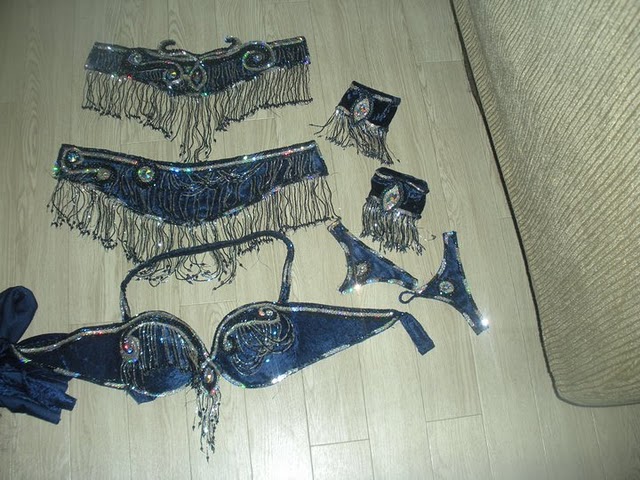
She did a really great job on the bead work - everything looked gorgeous. But for whatever reason she didn't have the heart to finish the project. She sold the project on Bhuz, and then the dancer who bought it also sold it again a few months later. That's where I come into the story. For $225, I bought everything that had been done so far, which included a bra and a halter strap, the front and back of a belt, upper arm cuffs, hand decorations, a crushed velvet trumpet skirt with metalic brocade gores, three half circles in navy chiffon for a circle skirt, and some extra fabric. I could probably calculate how much the materials themselves cost ... $30 for the cups, $60 for the fabric, $30 for the sew on jewels, $40 for all the beads and sequins, $15 for the interfacing, $10 for the thread... maybe roughly $185 in materials. But the design has a value, and the work the dancer did has a value, making the $225 price a steal.
I design and make costumes from scratch all the time, and you may be thinking that since I had to do so much rework on this costume that it would have been cheaper to just buy the materials and start with a clean slate. Cheaper, probably, but it also would have been more difficult. Designing a costume is a lot of work. It takes sketches and shopping for the right materials, experimenting with beading patterns, and figuring out what works and doesn't work as you go. But this project was sort of like a paint-by-numbers costume for me. All the decisions were already made - I just had to alter it to fit me, and possibly reinforce it to my standards of durability. And then there's the excitement of learning new things.
This may surprise you, but at the time that I started this project I had never touched a real Bella before in my life. I've known other dancers who have them and wear them, but I've never paid the $1000+ to have one designed for me, and I hadn't yet been quick enough to find a used one in my size sold on Bhuz before someone else snatched it up. So this other dancer's imitation of a Bella is pretty much the closest I had come at the time to seeing one up close. And figuring out how it's made has really been a neat exercise. I'm a slave to symmetry, and before going through this project it would have be very difficult for me to design something like this. But I think now that I've gone through it, I understand it better. That is priceless.
I created a series of videos using my iPhone and posted them on YouTube to document the process of altering this costume. I've embedded them in order here for your convenience. I've including links to the pages on which I explain in more detail any of the materials, skills or processes discussed in each video.
Project Overview
Altering the Cup Size: Using the Right Bra Base
For more information, check out bra bases
Covering the Cups
for more information, check out covering a bra
Dealing with Darts
Attaching the Parts
Checking the Fit
Drawing Shapes and Beading Them
For more information, check out beading.
Fringe and Swags, and the Importance of Strong Materials
For more information, check out fringe and swags and materials.
Creating the Back of the Belt Base
For more information, check out belt bases.
Covering, darting, and beading the Back of the Belt Base
For more information check out beading and fringe.
Determining the size and shape of the Front of the Belt Base
For more information go to belt bases.
Draw the embellishment design on the interfacing to determine belt outline.
For more information go to design.
Bead the Front Belt Panel, Start the Bottom Fringe
For more information go to fringe.
Lining the Belt and Bra
Performance with the Finished Costume